API
API
GlobalAPI
app.config.globalProperties
Vue3 没有 Prototype 属性, 使用 app.config.globalProperties 代替, 然后去自定义变量和函数
用于注册全局属性以供各位置组件使用
以字符串修饰为例:
main.ts
应用 API
directive
directive 是 vue3 的一项破坏性更新, 通过 directive 我们可以根据自己的需要自定义 vue 指令
当我们要手动操作 DOM 来修改视图并且在多处位置需要同样的操作逻辑时就可以通过自定义 vue 指令从而在各处便捷的进行使用
参数:
{string} name{Function | Object} [definition]
返回值:
- 如果传入
definition参数,则返回应用实例。 - 如果不传入
definition参数,则返回指令定义。
- 如果传入
用法:
注册或检索全局指令。
钩子函数
created: 元素初始化的时候(在绑定元素的 attribute 或事件监听器被应用之前调用)beforeMount: 指令绑定到元素后(在绑定元素的父组件挂载之前调用) 只调用一次mounted: 元素插入父级 dom 时(在绑定元素的父组件挂载之后调用)beforeUpdate: 元素被更新之前(在包含组件的 VNode 更新之前调用)updated: 在包含组件的 VNode 及其子组件的 VNode 更新之后调用beforeUnmount: 在元素被移除前(在绑定元素的父组件卸载之前调用)unmounted: 指令被移除后(在绑定元素的父组件卸载之后调用) 只调用一次
以拖曳操作为例, 实现组件拖动效果:
<!-- 组件拖曳示例 -->
<script setup lang="ts">
// 导入 directive 相关模块
import { ref, Directive, DirectiveBinding } from "vue";
// 自定义 v-move 指令进行组件拖曳
const vMove: Directive<any, void> = (
  el: HTMLDivElement,
  binding: DirectiveBinding
) => {
  // 取当前元素的第一个子元素作为拖曳元素
  let moveElement: HTMLDivElement = el.firstElementChild as HTMLDivElement;
  console.log(moveElement);
  // 定义鼠标按下事件(拖动)
  const mouseDown = (e: MouseEvent) => {
    let X = e.clientX - el.offsetLeft;
    let Y = e.clientY - el.offsetTop;
    const move = (e: MouseEvent) => {
      console.log(e);
      el.style.left = e.clientX - X + "px";
      el.style.top = e.clientY - Y + "px";
    };
    document.addEventListener("mousemove", move);
    document.addEventListener("mouseup", () => {
      document.removeEventListener("mousemove", move);
    });
  };
  // 绑定鼠标按下拖曳事件
  moveElement.addEventListener("mousedown", mouseDown);
};
</script>

<template>
  <div v-move class="box">
    <div class="header"></div>
    <div>内容</div>
  </div>
</template>

<style lang="less" scoped>
.box {
  // box 内容区域样式定义
  position: fixed;
  left: 50%;
  top: 50%;
  transform: translate(-50%, -50%);
  width: 200px;
  height: 200px;
  border: 3px solid #000;
  // 拖曳 header 样式定义
  .header {
    width: 100%;
    height: 50px;
    background: rgb(5, 5, 5);
  }
}
</style>
mixin
参数:
{Object} mixin
返回值:
- 应用实例
用法:
将一个 mixin 应用在整个应用范围内。一旦注册,它们就可以在当前的应用中任何组件模板内使用它。插件作者可以使用此方法将自定义行为注入组件。不建议在应用代码中使用。
参考:全局 mixin
自定义 Hook
vue3 的自定义 hook 主要用来处理复用代码逻辑的一些封装
- Vue3 的 hook 函数 相当于 vue2 的 mixin, 不同在与 hooks 是函数
- Vue3 的 hook 函数 可以帮助我们提高代码的复用性, 让我们能在不同的组件中都利用 hooks 函数
以获取图片元素 base64 为例:
ImageToBase64.ts:
// 将图片信息转 base64 的一个 hook
import { onMounted } from "vue";

// 定义 hook 参数类型
type Options = {
  el: string;
};

export default function (options: Options): Promise<{ baseUrl: string }> {
  return new Promise((resolve) => {
    onMounted(() => {
      let img: HTMLImageElement = document.querySelector(
        options.el
      ) as HTMLImageElement;
      console.log(img, "=====>");
      img.onload = () => {
        resolve({
          baseUrl: base64(img),
        });
      };
    });
    // 将图片转 base64
    const base64 = (el: HTMLImageElement) => {
      // 定义画布
      const canvas = document.createElement("canvas");
      // 建立一个 CanvasRenderingContext2D 二维渲染上下文。
      const ctx = canvas.getContext("2d");
      canvas.width = el.width;
      canvas.height = el.height;
      ctx?.drawImage(el, 0, 0, el.width, el.height);
      // 方法返回一个包含图片展示的 data URI
      return canvas.toDataURL("image/png");
    };
  });
}
Promise - 廖雪峰的官方网站 (liaoxuefeng.com)
document.querySelector() - Web API 接口参考 | MDN (mozilla.org)
Document.createElement() - Web API 接口参考 | MDN (mozilla.org)
HTMLCanvasElement.getContext() - Web API 接口参考 | MDN (mozilla.org)
HTMLCanvasElement.toDataURL() - Web API 接口参考 | MDN (mozilla.org)
DIYHook.vue:
<!-- 自定义hook使用测试 -->
<script setup lang="ts">
import useBase64 from "../../hooks/ImageToBase64";
useBase64({ el: "#img" }).then((res) => {
  console.log(res.baseUrl);
});
</script>

<template>
  <div>
    <img id="img" width="512" height="512" src="../../assets/M4.png" alt="M4" />
  </div>
</template>

<style lang="less" scoped></style>
指令
v-model
v-model 是 vue3 的一项破坏性更新, 它其实是个语法糖, 是通过 props 和 emit 组合而成的
使用 v-model 可以实现父子组件之间的双向绑定:
Dialog_vmodel.vue:
<script setup lang="ts">
import { ref, Ref } from "vue";
type Props = {
  flag: boolean;
  title: string;
  modelModifiers?: {
    change: boolean;
  };
};
const PropsData = defineProps<Props>();
console.log(PropsData);

// 改值:
const emit = defineEmits([
  "update:flag",
  "update:title",
  "update:modelModifiers",
  "update:peopleModifiers",
]);
const close = () => {
  if (PropsData.modelModifiers?.change) {
    emit("update:title", "子组件已接收回传change");
  } else {
    console.log(PropsData.modelModifiers?.change);
    emit("update:title", "子组件未接收到change信号");
  }
  emit("update:flag", false);
  // emit('update:title', '咸鱼型')
};
</script>

<template>
  <div v-if="flag" class="Dialog_vmodel">
    <div class="Dialog_vmodel-header">
      <span>标题---{{ title }}</span>
      <span @click="close">X</span>
    </div>
    <div class="Dialog_vmodel-content">
      <span>内容</span>
    </div>
  </div>
</template>

<style lang="less" scoped>
.Dialog_vmodel {
  width: 300px;
  height: 300px;
  border: 1px solid #ccc;
  position: fixed;
  left: 50%;
  top: 50%;
  transform: translate(-50%, -50%);
  &-header {
    header-bottom: 1px solid #ccc;
    display: flex;
    justify-content: space-between;
    padding: 10px;
  }
  &-content {
    padding: 10px;
  }
}
</style>
Dialog_parent.vue:
<script setup lang="ts">
import DialogVModel from "./Dialog_vmodel.vue";
import { ref, Ref } from "vue";

let flag: Ref<boolean> = ref<boolean>(true);
let title: Ref<string> = ref<string>("咸鱼型233");
let change: Ref<boolean> = ref<boolean>(false);
</script>

<template>
  <div>
    <button @click="flag = !flag">change {{ flag }}</button>
    <div>标题:{{ title }}</div>
    <!-- 单个双向绑定可以直接 v-model="xxx" 多个的时候可以用 v-model:xxx="xxx" -->
    <DialogVModel
      v-model:flag="flag"
      v-model:title="title"
      v-model.change="change"
    />
  </div>
</template>

<style lang="less" scoped></style>
特殊 attribute
ref
- Expects:
string | Function
ref 用于给元素或者子组件注册一个 reference
内置组件
transition
内置组件-transition | Vue.js (vuejs.org)
学习 Vue3 第二十一章(transition 动画组件) _小满 zs 的博客-CSDN 博客
css 动画中 ease,seae-in,ease-in-out,ease-out,效果区别_小赞赞 No1 的博客-CSDN 博客_ease-in-out
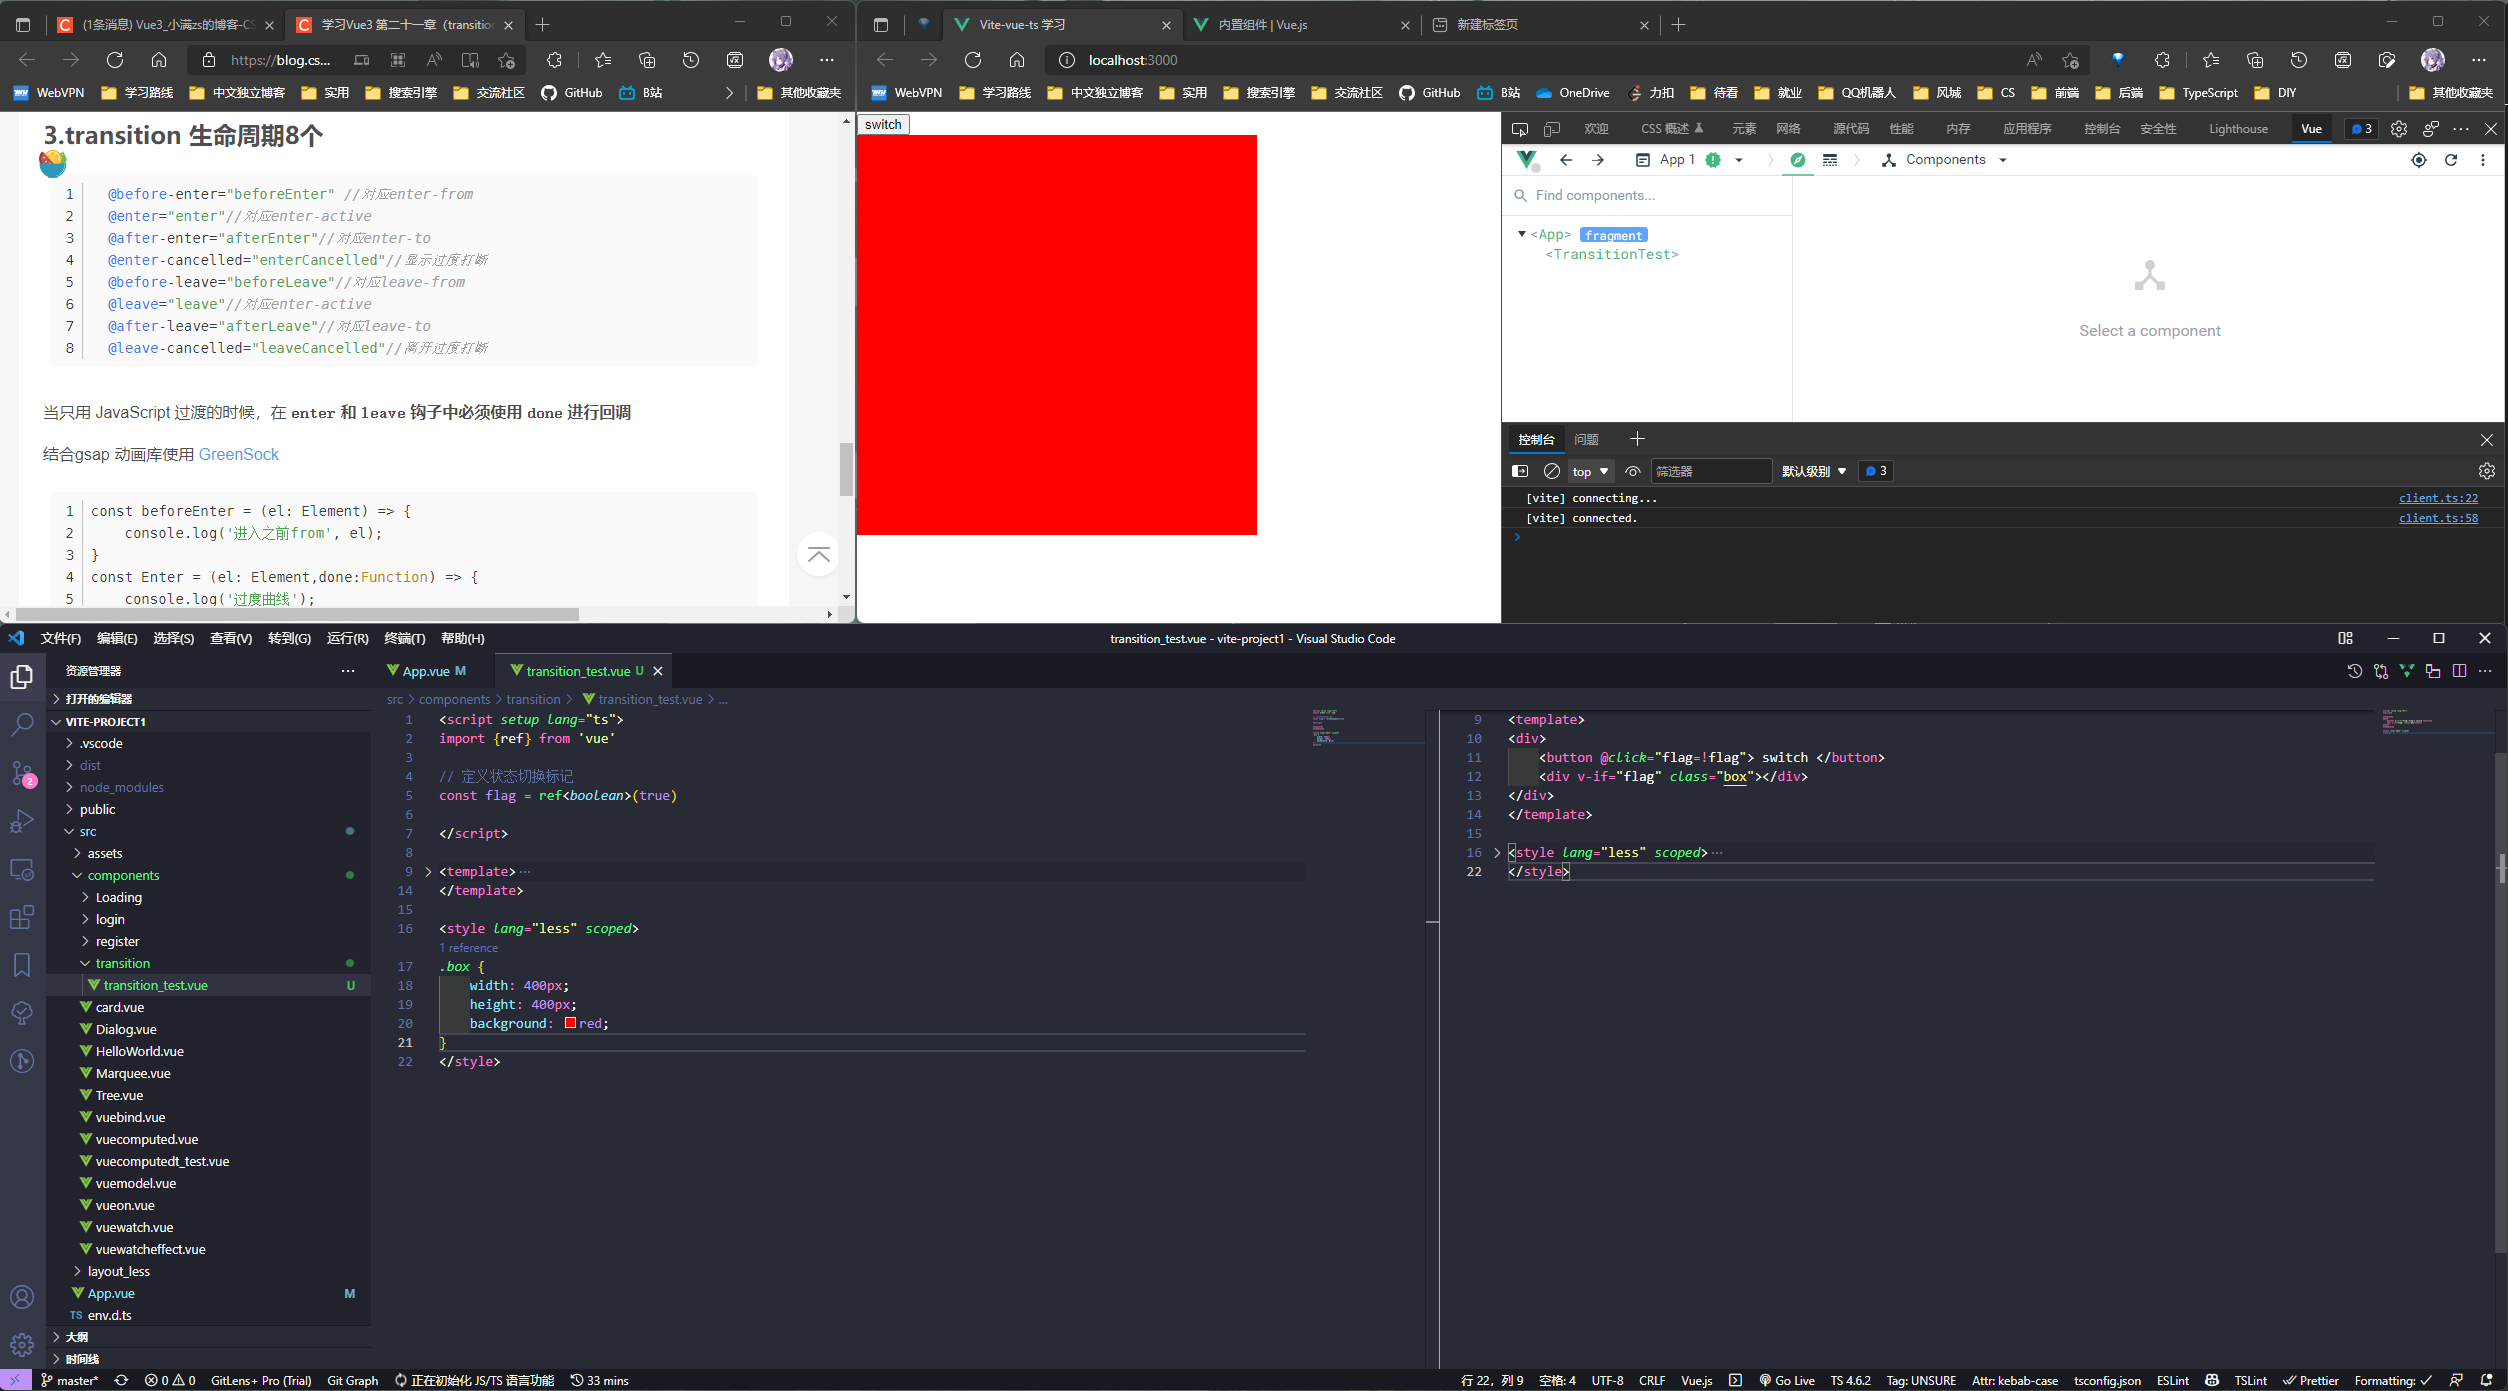
使用 v-if 或 v-show 切换组件的显示隐藏比较生硬, 使用 transition 配合 css 可以实现一些动效
tansition_test.vue
<script setup lang="ts">
import { ref } from "vue";

// 定义状态切换标记
const flag = ref<boolean>(true);
</script>

<template>
  <div>
    <button @click="flag = !flag">switch</button>
    <div v-if="flag" class="box"></div>
  </div>
</template>

<style lang="less" scoped>
.box {
  width: 400px;
  height: 400px;
  background: red;
}
</style>
可以看到, 这个切换比较生硬
使用 <transition> 包裹元素后可以结合 css 实现一些动效:
transition_test.vue:
<script setup lang="ts">
import { ref } from "vue";

// 定义状态切换标记
const flag = ref<boolean>(true);
</script>

<template>
  <div>
    <button @click="flag = !flag">switch</button>
    <transition name="boxFade">
      <div v-if="flag" class="box"></div>
    </transition>
  </div>
</template>

<style lang="less" scoped>
.box {
  width: 400px;
  height: 400px;
  background: red;
}
// 区域显示起点样式
.boxFade-enter-from {
  width: 0px;
  height: 0px;
}

// 区域显示过渡曲线
.boxFade-enter-active {
  // 动画执行 1.5s, 速度由快到慢(ease)[PS: 除了ease外还有 linear ease-in ease-out ease-in-out]
  transition: all 1.5s ease;
}

// 区域显示终点样式(一般与标签内定义样式这里就是与 box 一致)
.boxFade-enter-to {
  width: 400px;
  height: 400px;
}

// 区域隐藏起点样式(一般与标签内定义样式这里就是与 box 一致)
.boxFade-leave-from {
  width: 400px;
  height: 400px;
}

// 区域隐藏过渡曲线
.boxFade-leave-active {
  transition: all 2s ease;
}

// 区域隐藏终点样式
.boxFade-leave-to {
  width: 0px;
  height: 0px;
}
</style>
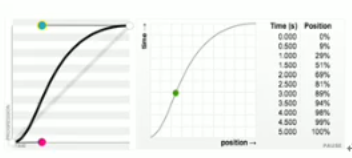
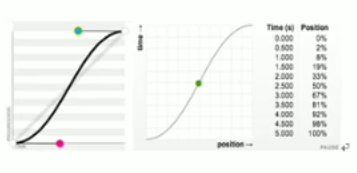
ease
默认值, 元素样式从初始状态过渡到终止状态时速度由快到慢, 逐渐变慢
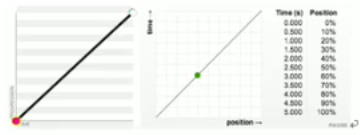
linear
元素样式从初始状态过渡到到终止状态速度是恒速(等于 cubic-bezier(0,0,1,1)) 。(匀速)
ease-in
规定以慢速开始的过渡效果(等于 cubic-bezier(0.42,0,1,1)) (相对于匀速,开始的时候慢,之后快) 。
呈加速状态, 常称这种效果为渐显效果
ease-out
规定以慢速结束的过渡效果(等于 cubic-bezier(0,0,0.58,1)) (相对于匀速,开始时快,结束时候间慢,) 。
呈减速状态, 常称这种效果为渐隐效果
ease-in-out
规定以慢速开始和结束的过渡效果(等于 cubic-bezier(0.42,0,0.58,1)) (相对于匀速,(开始和结束都慢) 两头慢) 。
先加速再减速, 常称这种效果为渐显渐隐效果
cubic-bezier(n,n,n,n)在 cubic-bezier 函数中定义自己的值。可能的值是 0 至 1 之间的数值。


还可以再加点花里胡哨的效果, 比如旋转:
// 区域显示起点样式
.boxFade-enter-from {
  width: 0px;
  height: 0px;
  // 来点花里胡哨的 360° 旋转
  transform: rotate(360deg);
}

// 区域隐藏起点样式(一般与标签内定义样式这里就是与 box 一致)
.boxFade-leave-from {
  width: 400px;
  height: 400px;
  // 来点花里胡哨的 360° 旋转
  transform: rotate(360deg);
}

样式表里不光可以使用 name-xxx 的形式, 也支持自定义, 比如:
<script setup lang="ts">
import { ref } from "vue";

// 定义状态切换标记
const flag = ref<boolean>(true);
</script>

<template>
  <div>
    <button @click="flag = !flag">switch</button>
    <transition
      name="boxFade"
      enter-from-class="boxEF"
      enter-active-class="boxEA"
      enter-to-class="boxET"
      leave-from-class="boxLF"
      leave-active-class="boxLA"
      leave-to-class="boxLT"
    >
      <div v-if="flag" class="box"></div>
    </transition>
  </div>
</template>

<style lang="less" scoped>
.box {
  width: 400px;
  height: 400px;
  background: red;
}
// 区域显示起点样式
.boxEF {
  width: 0px;
  height: 0px;
  // 来点花里胡哨的 360° 旋转
  transform: rotate(360deg);
}

// 区域显示过渡曲线
.boxEA {
  // 动画执行 1.5s, 速度由快到慢(ease)[PS: 除了ease外还有 linear ease-in ease-out ease-in-out]
  transition: all 1.5s ease-in-out;
}

// 区域显示终点样式(一般与标签内定义样式这里就是与 box 一致)
.boxET {
  width: 400px;
  height: 400px;
}

// 区域隐藏起点样式(一般与标签内定义样式这里就是与 box 一致)
.boxLF {
  width: 400px;
  height: 400px;
  // 来点花里胡哨的 360° 旋转
  transform: rotate(360deg);
}

// 区域隐藏过渡曲线
.boxLA {
  transition: all 1.5s ease-in-out;
}

// 区域隐藏终点样式
.boxLT {
  width: 0px;
  height: 0px;
}
</style>
在使用
<transition>时定义好各个样式的别名即可
结合 Animate.css 使用
[Animate.css](#结合
vue3 transition使用)
transition_test.vue:
<script setup lang="ts">
import { ref } from "vue";
// 引入 animate.css
import "animate.css";

// 定义状态切换标记
const flag = ref<boolean>(true);
</script>

<template>
  <div>
    <button @click="flag = !flag">switch</button>
    <transition
      enter-active-class="animate__animated animate__bounce"
      leave-active-class="animate__animated animate__fadeOut"
    >
      <div v-if="flag" class="box"></div>
    </transition>
  </div>
</template>

<style lang="less" scoped>
.box {
  width: 400px;
  height: 400px;
  background: red;
}
</style>
生命周期 和 GSAP
transition 有 8 个生命周期
  @before-enter="beforeEnter" //对应enter-from
  @enter="enter"//对应enter-active
  @after-enter="afterEnter"//对应enter-to
  @enter-cancelled="enterCancelled"//显示过度打断
  @before-leave="beforeLeave"//对应leave-from
  @leave="leave"//对应enter-active
  @after-leave="afterLeave"//对应leave-to
  @leave-cancelled="leaveCancelled"//离开过度打断
当只用 JavaScript 过渡的时候,在 enter 和 leave 钩子中必须使用 done 进行回调
结合 gsap 动画库使用:
transition_test_gsap.vue:
<script setup lang="ts">
import { ref } from "vue";
// 引入 gsap
import gsap from "gsap";

// 定义状态切换标记
const flag = ref<boolean>(true);

const EnterFrom = (el: Element) => {
  gsap.set(el, {
    width: 0,
    height: 0,
  });
};

const EnterActive = (el: Element, done: gsap.Callback) => {
  gsap.to(el, {
    width: 400,
    height: 400,
    onComplete: done,
  });
};

const leave = (el: Element, done: gsap.Callback) => {
  gsap.to(el, {
    width: 0,
    height: 0,
    onComplete: done,
  });
};
</script>

<template>
  <div>
    <button @click="flag = !flag">switch</button>
    <transition @before-enter="EnterFrom" @enter="EnterActive" @leave="leave">
      <div v-if="flag" class="box"></div>
    </transition>
  </div>
</template>

<style lang="less" scoped>
.box {
  width: 400px;
  height: 400px;
  background: red;
}
</style>

appear
通过这个属性可以设置初始节点过度 就是页面加载完成就开始动画 对应三个状态
appear-active-class="" appear-from-class="" appear-to-class="" appear
可以结合 Animate.css 调用一些高级的动效:
transition_test_appear.vue:
<script setup lang="ts">
import { ref } from "vue";
// 引入 animate.css
import "animate.css";

// 定义状态切换标记
const flag = ref<boolean>(true);
</script>

<template>
  <div>
    <button @click="flag = !flag">switch</button>
    <transition appear appear-active-class="animate__animated animate__bounce">
      <div v-if="flag" class="box"></div>
    </transition>
  </div>
</template>

<style lang="less" scoped>
.box {
  width: 400px;
  height: 400px;
  background: red;
}
</style>
transition-group
Props:
tag-string- 如果未定义,则不渲染动画元素。move-class- 覆盖移动过渡期间应用的 CSS 类。- 除了
mode- 其他 attribute 和<transition>相同。
事件:
- 事件和
<transition>相同。
- 事件和
用法:
<transition-group>提供了多个元素/组件的过渡效果。默认情况下,它不会渲染一个 DOM 元素包裹器,但是可以通过tagattribute 来定义。注意,每个
<transition-group>的子节点必须有独立的 key,动画才能正常工作。
<transition-group> 支持通过 CSS transform 过渡移动。当一个子节点被更新,从屏幕上的位置发生变化,它会被应用一个移动中的 CSS 类 (通过 name attribute 或配置 move-class attribute 自动生成)。如果 CSS transform property 是“可过渡” property,当应用移动类时,将会使用 FLIP 技术使元素流畅地到达动画终点。
<transition-group tag="ul" name="slide">
  <li v-for="item in items" :key="item.id">{{ item.text }}</li>
</transition-group>
动效用法和 transition 一致:
transition_group_test.vue:
<script setup lang="ts">
import { ref, reactive } from "vue";
import "animate.css";

const list = reactive<number[]>([1, 2, 3, 4, 5, 6]);

const add = () => {
  list.push(list.length + 1);
};

const dec = () => {
  list.pop();
};
</script>

<template>
  <div>
    <button @click="add">添加</button>
    <button @click="dec">删除</button>
    <div class="wraps">
      <transition-group
        enter-active-class="animate__animated animate__bounce"
        leave-active-class="animate__animated animate__fadeOut"
      >
        <div v-for="item in list" :key="item" class="box">
          {{ item }}
        </div>
      </transition-group>
    </div>
  </div>
</template>

<style lang="less" scoped>
.wraps {
  display: flex;
  flex-wrap: wrap;
  word-break: break-all; // 不换行
  border: 1px solid #ccc;
  .box {
    margin: 10px;
  }
}
</style>
平面过渡动画
以打乱数组为例:
transition_group_test_flip.vue:
<script setup lang="ts">
import { ref } from "vue";
import _ from "lodash";

let list = ref(
  Array.apply(null, { length: 81 } as number[]).map((_, index) => {
    return {
      id: index,
      number: (index % 9) + 1,
    };
  })
);

console.log(list.value);

const random = () => {
  list.value = _.shuffle(list.value);
};
</script>

<template>
  <div>
    <button @click="random">random</button>
    <transition-group move-class="move_active" class="wraps" tag="div">
      <div class="items" v-for="item in list" :key="item.id">
        {{ item.number }}
      </div>
    </transition-group>
  </div>
</template>

<style lang="less" scoped>
.wraps {
  display: flex;
  flex-wrap: wrap;
  width: calc(25px * 10 + 9px);
  .items {
    width: 25px;
    height: 25px;
    border: 1px solid #ccc;
    display: flex;
    justify-content: center; // 居中
    align-items: center; // 垂直居中
  }
}

.move_active {
  transition: all 1.5s ease-in-out;
}
</style>
状态过渡
结合 gsap 实现一个数字更新时的滚动效果:
<!-- 状态过渡 -->
<script setup lang="ts">
import gsap from "gsap";
import { reactive, watch } from "vue";

const num = reactive({
  current: 0,
  tweenedNumber: 0,
});

watch(
  () => num.current,
  (newVal, oldVal) => {
    gsap.to(num, {
      duration: 1,
      tweenedNumber: newVal,
      onUpdate: () => {
        console.log(num.tweenedNumber);
      },
    });
  }
);
</script>

<template>
  <div>
    <input v-model="num.current" step="20" type="number" />
    <div>{{ num.tweenedNumber.toFixed(0) }}</div>
  </div>
</template>

<style lang="less" scoped></style>
keep-alive
有时候我们不希望组件被重新渲染影响使用体验;或者处于性能考虑,避免多次重复渲染降低性能。而是希望组件可以缓存下来,维持当前的状态。这时候就需要用到keep-alive组件。
keep-alive主要用于保留组件状态或避免重新渲染。
<keep-alive>不会在函数式组件中正常工作,因为它们没有缓存实例。
- Props:
include-string | RegExp | Array。只有名称匹配的组件会被缓存。exclude-string | RegExp | Array。任何名称匹配的组件都不会被缓存。max-number | string。最多可以缓存多少组件实例。
login.vue:
<!-- 登录组件 -->
<script setup lang="ts">
import {
  reactive,
  onMounted,
  onUnmounted,
  onActivated,
  onDeactivated,
} from "vue";
// 只有使用了 keep-alive 组件才会有 onActivated 和 onDeactivated 事件

// 登录表单
const form = reactive({
  login: "",
  password: "",
});

// 登录按钮触发事件
const submit = () => {
  console.log(form);
};

onMounted(() => {
  console.log("login mounted");
});

onUnmounted(() => {
  console.log("login unmounted");
});

onActivated(() => {
  console.log("login activated");
});

onDeactivated(() => {
  console.log("login deactivated");
});
</script>

<template>
  <div>
    <!-- 账密输入表单 -->
    <table>
      <!-- 账号输入区域 -->
      <tr>
        <td>账号</td>
        <td>
          <input type="text" v-model="form.login" placeholder="请输入账号" />
        </td>
      </tr>
      <!-- 密码输入区域 -->
      <tr>
        <td>密码</td>
        <td>
          <input
            type="password"
            v-model="form.password"
            placeholder="请输入密码"
          />
        </td>
      </tr>
    </table>
    <button @click="submit">登录</button>
  </div>
</template>

<style lang="less" scoped></style>
只有使用了
keep-alive组件才会有onActivated和onDeactivated事件(这会运用在
<keep-alive>的直接子节点及其所有子孙节点。)
如图所示,
Login 组件只会mounted一次, 点击切换按钮后不会unmounted, 不过点击切换按钮会调起onDeactivated, 再点击一次会变再调起onActivated

register.vue
<!-- 登录组件 -->
<script setup lang="ts">
import { reactive } from "vue";

// 登录表单
const form = reactive({
  login: "",
  password: "",
  code: "",
});

// 登录按钮触发事件
const submit = () => {
  console.log(form);
};
</script>

<template>
  <div>
    <!-- 账密输入表单 -->
    <table>
      <!-- 账号输入区域 -->
      <tr>
        <td>账号</td>
        <td>
          <input type="text" v-model="form.login" placeholder="请输入账号" />
        </td>
      </tr>
      <!-- 密码输入区域 -->
      <tr>
        <td>密码</td>
        <td>
          <input
            type="password"
            v-model="form.password"
            placeholder="请输入密码"
          />
        </td>
      </tr>
      <!-- 验证码输入区域 -->
      <tr>
        <td>验证码</td>
        <td>
          <input type="text" v-model="form.code" placeholder="请输入验证码" />
        </td>
      </tr>
    </table>
    <button @click="submit">注册</button>
  </div>
</template>

<style lang="less" scoped></style>
在登录组件中演示了使用
keep-alive后组件声明周期的变化, 可以得知如果想在切换组件的时候做些什么, 那么应当修改onActivated和onDeactivated方法例如在从注册界面切换到登录界面时清空注册页面的验证码输入框:
// 设置切换到登录界面时, 注册界面的验证码会清空
onDeactivated(() => {
  console.log("register deactivated");
  form.code = "";
  console.log("验证码已清空");
});
lessContent.vue:
<script setup lang="ts">
import A from "./A.vue";
import B from "./B.vue";
import C from "./C.vue";
import Dialog from "../../components/Dialog.vue";
// import Loading from '../../components/Loading/loading.vue' 异步化组件后就不能这样直接引入使用了
// 引入登录组件
import Login from "../../components/login/login.vue";
// 引入注册组件
import Register from "../../components/register/register.vue";
import { reactive, markRaw, ref, defineAsyncComponent } from "vue";

const Loading = defineAsyncComponent(
  () => import("../../components/Loading/loading.vue")
);

type Tabs = {
  name: string;
  comName: any;
};

type Com = Pick<Tabs, "comName">;

const data = reactive<Tabs[]>([
  {
    name: "我是 A 组件",
    comName: markRaw(A),
  },
  {
    name: "我是 B 组件",
    comName: markRaw(B),
  },
  {
    name: "我是 C 组件",
    comName: markRaw(C),
  },
]);

let current = reactive<Com>({
  comName: data[0].comName,
});

const switchCom = (item: Tabs) => {
  current.comName = item.comName;
};

// 动态插槽相关
let name = ref("dialog_header");

// 切换登录注册表单页面
const flag = ref(true);
const switchLoginRegist = () => {
  flag.value = !flag.value;
};
</script>

<template>
  <div class="content_layout">
    <button @click="switchLoginRegist">切换</button>
    <keep-alive>
      <Login v-if="flag"></Login>
      <Register v-else></Register>
    </keep-alive>
    <teleport to=".teleport_class_test">
      <div class="loading">loading...</div>
    </teleport>
    <!-- 异步组件测试 -->
    <Suspense>
      <template #default>
        <Loading></Loading>
      </template>
      <template #fallback>
        <div>加载中...</div>
      </template>
    </Suspense>
    <!-- 插槽测试 -->
    <Dialog>
      <!-- 具名插槽 -->
      <template v-slot:dialog_header>
        <div>摆</div>
      </template>
      <!-- 匿名插槽 -->
      <!-- <template v-slot="{data}"> -->
      <!-- 简写: -->
      <template #default="{ data }">
        <div>姓名: {{ data.name }} 年龄: {{ data.age }}</div>
      </template>
      <!-- 具名插槽 -->
      <!-- 简写: -->
      <template #dialog_footer>
        <div>摸了</div>
      </template>
      <!-- 动态插槽 -->
      <template #[name]> 动态插槽演示 </template>
    </Dialog>
    <div class="tab">
      <div :key="item.name" v-for="item in data" @click="switchCom(item)">
        {{ item.name }}
      </div>
    </div>
    <component :is="current.comName" />
    <div class="content_layout-items" :key="item" v-for="item in 100">
      {{ item }}
    </div>
  </div>
</template>

<style lang="less" scoped>
.content_layout {
  flex: 1;
  margin: 20px;
  border: 1px solid #ccc;
  overflow: auto;
  &-items {
    padding: 20px;
    border: 1px solid #ccc;
  }
}

.tab {
  display: flex;
  flex: 1;
  flex-direction: row;
  div {
    flex: 1;
    padding: 10px;
    border: 1px solid #ccc;
    cursor: pointer;
    &:hover {
      background: #eee;
    }
  }
}

.loading {
  position: absolute;
  right: 10px;
  top: 10px;
  background: greenyellow;
}
</style>
如果想选择性的使 keep-alive 标签 内的组件应用 keep-alive 的话可以使用 :include
例如, 如果想让上面的 keep-alive 标签 内的两个组件 Login 和 Register 只有前者应用 keep-alive 的话可以如此书写:
<keep-alive :include="['Login']">
  <Login v-if="flag"></Login>
  <Register v-else></Register>
</keep-alive>
这样写法需要注意的是定位
Login 组件使用的“”字符串, 那么在使用vue3 setup 语法糖的情况下应当在Login 组件中添加一个script 标签并在其中定义组件别名:<script lang="ts"> export default{ name: "Login" } </script>
与 include 相对的则是 exclude, 使用 exclude 可以使 exclude 后面数组内的组件不应用缓存
二者都可以用逗号分隔字符串、正则表达式或一个数组来表示:
<!-- 逗号分隔字符串 -->
<keep-alive include="a,b">
  <component :is="view"></component>
</keep-alive>

<!-- regex (使用 `v-bind`) -->
<keep-alive :include="/a|b/">
  <component :is="view"></component>
</keep-alive>

<!-- Array (使用 `v-bind`) -->
<keep-alive :include="['a', 'b']">
  <component :is="view"></component>
</keep-alive>
除此以外 max prop 的作用是决定最多可以缓存多少组件实例, 一旦这个数字达到了,在新实例被创建之前,已缓存组件中最久没有被访问的实例会被销毁掉。
<keep-alive :max="10">
  <component :is="view"></component>
</keep-alive>
slot
详见 通过插槽分发内容
响应性 API
响应性基础 API
reactive
返回对象的响应式副本
const obj = reactive({ count: 0 });
响应式转换是“深层”的——它影响所有嵌套 property。在基于 ES2015 Proxy 的实现中,返回的 proxy 是不等于原始对象的。建议只使用响应式 proxy,避免依赖原始对象。
类型声明:
function reactive<T extends object>(target: T): UnwrapNestedRefs<T>;
提示:
reactive将解包所有深层的 refs,同时维持 ref 的响应性。const count = ref(1); const obj = reactive({ count }); // ref 会被解包 console.log(obj.count === count.value); // true // 它会更新 `obj.count` count.value++; console.log(count.value); // 2 console.log(obj.count); // 2 // 它也会更新 `count` ref obj.count++; console.log(obj.count); // 3 console.log(count.value); // 3重要
重要
当将 ref 分配给
reactiveproperty 时,ref 将被自动解包。const count = ref(1); const obj = reactive({}); obj.count = count; console.log(obj.count); // 1 console.log(obj.count === count.value); // true
官方建议定义数据的时候,
reactive定义复杂的数据类型的数据,ref推荐定义基本数据类型,
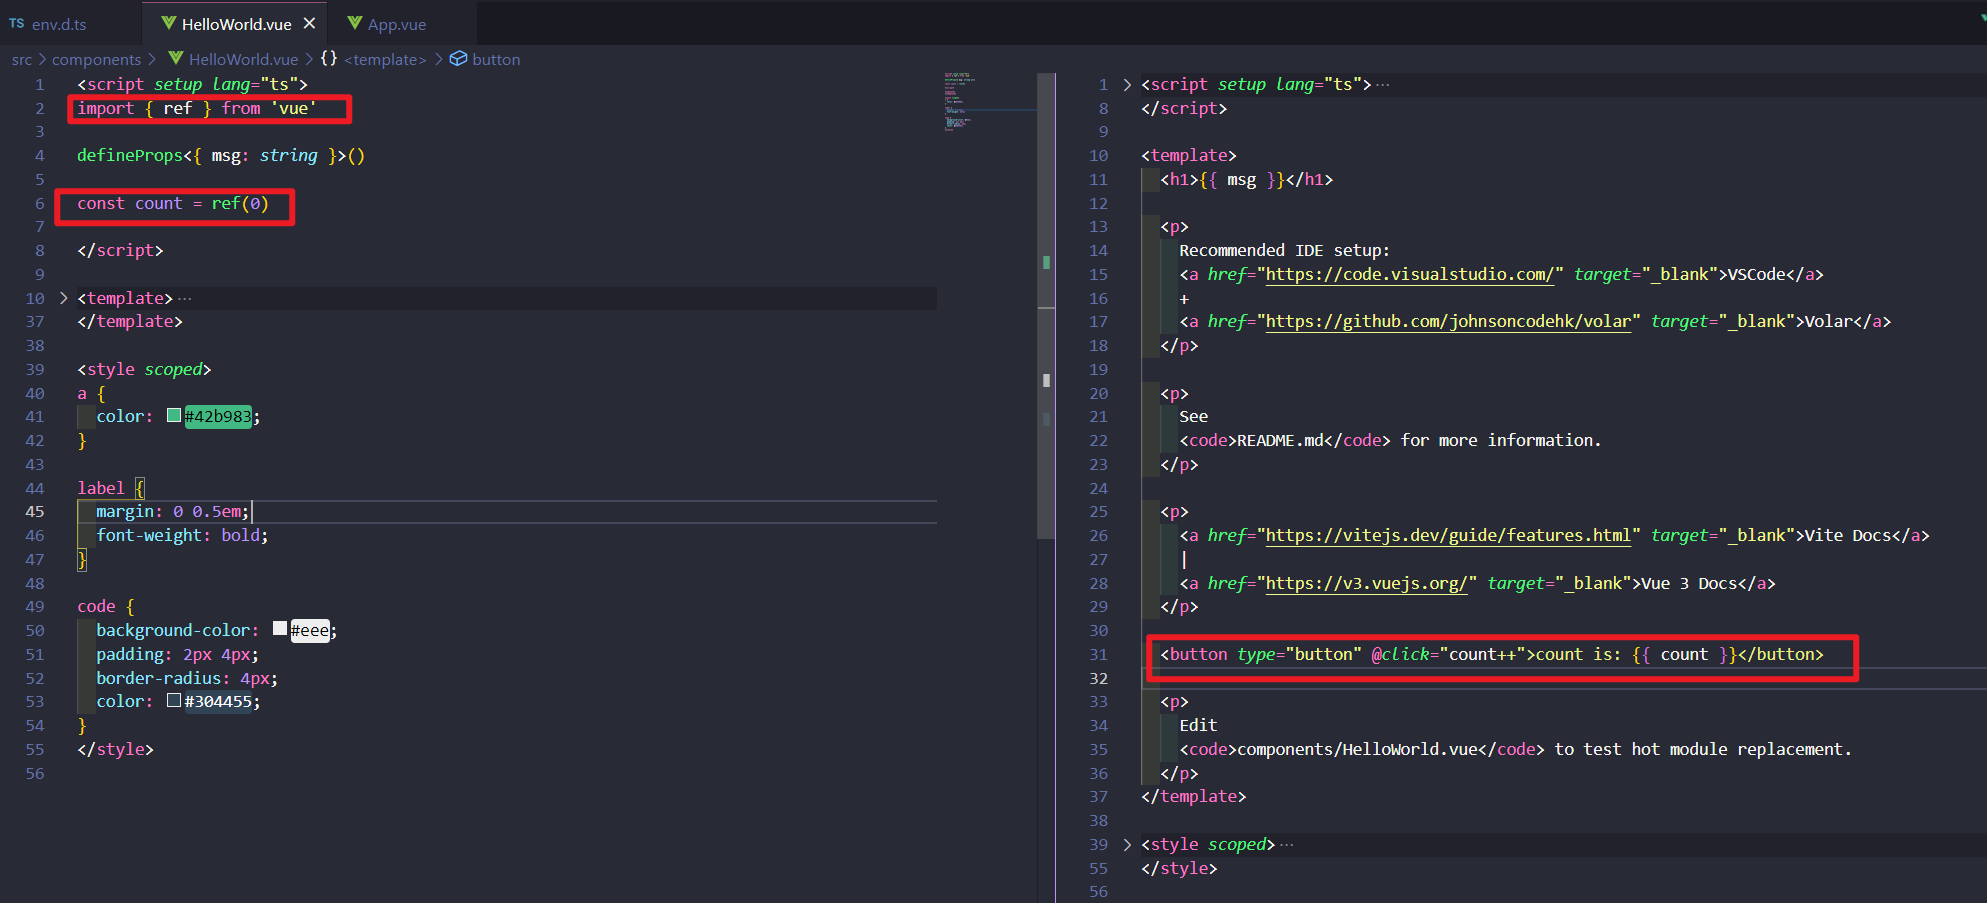
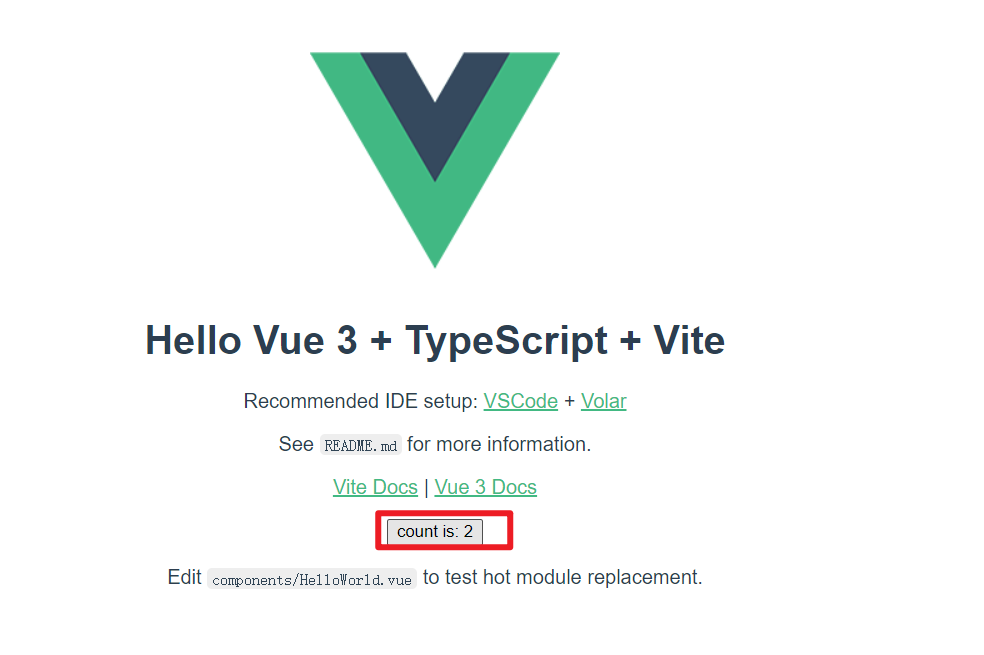
Refs
ref
接受一个内部值并返回一个响应式且可变的 ref 对象。ref 对象仅有一个 .value property,指向该内部值。
示例:
const count = ref(0);
console.log(count.value); // 0

count.value++;
console.log(count.value); // 1
如果将对象分配为 ref 值,则它将被 reactive 函数处理为深层的响应式对象。
类型声明:
interface Ref<T> {
  value: T;
}

function ref<T>(value: T): Ref<T>;
有时我们可能需要为 ref 的内部值指定复杂类型。可以在调用 ref 时传递一个泛型参数以覆盖默认推断,从而简洁地做到这一点:
const foo = ref<string | number>("foo"); // foo 的类型:Ref<string | number>

foo.value = 123; // ok!
如果泛型的类型未知,则建议将 ref 转换为 Ref<T>:
function useState<State extends string>(initial: State) {
  const state = ref(initial) as Ref<State>; // state.value -> State extends string
  return state;
}
Computed 与 watch
computed
Computed 与 watch | Vue.js (vuejs.org)
「computed」 是Vue中提供的一个计算属性。它被混入到 Vue 实例中,所有的 getter 和 setter 的 this 上下文自动的绑定为 Vue 实例。计算属性的结果会被缓存,除非依赖的响应式 property 变化才会从新计算。
由于 Vue 声明文件的循环特性,TypeScript 可能难以推断 computed 的类型。因此,你可能需要注解计算属性的返回类型。
import { defineComponent } from "vue";

const Component = defineComponent({
  data() {
    return {
      message: "Hello!",
    };
  },
  computed: {
    // 需要注解
    greeting(): string {
      return this.message + "!";
    },

    // 在使用 setter 进行计算时,需要对 getter 进行注解
    greetingUppercased: {
      get(): string {
        return this.greeting.toUpperCase();
      },
      set(newValue: string) {
        this.message = newValue.toUpperCase();
      },
    },
  },
});
类型声明 computed
import { defineComponent, ref, computed } from "vue";

export default defineComponent({
  name: "CounterButton",
  setup() {
    let count = ref(0);

    // 只读
    const doubleCount = computed(() => count.value * 2);

    const result = doubleCount.value.split(""); // => Property 'split' does not exist on type 'number'
  },
});
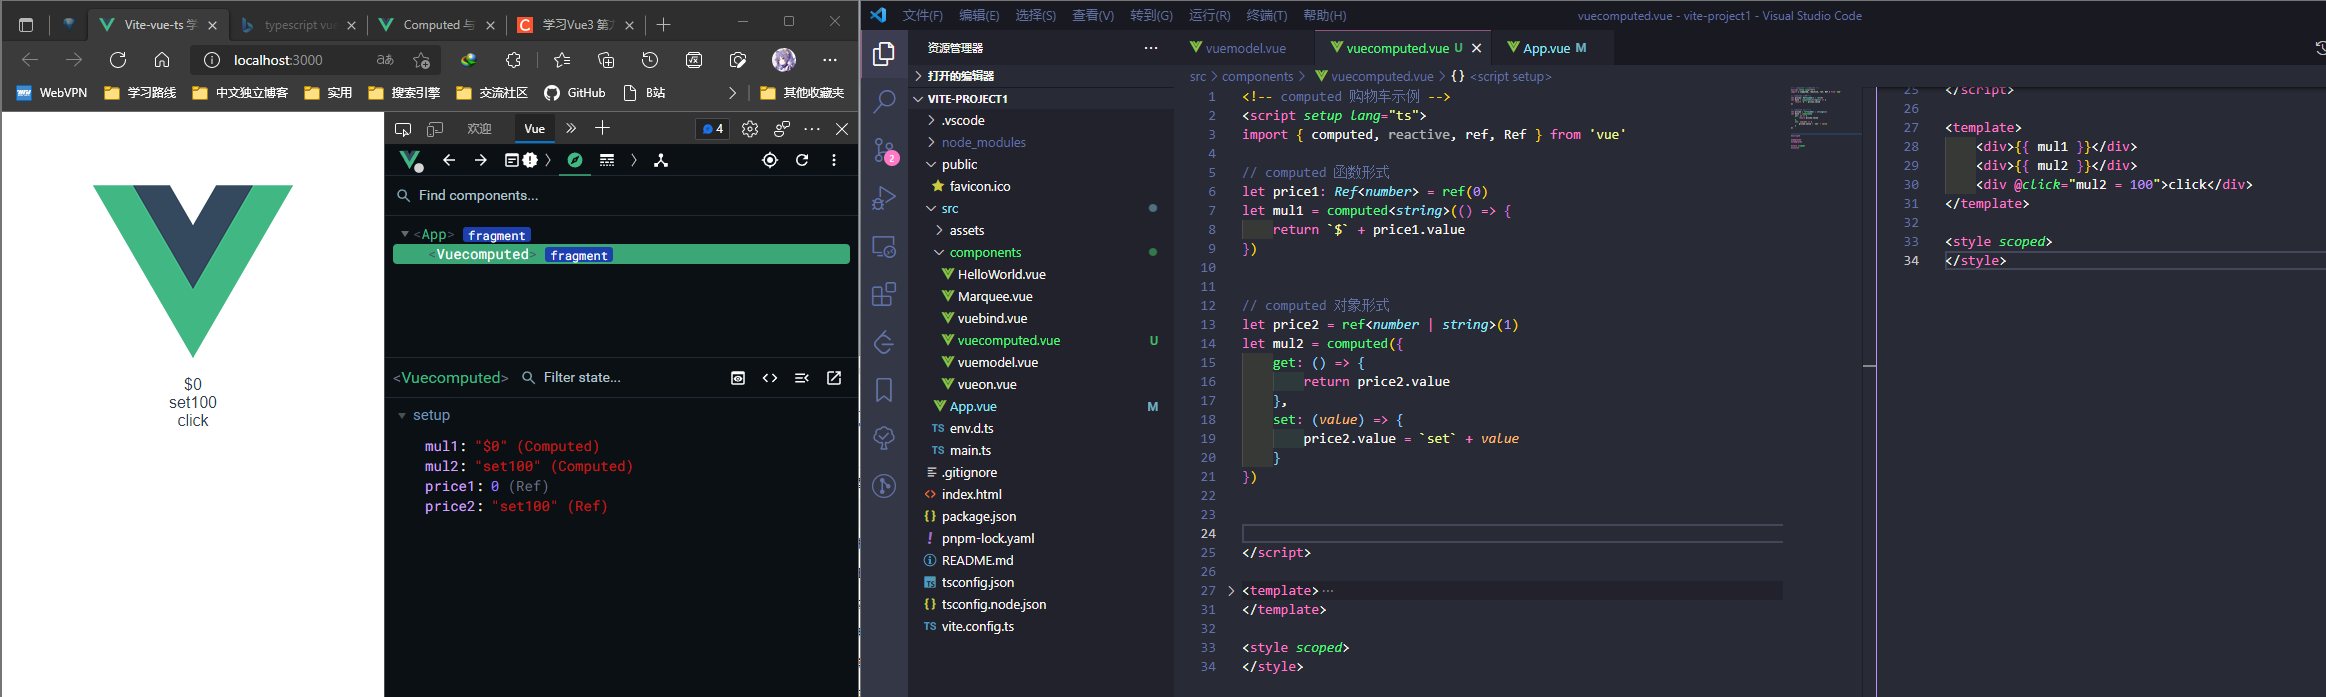
购物车示例
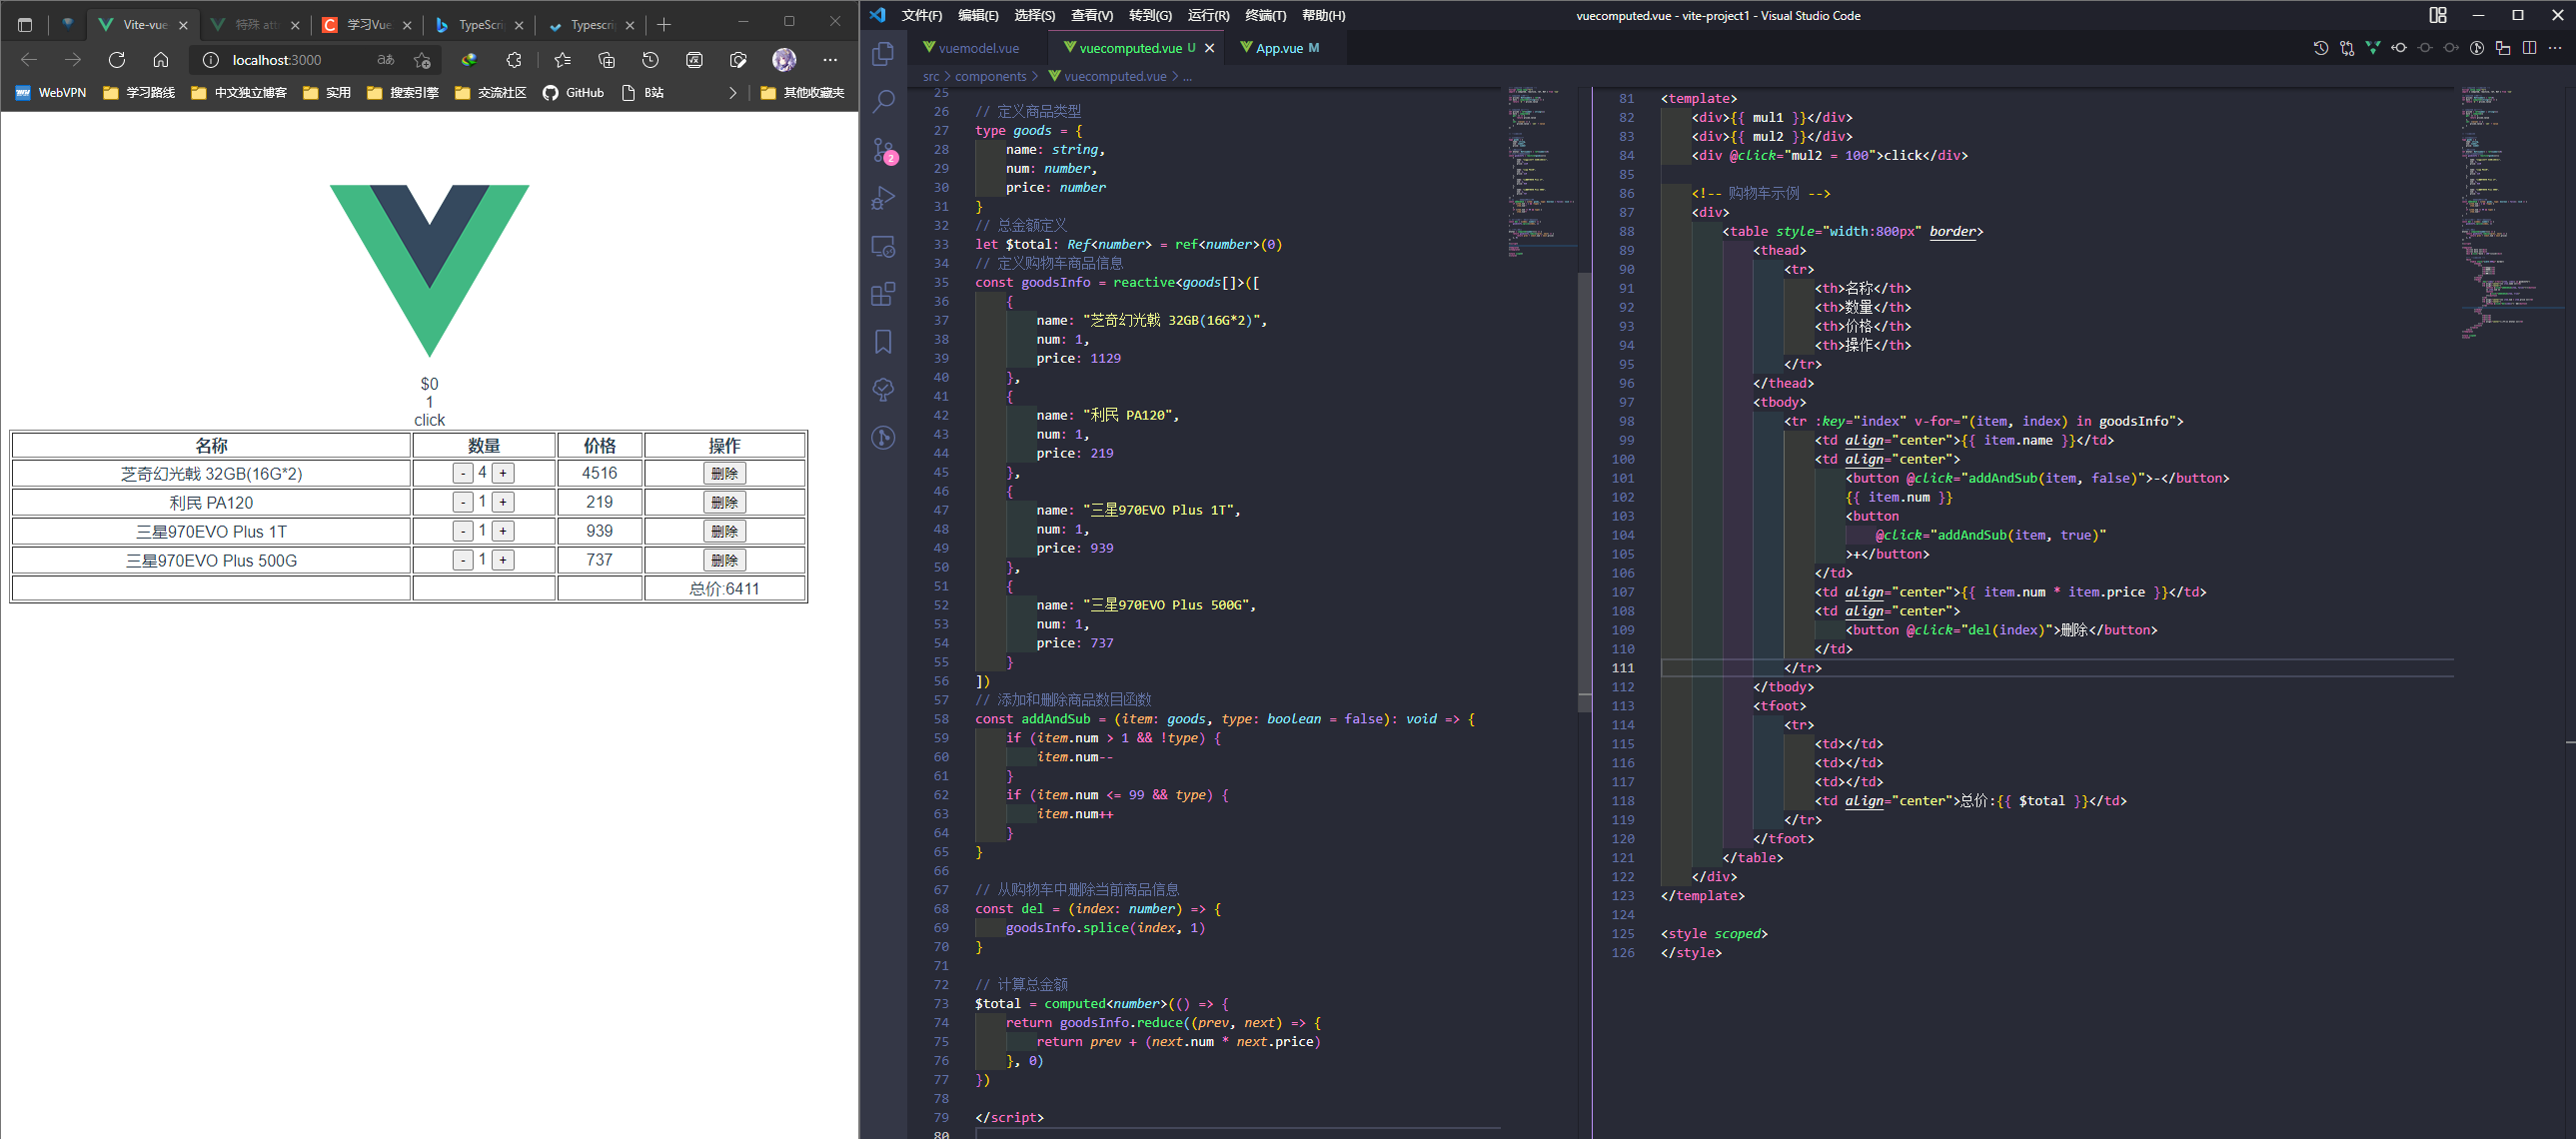
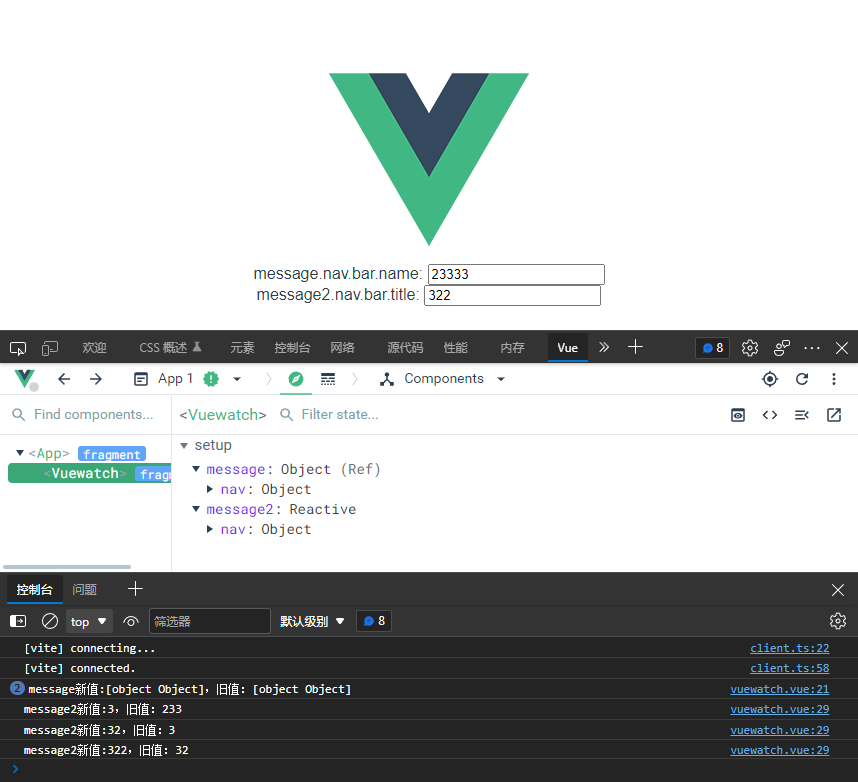
watch
watch API 与选项式 API this.$watch (以及相应的 watch 选项) 完全等效。watch 需要侦听特定的数据源,并在单独的回调函数中执行副作用。默认情况下,它也是惰性的——即回调仅在侦听源发生变化时被调用。
- 与 watchEffect 相比,
watch允许我们:- 惰性地执行副作用;
- 更具体地说明应触发侦听器重新运行的状态;
- 访问被侦听状态的先前值和当前值。
<script setup lang="ts">
import { ref, watch, reactive } from "vue";

let message = ref({
  nav: {
    bar: {
      name: "233",
    },
  },
});

let message2 = reactive({
  nav: {
    bar: {
      title: "233",
    },
  },
});

watch(
  message,
  (newVal, oldVal) => {
    console.log("message新值:" + newVal + ",旧值:" + oldVal);
  },
  {
    deep: true,
  }
);

watch(
  () => message2.nav.bar.title,
  (newVal, oldVal) => {
    console.log("message2新值:" + newVal + ",旧值:" + oldVal);
  }
);
</script>

<template>
  <div>
    message.nav.bar.name:
    <input v-model="message.nav.bar.name" type="text" />
  </div>
  <div>
    message2.nav.bar.title:
    <input v-model="message2.nav.bar.title" type="text" />
  </div>
</template>

<style></style>
watchEffect
立即执行传入的一个函数,同时响应式追踪其依赖,并在其依赖变更时重新运行该函数
<script setup lang="ts">
import { watchEffect, ref } from 'vue'

let message = ref<string>('233')
let message2 = ref<string>("寄")

const stop = watchEffect((oninvalidate) => {
    // let ipt: HTMLInputElement = document.querySelector('#ipt') as HTMLInputElement
    console.log("messgae===>" + message.value)
    // console.log("messgae2===>" + message2.value)

    // console.log(ipt, "ell")

    oninvalidate(() => {
        console.log("before")
    })
}, {
    flush: "post",
    onTrigger: (e) => {
        debugger
    }
}

);

const stopWatch = () => stop()

</script>

<template>
    <div>
        <input id="ipt" type="text" v-model="message" />
        <input type="text" v-model="message2" />
        <button @click="stopWatch">停止监听</button>
    </div>
</template>

<style scoped>
</style>
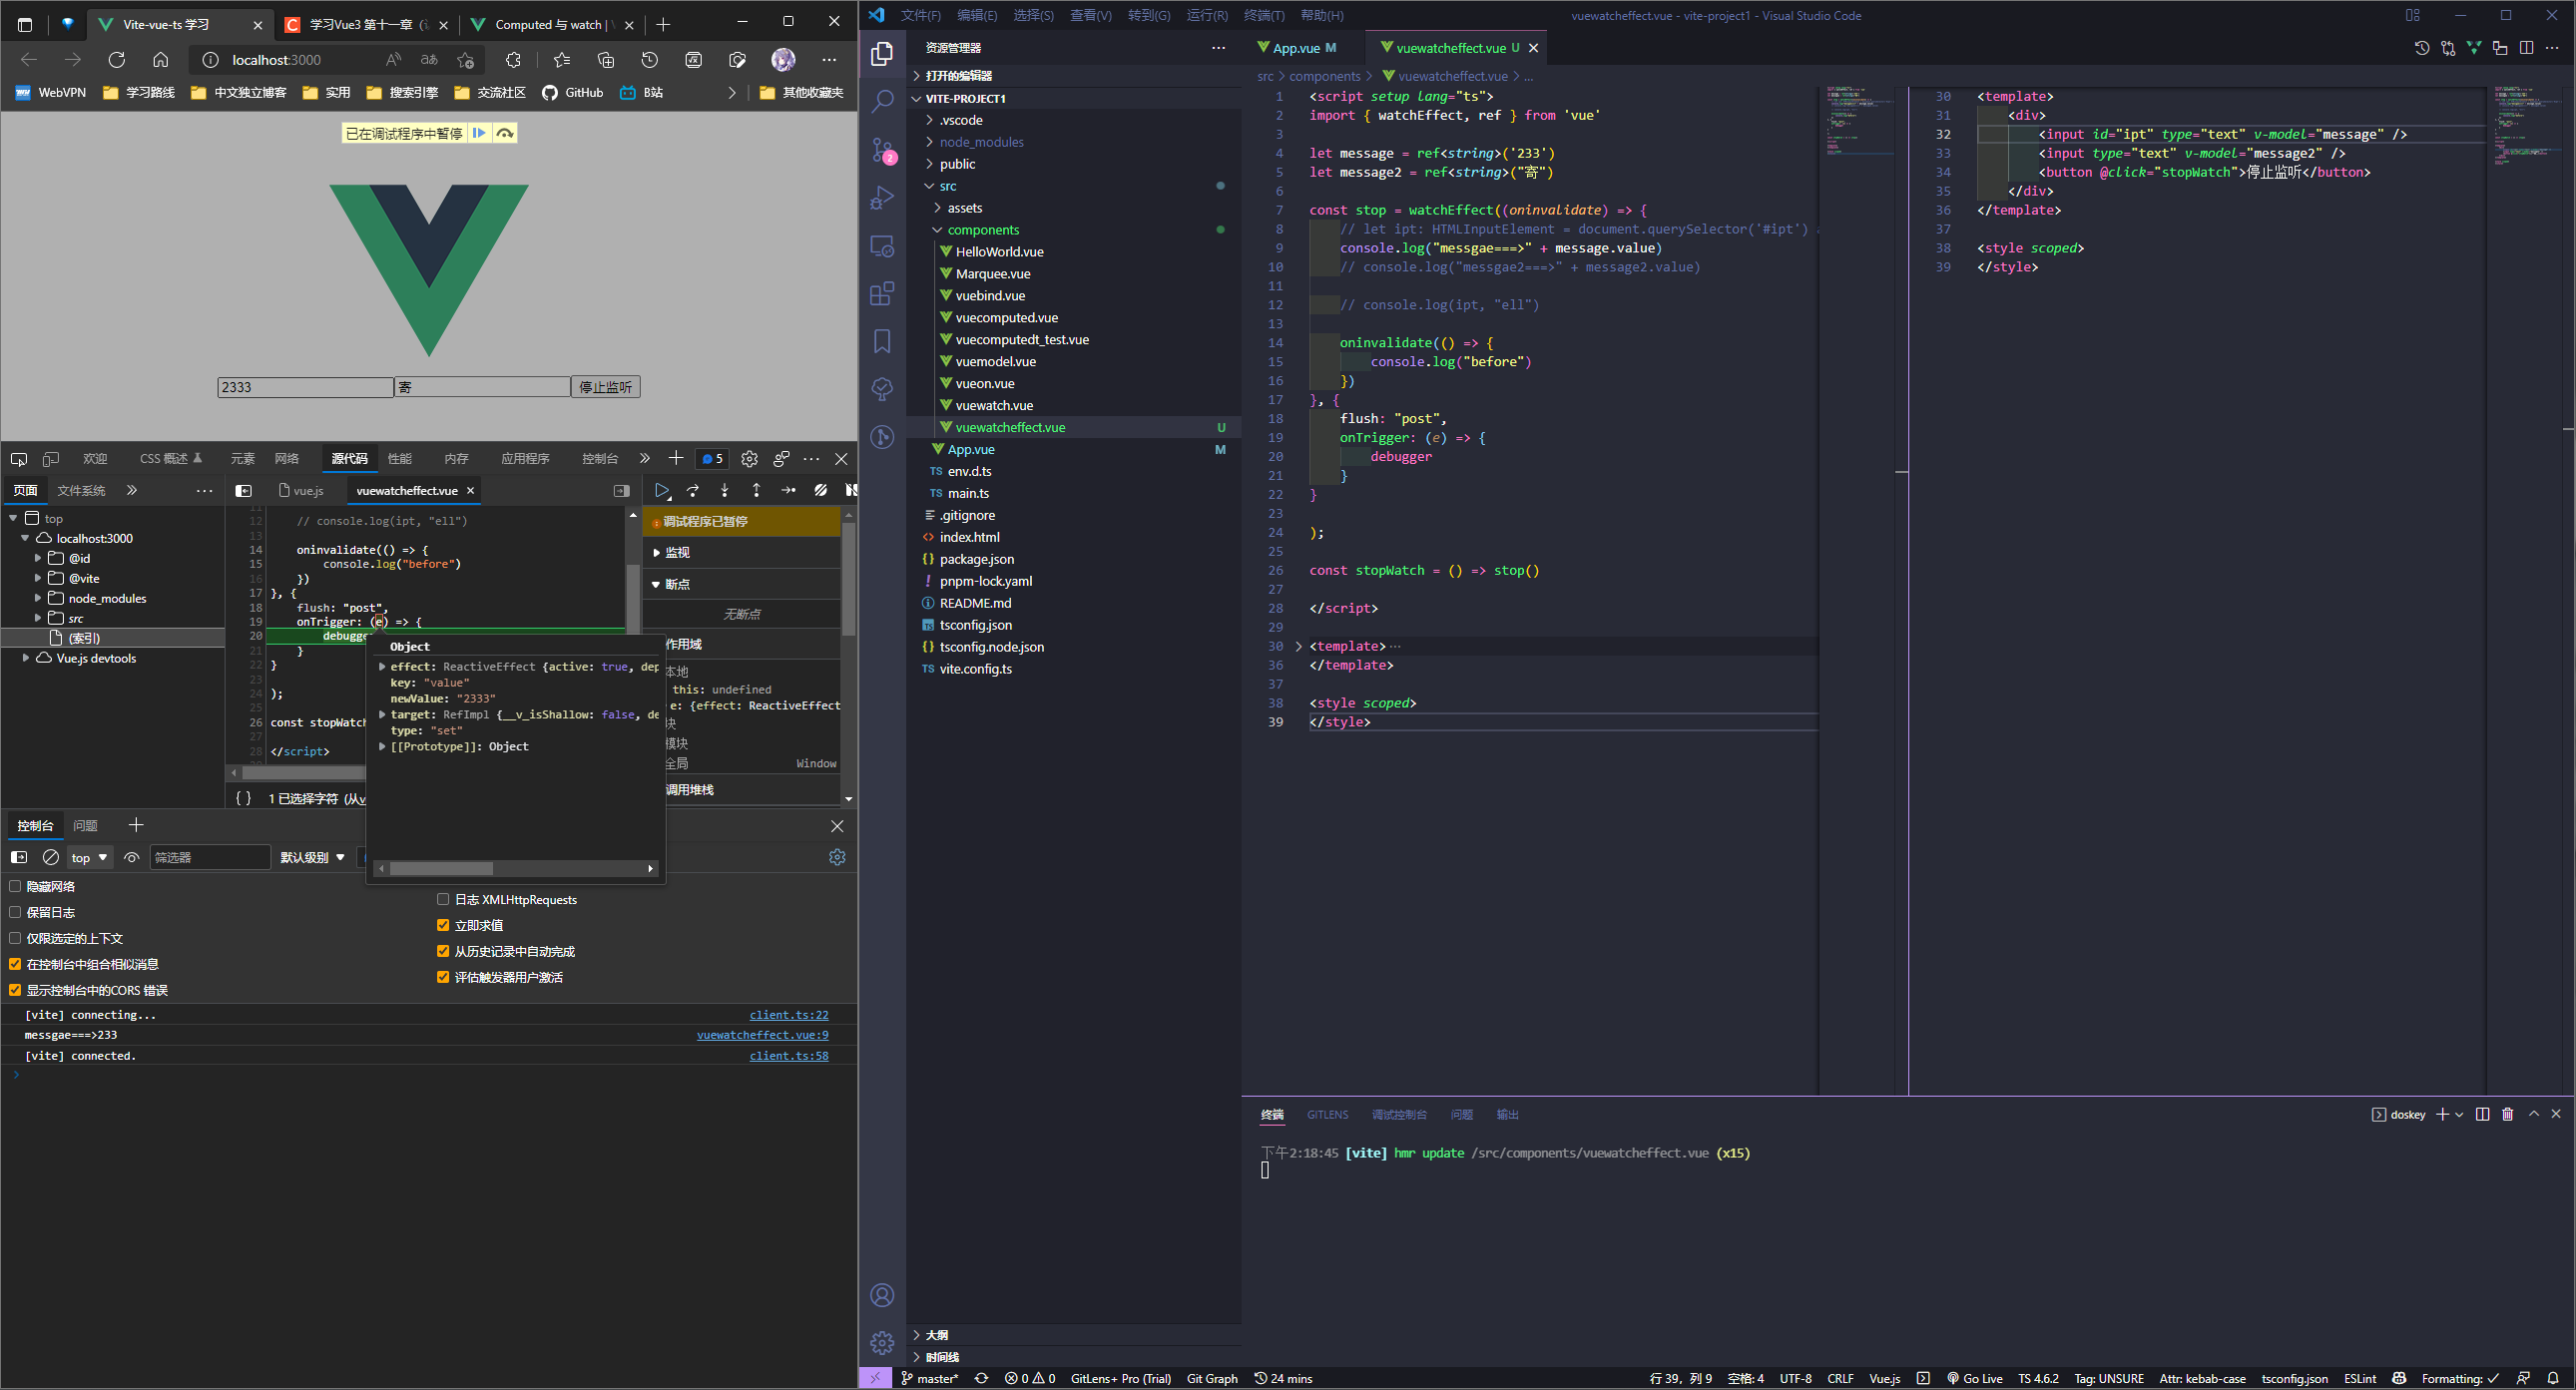
- 副作用刷新时机 flush 一般使用 post
| pre | sync | post | |
|---|---|---|---|
| 更新时机 | 组件更新前执行 | 强制效果始终同步触发 | 组件更新后执行 |
onTrigger可以帮助调试watchEffect
组合式 API
Provide/inject
provide 和 inject 启用依赖注入。这两者只能在使用当前活动实例的 setup() 期间被调用。
当出现多层组件嵌套时, 要从根组件向下传递信息除了可以通过逐级传递之外还可以使用依赖注入的方式进行传递
使用上比较简单, 根组件使用 provide 定义需要的传给子组件的数据, 然后各级子组件直接使用 inject 取值即可
PI_A.vue:
<script setup lang="ts">
import PIB from "./PI_B.vue";
import { provide, ref } from "vue";

provide("flag", ref(false)); // 两个参数, 前者是 key 后者是 value
</script>

<template>
  <div class="PI_A">
    <div>A 组件内容区域</div>
    <PIB></PIB>
  </div>
</template>

<style lang="less" scoped>
.PI_A {
  width: 300px;
  height: 300px;
  background: red;
  color: #fff;
}
</style>
PI_B.vue
<script setup lang="ts">
import PIC from "./PI_C.vue";
import { inject } from "vue";

let data = inject("flag");
</script>

<template>
  <div class="PI_B">
    <h1>B 组件内容区域</h1>
    <div>{{ data }}</div>
    <PIC></PIC>
  </div>
</template>

<style lang="less" scoped>
.PI_B {
  width: 300px;
  height: 300px;
  background: blue;
  color: #fff;
}
</style>
PI_C.vue
<script setup lang="ts">
import { inject, Ref, ref } from "vue";

let data = inject<Ref<boolean>>("flag", ref(false)); // 两个参数, 前者是 key 后者是 默认值
</script>

<template>
  <div class="PI_C">
    <!-- 通过按钮改变 data 接受的 flag 值(取反)-->
    <button @click="data = !data">改变 flag</button>
    <h1>C 组件内容区域</h1>
    <h1>{{ data }}</h1>
  </div>
</template>

<style lang="less" scoped>
.PI_C {
  width: 300px;
  height: 300px;
  background: green;
  color: #fff;
}
</style>
底层逻辑是使用类似对象继承的方式实现的, 构造子对象的时候会自动继承父级的属性