组件系统
组件系统
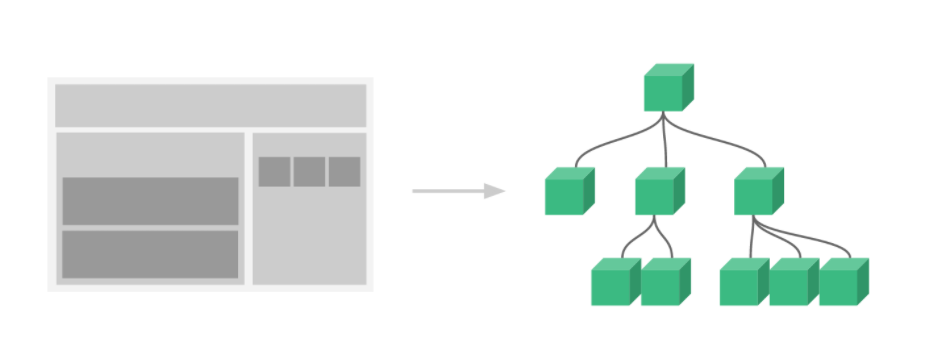
组件系统是 Vue 的另一个重要概念,因为它是一种抽象,允许我们使用小型、独立和通常可复用的组件构建大型应用。仔细想想,几乎任意类型的应用界面都可以抽象为一个组件树:
每一个 vue 文件都可以充当组件来使用, 每一个组件都可以复用
例如:
在组件
App.vue中通过Prop传数据给msg调用HelloWorld.vue组件
生命周期
下图展示了实例的生命周期。我们不需要立马弄明白所有的东西,不过随着不断学习和使用,它的参考价值会越来越高。

单文件组件 SFC(Single File Component)
<script setup> 是在单文件组件 (SFC) 中使用组合式 API 的编译时语法糖。相比于普通的 <script> 语法,它具有更多优势:
- 更少的样板内容,更简洁的代码。
- 能够使用纯 Typescript 声明 props 和抛出事件。
- 更好的运行时性能 (其模板会被编译成与其同一作用域的渲染函数,没有任何的中间代理)。
- 更好的 IDE 类型推断性能 (减少语言服务器从代码中抽离类型的工作)。
*.vue 组件都由三种类型的顶层语法块所组成:<template>、<script>、<style>
<template>- 每个
*.vue文件最多可同时包含一个顶层<template>块。 - 其中的内容会被提取出来并传递给
@vue/compiler-dom,预编译为 JavaScript 的渲染函数,并附属到导出的组件上作为其render选项。
- 每个
<script>- 每一个
*.vue文件最多可同时包含一个<script>块(不包括<script setup>) - 该脚本将作为 ES Module 来执行。
- 其默认导出的内容应该是 Vue 组件选项对象,它要么是一个普通的对象,要么是 defineComponent 的返回值。
- 每一个
<script setup>- 每个
*.vue文件最多可同时包含一个<script setup>块 (不包括常规的<script>) - 该脚本会被预处理并作为组件的
setup()函数使用,也就是说它会在每个组件实例中执行。<script setup>的顶层绑定会自动暴露给模板。更多详情请查看单文件组件 | Vue.js (vuejs.org)
- 每个
<style>- 一个
*.vue文件可以包含多个<style>标签。 <style>标签可以通过 scoped 或 module attribute 将样式封装在当前组件内。多个不同封装模式的<style>标签可以在同一个组件中混
- 一个
基本语法
<script setup>
console.log("hello script setup");
</script>
里面的代码会被编译成组件 setup() 函数的内容。这意味着与普通的 <script> 只在组件被首次引入的时候执行一次不同,<script setup> 中的代码会在每次组件实例被创建的时候执行
模板语法
v-on
Web/03-v-on 的事件修饰符.md at master · qianguyihao/Web (github.com)
修饰符
.stop阻止冒泡。调用event.stopPropagation()。.prevent阻止默认事件(默认行为) 。本质是调用 event.preventDefault()。.capture添加事件监听器时,使用捕获的方式(也就是说,事件采用捕获的方式,而不是采用冒泡的方式) 。.self只有当事件在该元素本身(比如不是子元素) 触发时,才会触发回调。.once事件只触发一次。.{keyCode | keyAlias}只当事件是从侦听器绑定的元素本身触发时,才触发回调。.native监听组件根元素的原生事件。
PS:一个事件,允许同时使用多个事件修饰符。
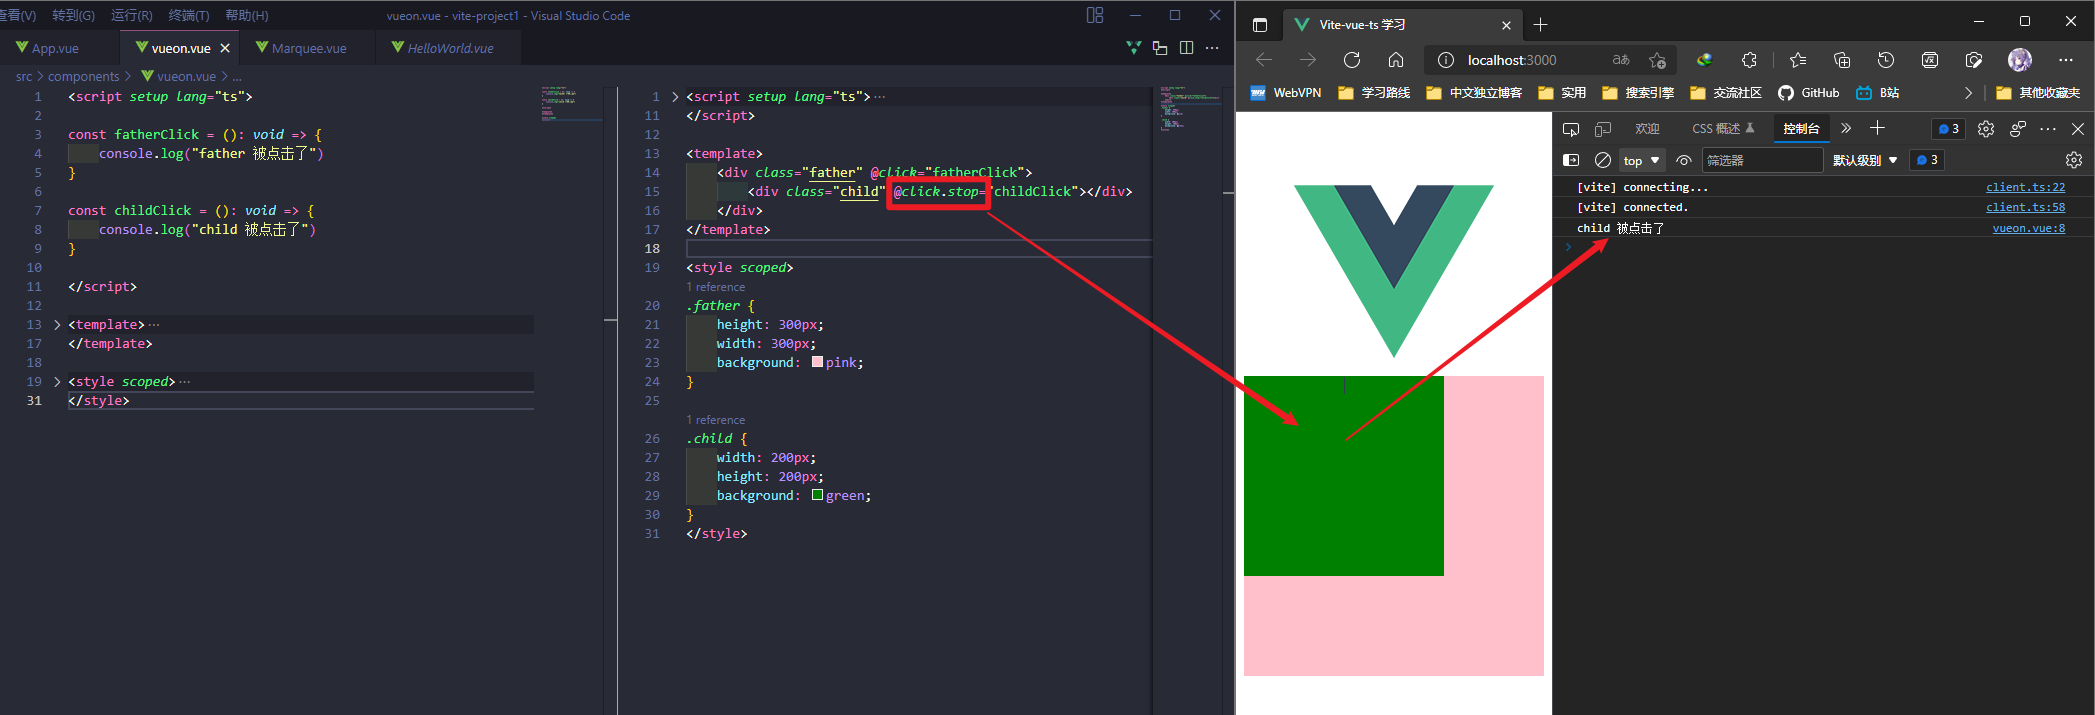
.stop
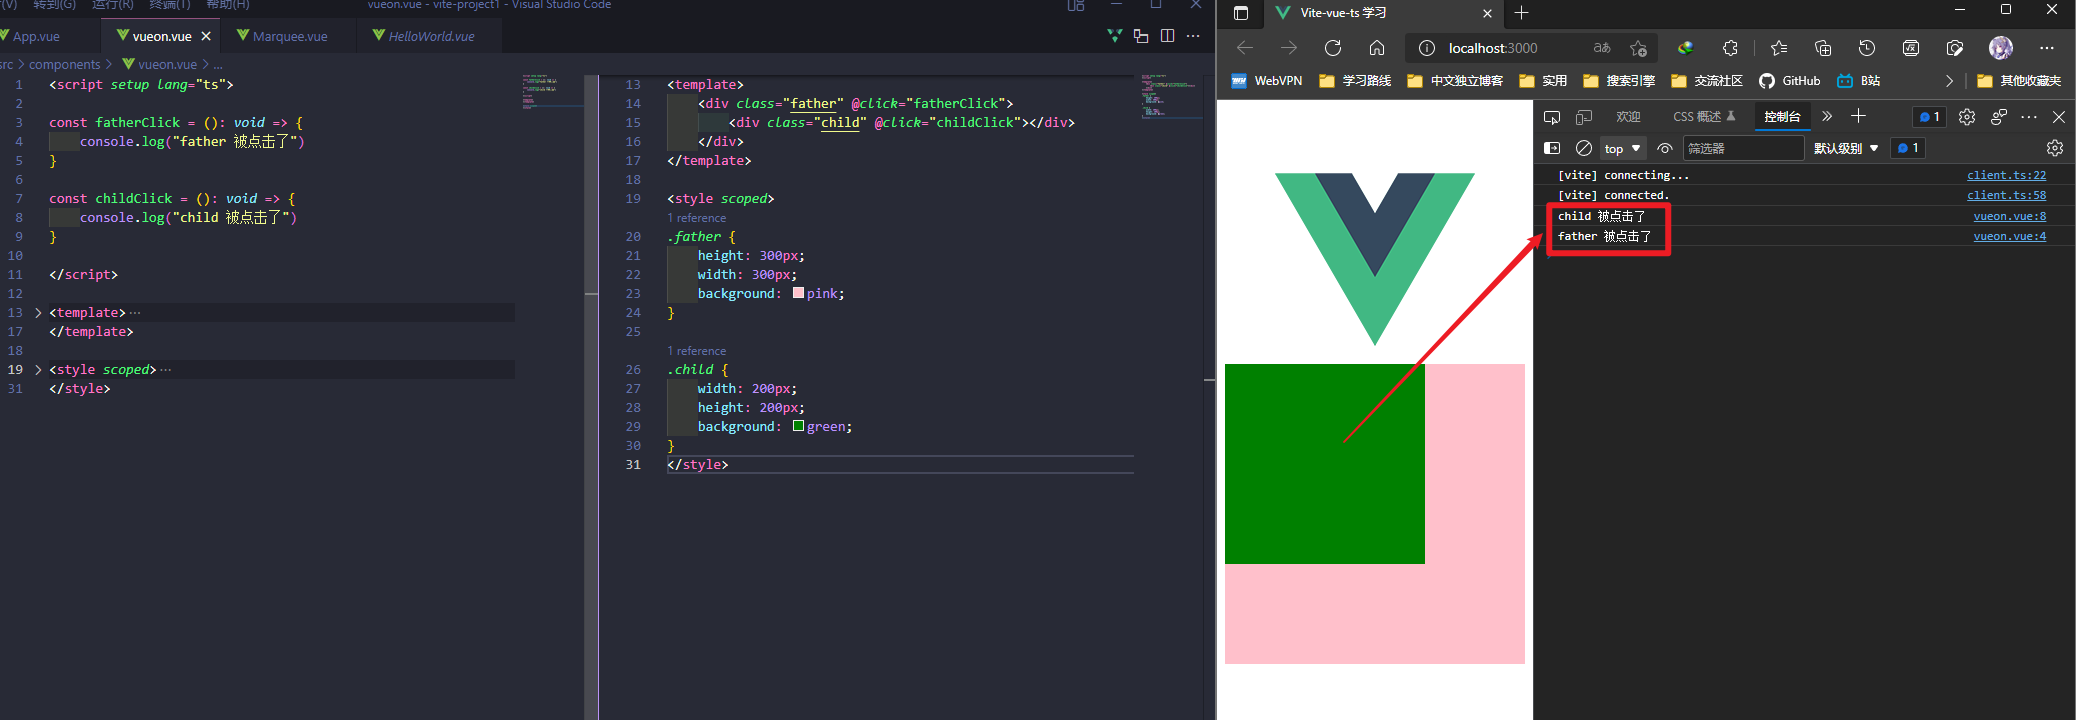
此代码冲存在冒泡现象, 当点击字标签(绿色区域)时父标签也被触发, 如果不想让字标签的点击事件冒泡到父标签可以给字标签添加一个事件修饰符 .stop 阻止冒泡
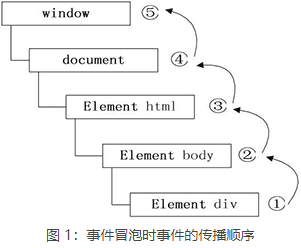
事件冒泡:当一个元素接收到事件时,会把它接收到的事件逐级向上传播给它的祖先元素,一直传到顶层的 window 对象(关于最后传播到的顶层对象,不同浏览器有可能不同,例如 IE9 及其以上的 IE、FireFox、Chrome、Safari 等浏览器,事件冒泡的顶层对象为 window 对象,而 IE7/8 顶层对象则为 document 对象) 。
例如,在 Chrome 浏览器中,当用户单击了
<div>元素,click 事件将按照<div>→<body>→<html>→document→window的顺序进行传播,如图 1 所示。事件冒泡可以形象地比喻为把一块石头投入水中,泡泡会一直从水底冒出水面,也就是说从下向上开始传播。
事件冒泡对所有浏览器都是默认存在的,且由元素的 HTML 结构决定,而不是由元素在页面中的位置决定,所以即便使用定位或浮动使元素脱离父元素的范围,单击元素时,其依然存在冒泡现象。
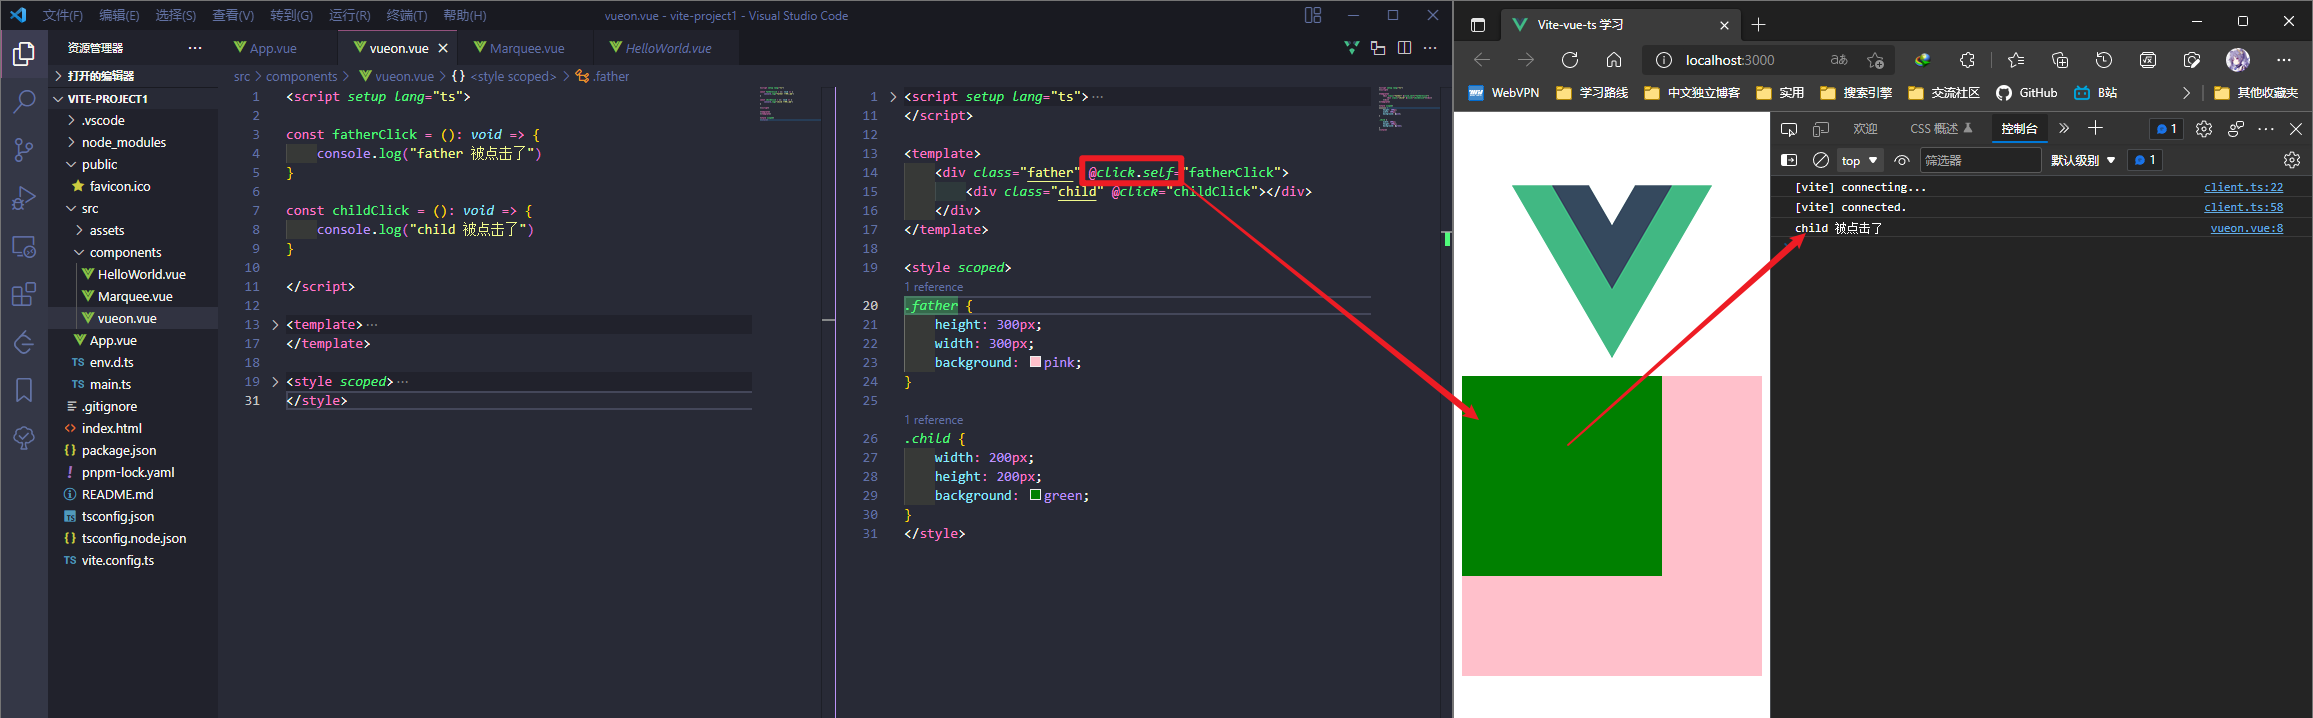
只是不想触发父组件的单击事件时也可以使用
.self将父组件的单击事件设置为仅当自己被点击时触发
v-model
v-bind可以实现数据的单向绑定v-model可以实现数据的双向绑定
v-model只能运用在表单元素中,或者用于自定义组件。常见的表单元素包括:input(radio, text, address, email....) 、select、checkbox 、textarea
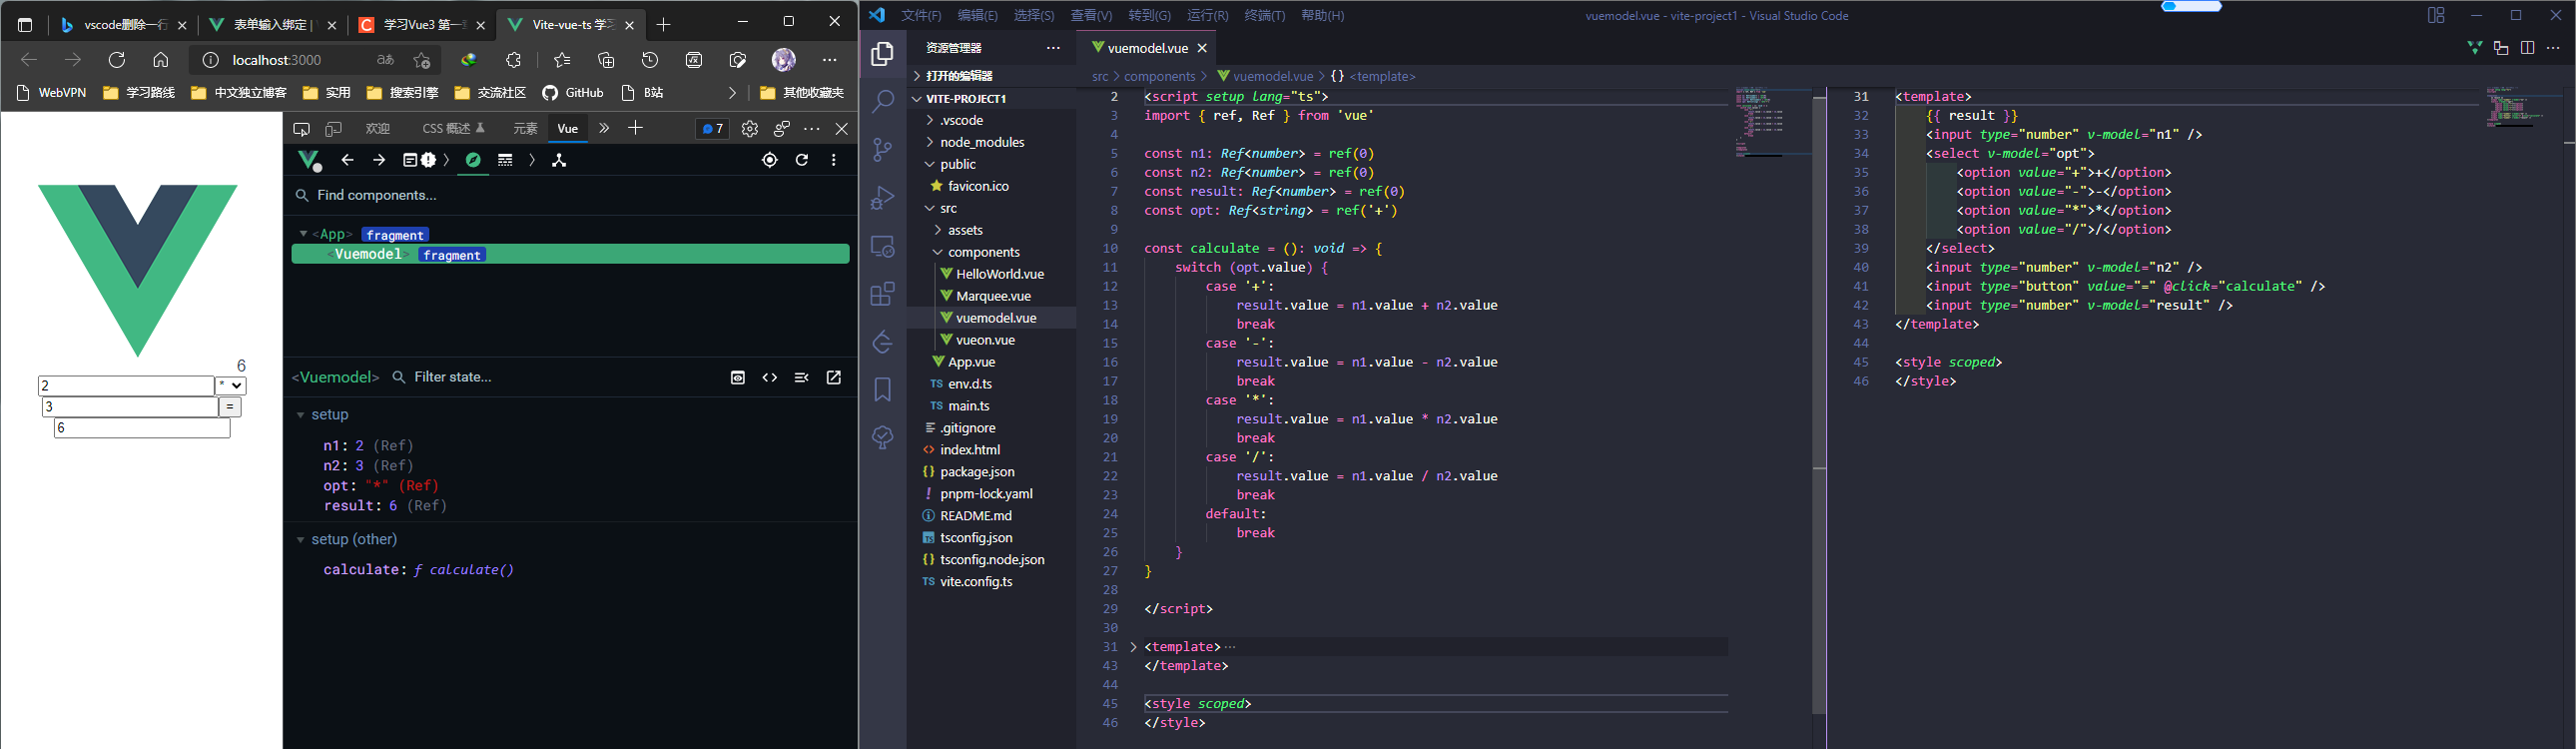
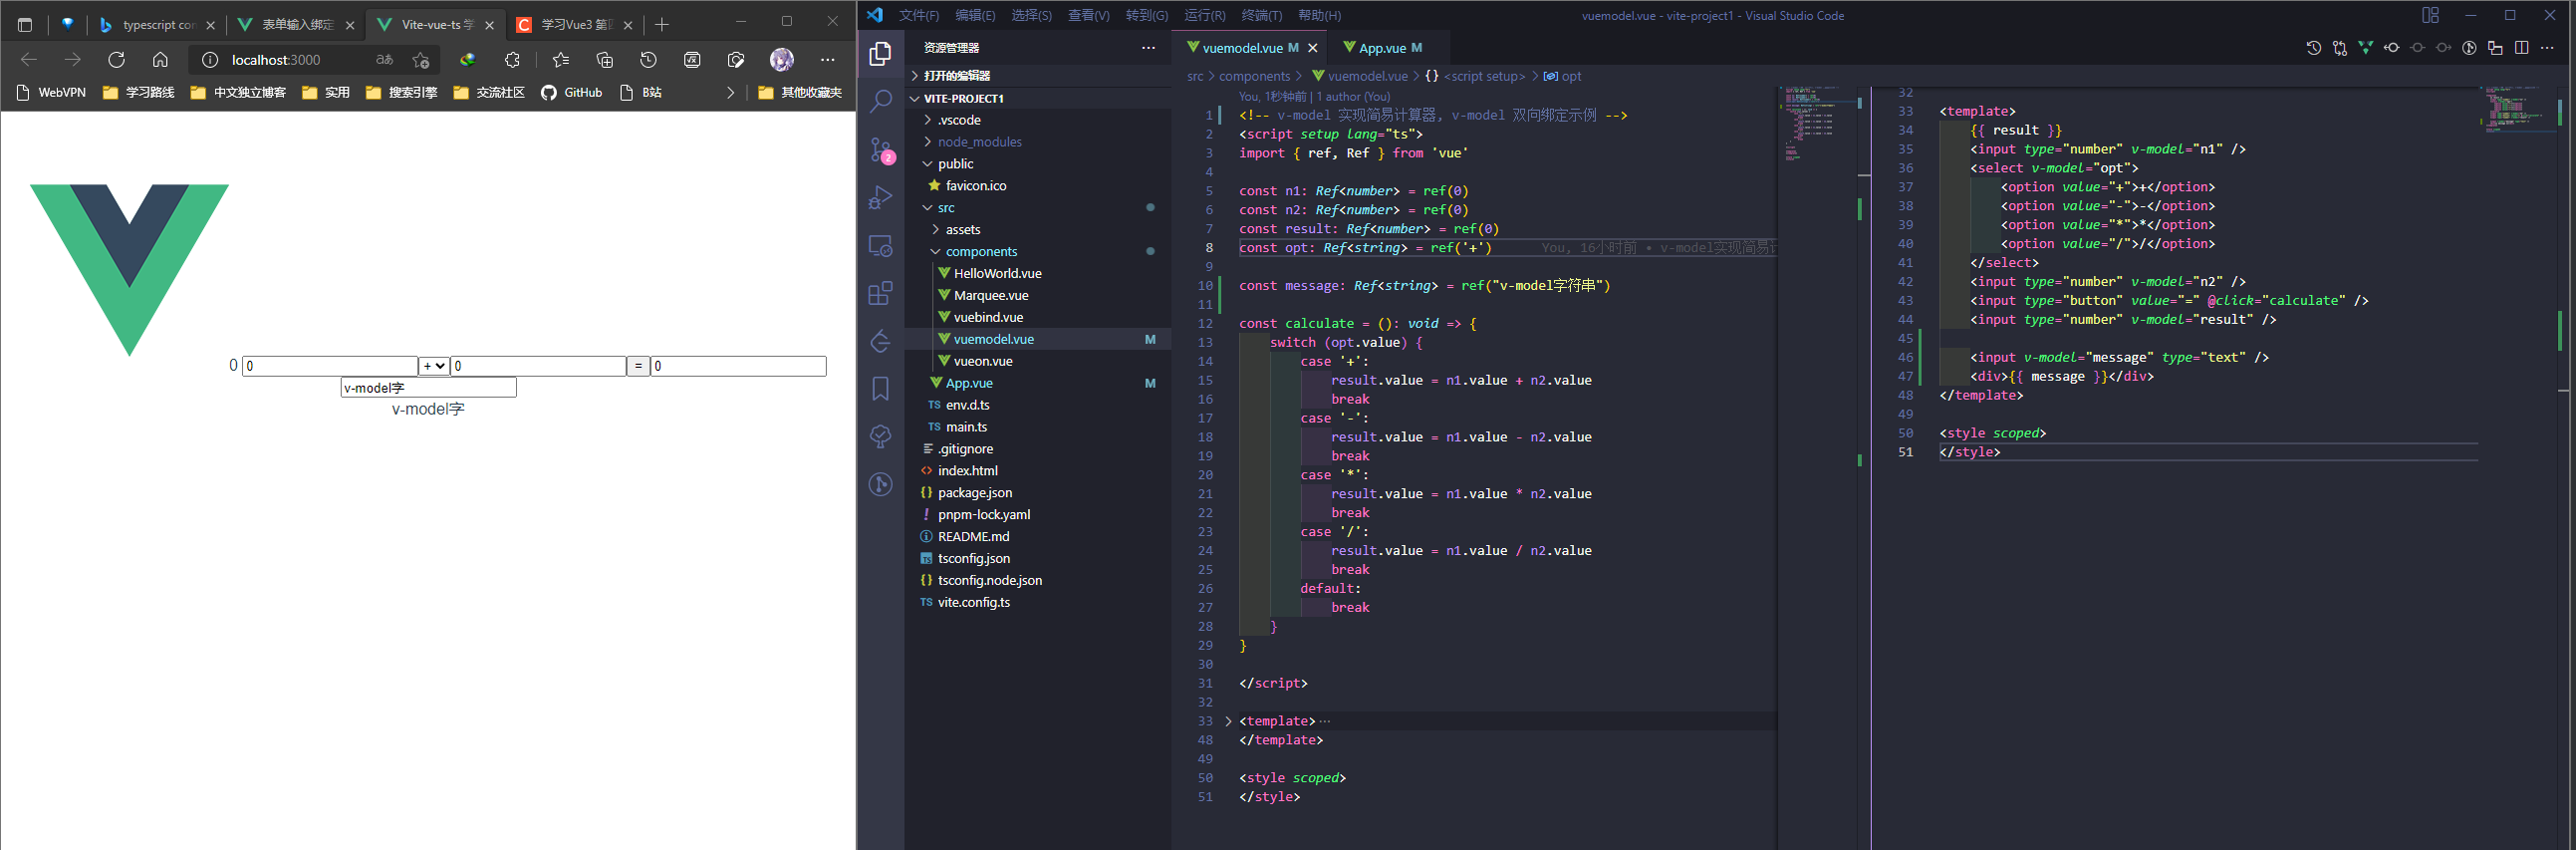
计算器示例
<!-- v-model 实现简易计算器, v-model 双向绑定示例 -->
<script setup lang="ts">
import { ref, Ref } from "vue";

const n1: Ref<number> = ref(0);
const n2: Ref<number> = ref(0);
const result: Ref<number> = ref(0);
const opt: Ref<string> = ref("+");

const message: Ref<string> = ref("v-model字符串");

const calculate = (): void => {
  switch (opt.value) {
    case "+":
      result.value = n1.value + n2.value;
      break;
    case "-":
      result.value = n1.value - n2.value;
      break;
    case "*":
      result.value = n1.value * n2.value;
      break;
    case "/":
      result.value = n1.value / n2.value;
      break;
    default:
      break;
  }
};
</script>

<template>
  {{ result }}
  <input type="number" v-model="n1" />
  <select v-model="opt">
    <option value="+">+</option>
    <option value="-">-</option>
    <option value="*">*</option>
    <option value="/">/</option>
  </select>
  <input type="number" v-model="n2" />
  <input type="button" value="=" @click="calculate" />
  <input type="number" v-model="result" />

  <input v-model="message" type="text" />
  <div>{{ message }}</div>
</template>

<style scoped></style>
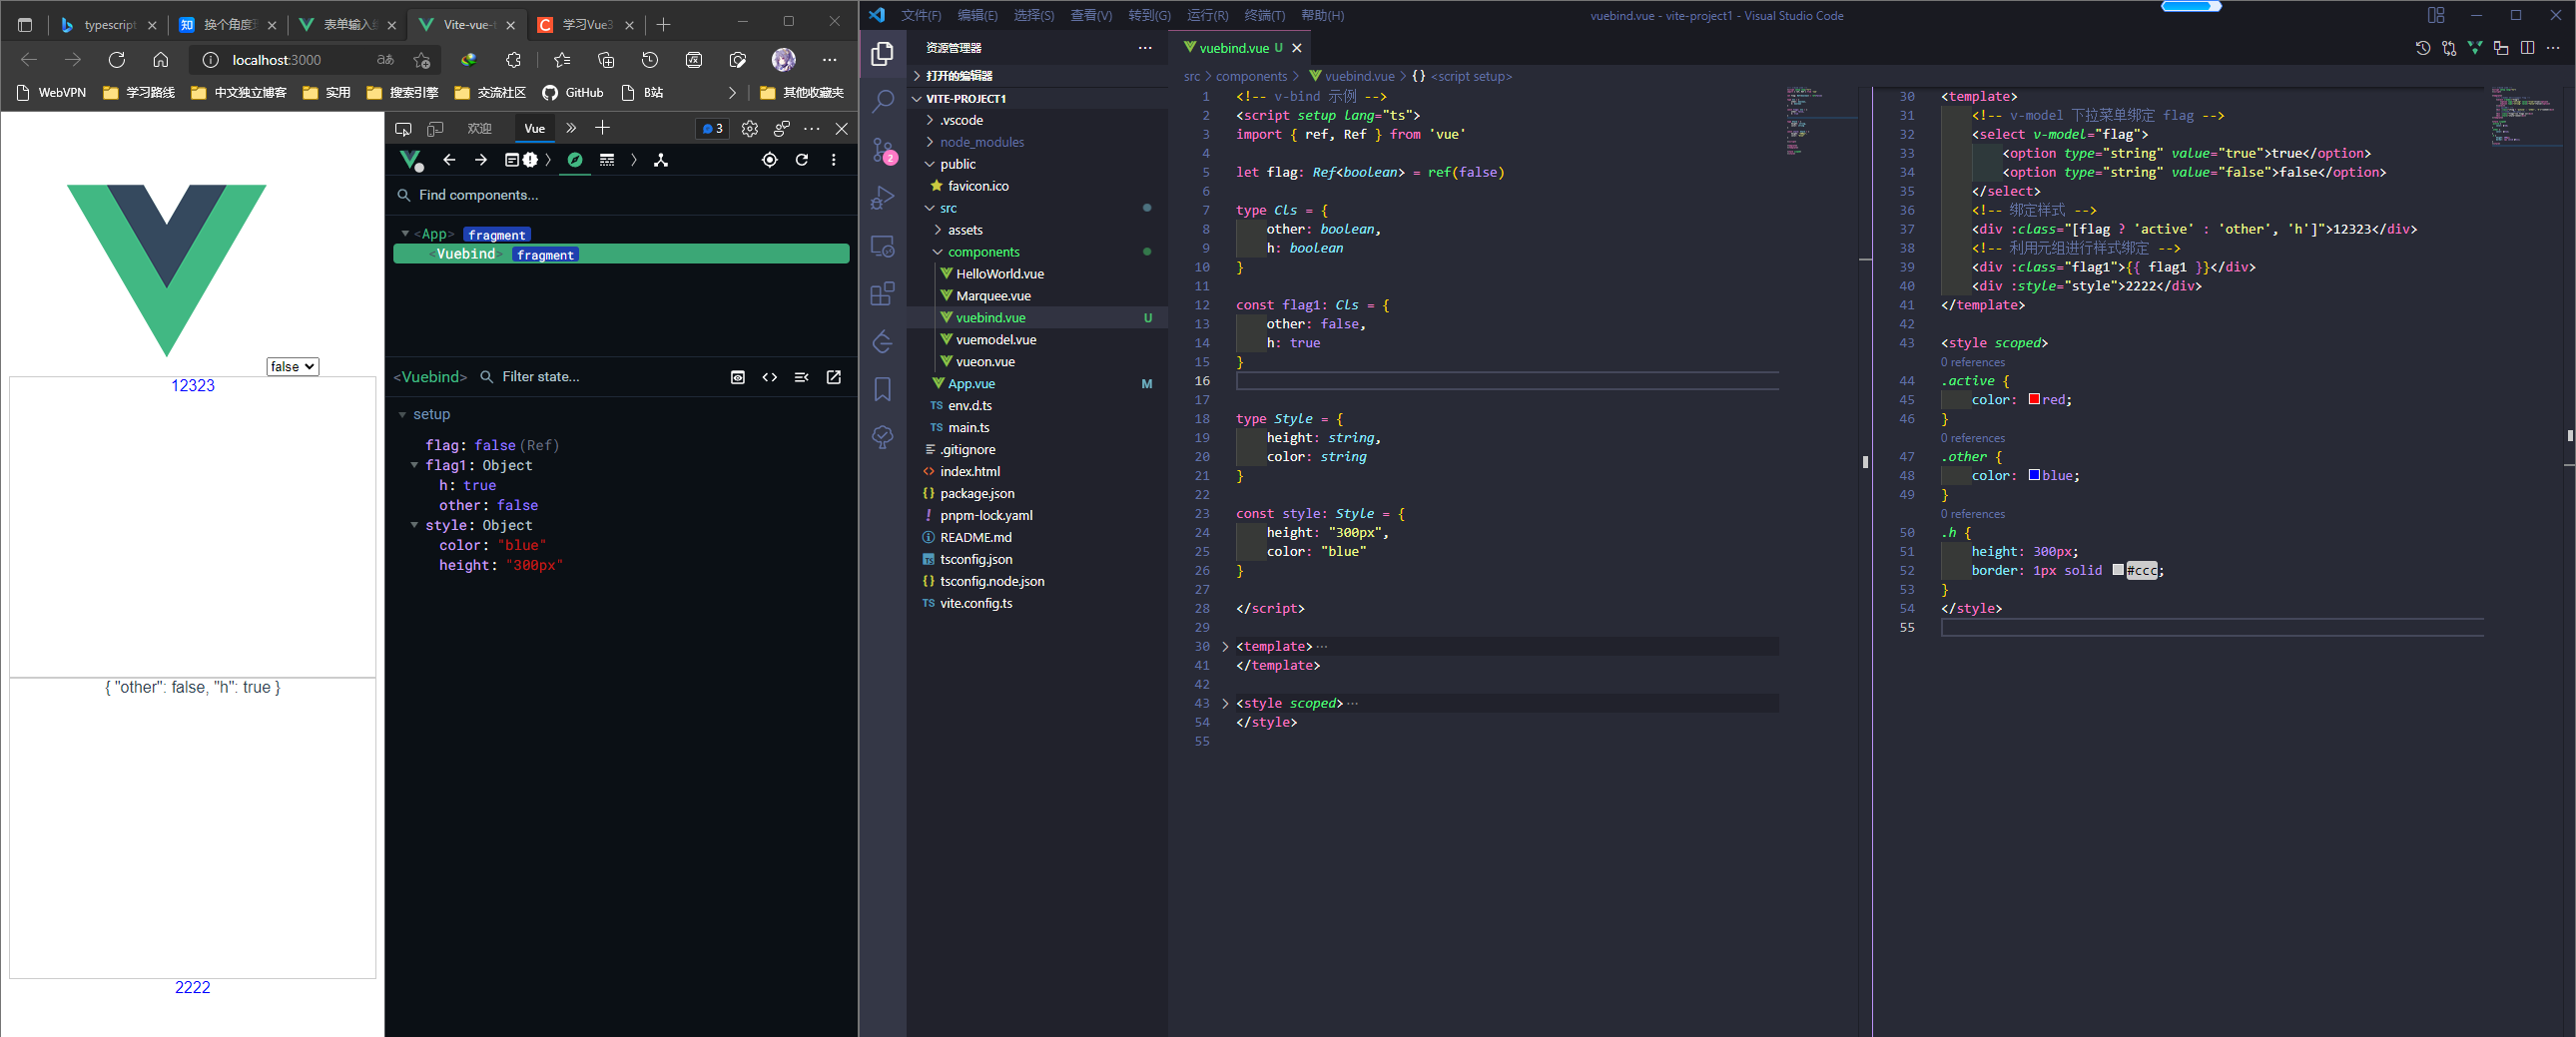
v-bind
v-bind 绑定 style 样例:
<!-- v-bind 示例 -->
<script setup lang="ts">
import { ref, Ref } from "vue";

let flag: Ref<boolean> = ref(false);

type Cls = {
  other: boolean;
  h: boolean;
};

const flag1: Cls = {
  other: false,
  h: true,
};

type Style = {
  height: string;
  color: string;
};

const style: Style = {
  height: "300px",
  color: "blue",
};
</script>

<template>
  <!-- v-model 下拉菜单绑定 flag -->
  <select v-model="flag">
    <option type="string" value="true">true</option>
    <option type="string" value="false">false</option>
  </select>
  <!-- 绑定样式 -->
  <div :class="[flag ? 'active' : 'other', 'h']">12323</div>
  <!-- 利用元组进行样式绑定 -->
  <div :class="flag1">{{ flag1 }}</div>
  <div :style="style">2222</div>
</template>

<style scoped>
.active {
  color: red;
}
.other {
  color: blue;
}
.h {
  height: 300px;
  border: 1px solid #ccc;
}
</style>
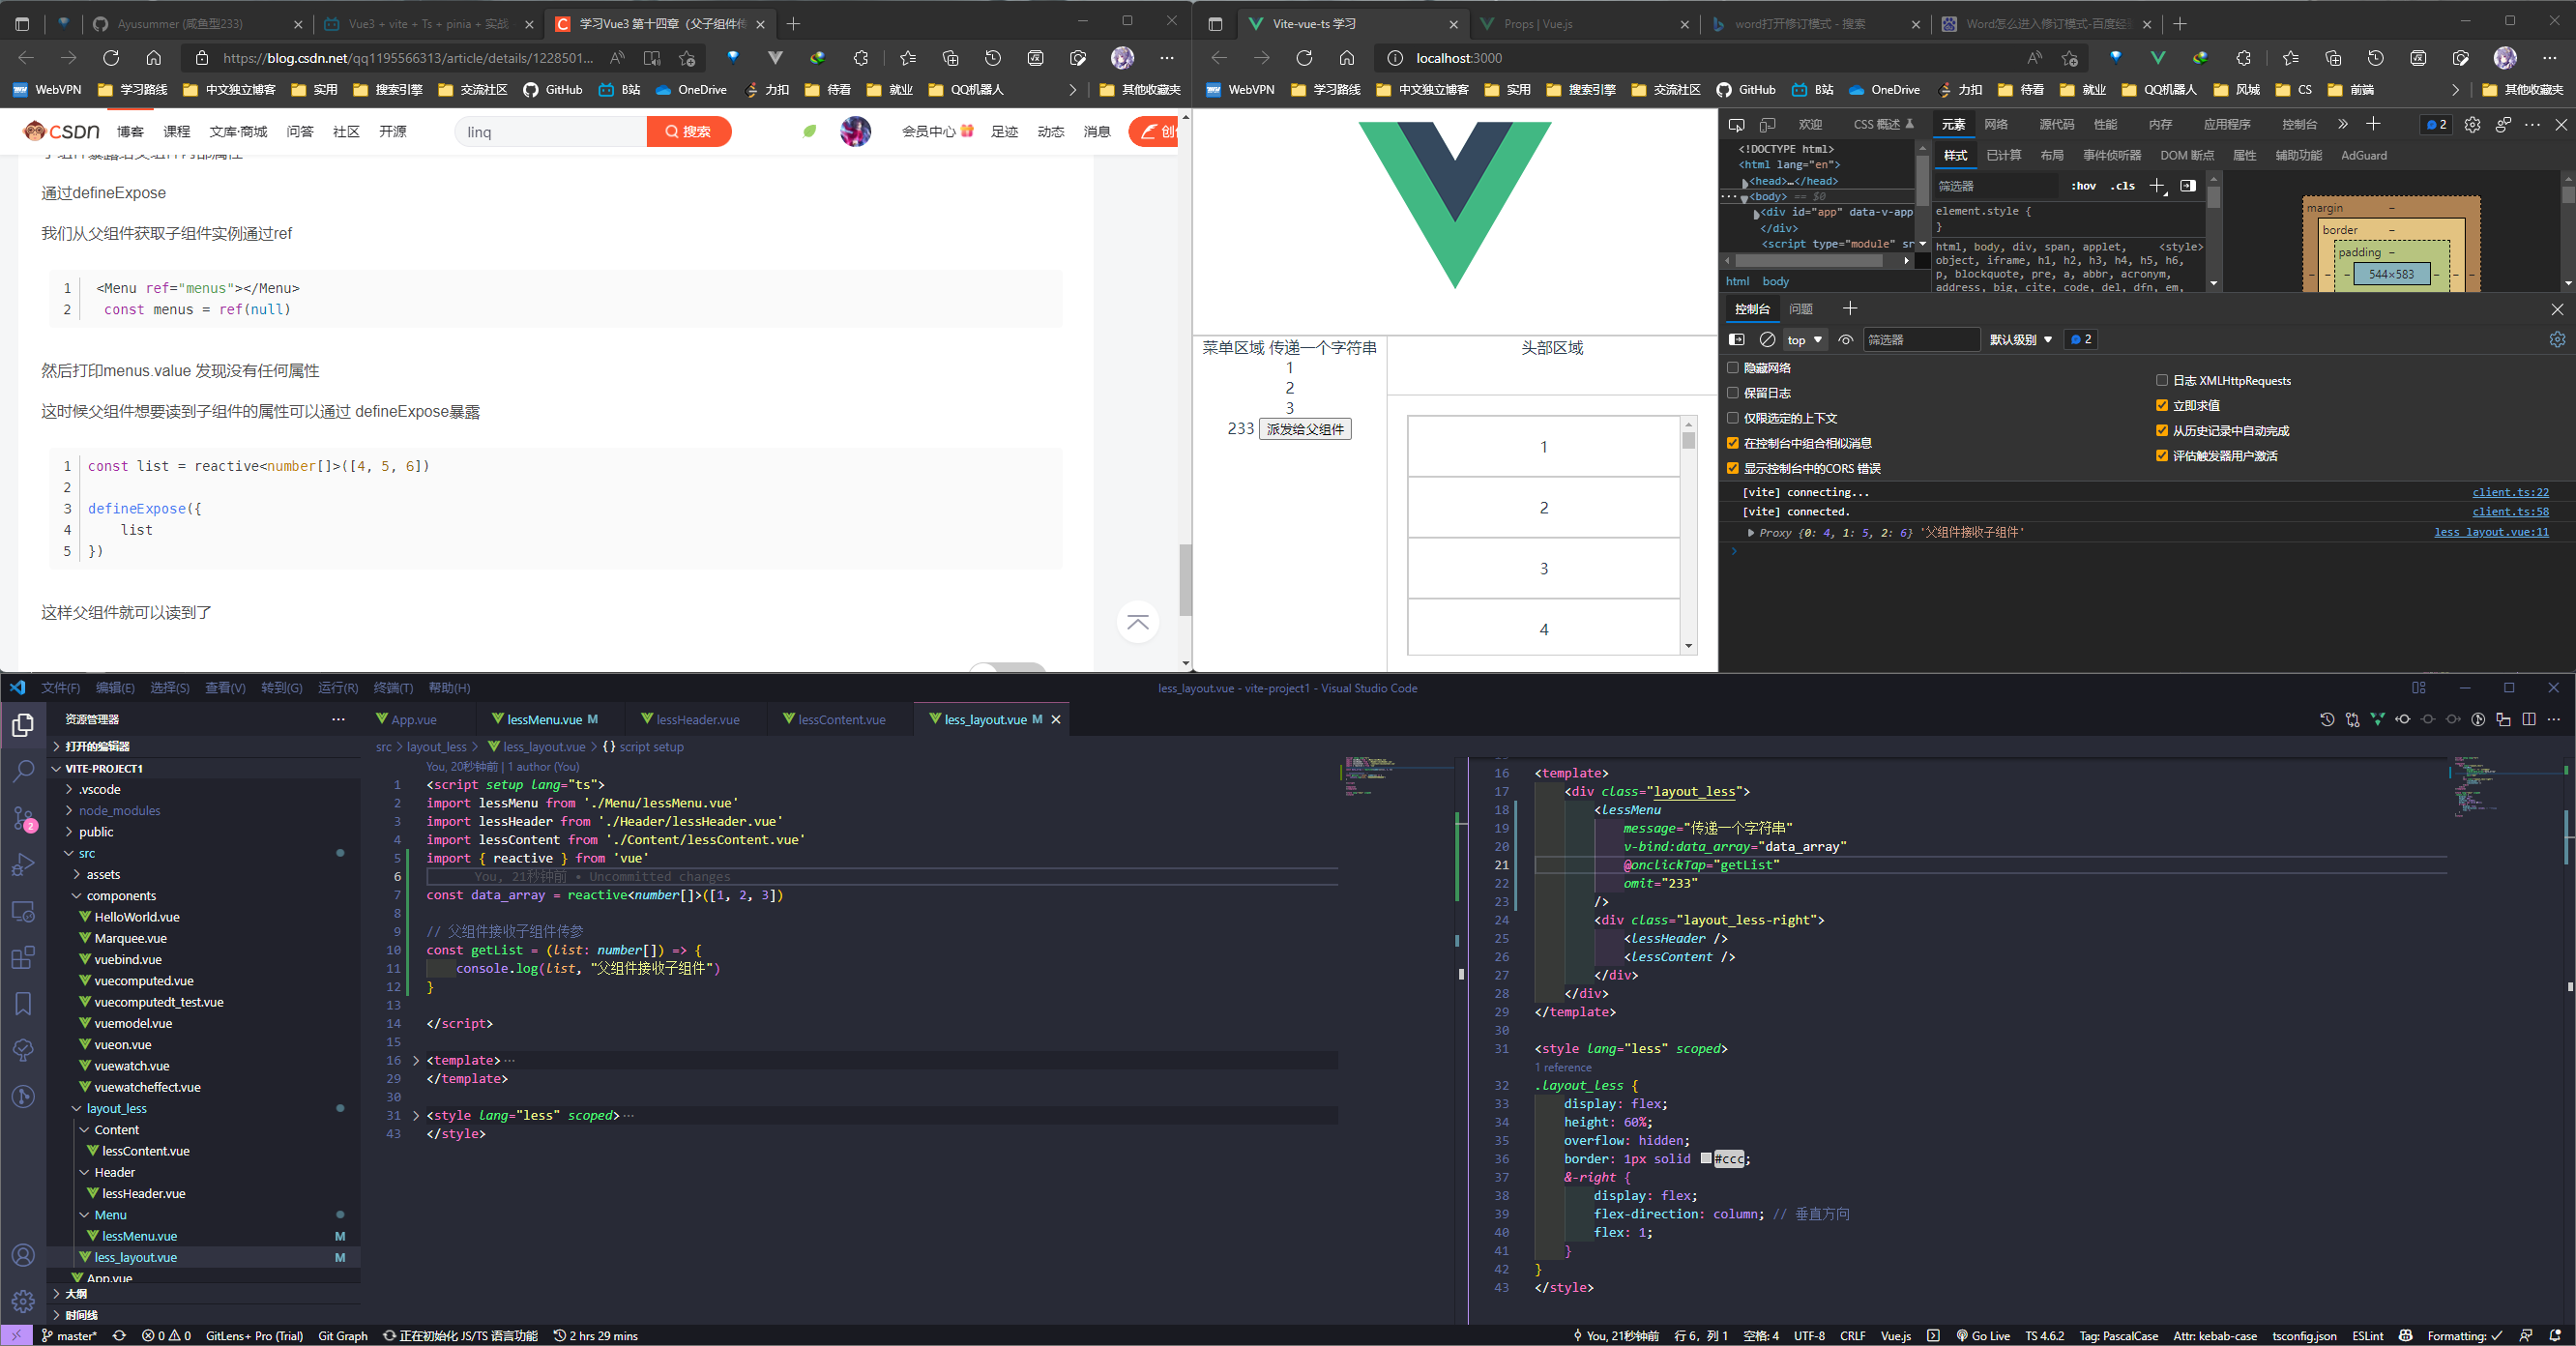
父子组件传参
父组件通过 v-bind 绑定一个数据,然后子组件通过 defineProps 接受传过来的值,
传递字符串
字符串传递可以直接在父组件调用子组件的之后写个字符串上去;
例如在父组件 less_layout 中调用子组件 lessMenu 时传一个字符串 message 过去
<script setup lang="ts">
import lessMenu from "./Menu/lessMenu.vue";
import lessHeader from "./Header/lessHeader.vue";
import lessContent from "./Content/lessContent.vue";
</script>

<template>
  <div class="layout_less">
    <lessMenu message="传递一个字符串" />
    <div class="layout_less-right">
      <lessHeader />
      <lessContent />
    </div>
  </div>
</template>

<style lang="less" scoped>
.layout_less {
  display: flex;
  height: 60%;
  overflow: hidden;
  border: 1px solid #ccc;
  &-right {
    display: flex;
    flex-direction: column; // 垂直方向
    flex: 1;
  }
}
</style>
子组件 lessMenu 则通过 defineProps 来接收父组件传递过来的值
defineProps是无需引入的直接使用即可
使用 TypeScript 的话可以使用传递字面量类型的纯类型语法做为参数
<script setup lang="ts">
defineProps<{
  message: string;
}>();
</script>

<template>
  <div class="menu_less">
    菜单区域
    {{ message }}
  </div>
</template>

<style lang="less" scoped>
.menu_less {
  width: 200px;
  border-right: 1px solid #ccc;
}
</style>
传递任意类型参数
父组件使用 v-bind 对子组件进行传参
<script setup lang="ts">
import lessMenu from "./Menu/lessMenu.vue";
import lessHeader from "./Header/lessHeader.vue";
import lessContent from "./Content/lessContent.vue";
import { reactive } from "vue";

const data_array = reactive<number[]>([1, 2, 3]);
</script>

<template>
  <div class="layout_less">
    <lessMenu message="传递一个字符串" v-bind:data_array="data_array" />
    <div class="layout_less-right">
      <lessHeader />
      <lessContent />
    </div>
  </div>
</template>

<style lang="less" scoped>
.layout_less {
  display: flex;
  height: 60%;
  overflow: hidden;
  border: 1px solid #ccc;
  &-right {
    display: flex;
    flex-direction: column; // 垂直方向
    flex: 1;
  }
}
</style>
子组件使用 definePops 接收父组件传递的参数
<script setup lang="ts">
defineProps<{
  message: string;
  data_array: number[];
}>();
</script>

<template>
  <div class="menu_less">
    菜单区域
    {{ message }}
    <div v-for="item in data_array" :key="item">{{ item }}</div>
  </div>
</template>

<style lang="less" scoped>
.menu_less {
  width: 200px;
  border-right: 1px solid #ccc;
}
</style>
参数默认值
TS 特有的默认值方式
withDefaults 是个函数也是无须引入开箱即用接受一个 props 函数第二个参数是一个对象设置默认值
例如:
<script setup lang="ts">
type Props = {
  message?: string;
  data_array?: number[];
  omit?: string;
};
withDefaults(defineProps<Props>(), {
  message: "Hello World",
  data_array: () => [1, 2, 3],
  omit: "omit",
});
</script>

<template>
  <div class="menu_less">
    菜单区域
    {{ message }}
    <div v-for="item in data_array" :key="item">{{ item }}</div>
    {{ omit }}
  </div>
</template>

<style lang="less" scoped>
.menu_less {
  width: 200px;
  border-right: 1px solid #ccc;
}
</style>
子组件给父组件传参
在子组件绑定一个 click 事件, 然后通过 defineEmits 注册一个自定义事件, 点击 click 触发 emit 调用注册的时间然后传递参数
<script setup lang="ts">
import { reactive } from "vue";

/* 子组件给父组件传参 */
const list = reactive<number[]>([4, 5, 6]);
const emit = defineEmits(["onclickTap"]);
const clickTap = () => {
  emit("onclickTap", list);
};

// 参数默认值
type Props = {
  message?: string;
  data_array?: number[];
  omit?: string;
};
withDefaults(defineProps<Props>(), {
  message: "Hello World",
  data_array: () => [1, 2, 3],
  omit: "omit",
});
</script>

<template>
  <div class="menu_less">
    菜单区域
    {{ message }}
    <div v-for="item in data_array" :key="item">{{ item }}</div>
    {{ omit }}
    <button @click="clickTap">派发给父组件</button>
  </div>
</template>

<style lang="less" scoped>
.menu_less {
  width: 200px;
  border-right: 1px solid #ccc;
}
</style>
父组件接收子组件的事件
<script setup lang="ts">
import lessMenu from "./Menu/lessMenu.vue";
import lessHeader from "./Header/lessHeader.vue";
import lessContent from "./Content/lessContent.vue";
import { reactive } from "vue";

const data_array = reactive<number[]>([1, 2, 3]);

// 父组件接收子组件传参
const getList = (list: number[]) => {
  console.log(list, "父组件接收子组件");
};
</script>

<template>
  <div class="layout_less">
    <lessMenu
      message="传递一个字符串"
      v-bind:data_array="data_array"
      @onclickTap="getList"
      omit="233"
    />
    <div class="layout_less-right">
      <lessHeader />
      <lessContent />
    </div>
  </div>
</template>

<style lang="less" scoped>
.layout_less {
  display: flex;
  height: 60%;
  overflow: hidden;
  border: 1px solid #ccc;
  &-right {
    display: flex;
    flex-direction: column; // 垂直方向
    flex: 1;
  }
}
</style>
需要注意的是: 虽然子组件传过来的是个
reactive<number[]>, 父组件的接收函数中的参数类型应但是number[], 否则将无法正常接收
子组件暴露给父组件内部属性
通过 defineExpose 将子组件的内部属性暴露给父组件
<script setup lang="ts">
import { reactive } from "vue";

/* 子组件通过 defineExpose 将内部属性 exposeArray 暴露给父组件 */
const exposeArray = reactive<number[]>([7, 8, 9]);
defineExpose({
  exposeArray,
});

/* 子组件给父组件传参 */
const list = reactive<number[]>([4, 5, 6]);
const emit = defineEmits(["onclickTap"]);
const clickTap = () => {
  emit("onclickTap", list);
};

// 参数默认值
type Props = {
  message?: string;
  data_array?: number[];
  omit?: string;
};
withDefaults(defineProps<Props>(), {
  message: "Hello World",
  data_array: () => [1, 2, 3],
  omit: "omit",
});
</script>

<template>
  <div class="menu_less">
    菜单区域
    {{ message }}
    <div v-for="item in data_array" :key="item">{{ item }}</div>
    {{ omit }}
    <button @click="clickTap">派发给父组件</button>
  </div>
</template>

<style lang="less" scoped>
.menu_less {
  width: 200px;
  border-right: 1px solid #ccc;
}
</style>
父组件通过 ref 接收子组件暴露给父组件的内部属性
<script setup lang="ts">
import lessMenu from "./Menu/lessMenu.vue";
import lessHeader from "./Header/lessHeader.vue";
import lessContent from "./Content/lessContent.vue";
import { reactive, ref } from "vue";

const exposeArrayFromMenu = ref(null);

const data_array = reactive<number[]>([1, 2, 3]);

// 父组件接收子组件传参
const getList = (list: number[]) => {
  console.log(list, "父组件接收子组件");
};
</script>

<template>
  <div class="layout_less">
    {{ exposeArrayFromMenu }}
    <lessMenu
      message="传递一个字符串"
      v-bind:data_array="data_array"
      @onclickTap="getList"
      omit="233"
      ref="exposeArrayFromMenu"
    />
    <div class="layout_less-right">
      <lessHeader />
      <lessContent />
    </div>
  </div>
</template>

<style lang="less" scoped>
.layout_less {
  display: flex;
  height: 60%;
  overflow: hidden;
  border: 1px solid #ccc;
  &-right {
    display: flex;
    flex-direction: column; // 垂直方向
    flex: 1;
  }
}
</style>
兄弟组件传参
利用父组件中转实现兄弟组件传参
BCTP_A.vue:
<!-- 与 B 组件互为兄弟组件 -->
<script setup lang="ts">
import { ref, Ref } from "vue";

const emit = defineEmits(["transferFlag"]);
let flag: Ref<boolean> = ref(false);

const emitFlag = () => {
  flag.value = !flag.value;
  console.log("A组件待传值flag:" + flag.value + "到父组件");
  emit("transferFlag", flag.value);
};
</script>

<template>
  <div class="BCTP_A">
    <button @click="emitFlag">flag 取反并传给 parent</button>
  </div>
</template>

<style lang="less" scoped>
.BCTP_A {
  width: 200px;
  height: 200px;
  background: blue;
  color: #fff;
}
</style>
BCTP_parent.vue:
<!-- 兄弟组件传参-父组件 -->
<script setup lang="ts">
import BCTP_A from "./BCTP_A.vue";
import BCTP_B from "./BCTP_B.vue";
import { Ref, ref } from "vue";
// 定义一个 ref 变量, 用于接收 BCTP_A 组件的 flag 值, 并且设置默认值为 false
let BCTP_A_flag: Ref<boolean> = ref(false);
// 接收 BCTP_A 组件传递过来的 flag 值
const getFlag = (flag: boolean) => {
  BCTP_A_flag.value = flag;
  console.log("父组件接收到 A 组件的传值为:", BCTP_A_flag.value);
};
</script>

<template>
  <div>
    <BCTP_A @transferFlag="getFlag"></BCTP_A>
    <BCTP_B :flag="BCTP_A_flag"></BCTP_B>
  </div>
</template>

<style lang="less" scoped></style>
BCTP_B.vue
<!-- 与 A 组件互为兄弟组件 -->
<script setup lang="ts">
type Props = {
  flag: boolean;
};
defineProps<Props>();
</script>

<template>
  <div class="BCTP_B">B 组件接收到父组件传过来的值为: {{ flag }}</div>
</template>

<style lang="less" scoped>
.BCTP_B {
  width: 200px;
  height: 200px;
  background: green;
  color: #fff;
}
</style>
虽然这种凭借父组件中转的方法可以实现兄弟组件之间的传参, 但是这样做未免太过繁琐, 每次传参都需要写三处传入传出
通过发布订阅模式传参
Bus.ts
type BusClass<T> = {
  emit: (name: T) => void;
  on: (name: T, callback: Function) => void;
};
type BusParams = string | number | symbol;
type List = {
  [key: BusParams]: Array<Function>;
};
class Bus<T extends BusParams> implements BusClass<T> {
  list: List;
  constructor() {
    this.list = {};
  }
  emit(name: T, ...args: Array<any>) {
    let eventName: Array<Function> = this.list[name];
    eventName.forEach((ev) => {
      ev.apply(this, args);
    });
  }
  on(name: T, callback: Function) {
    let fn: Array<Function> = this.list[name] || [];
    fn.push(callback);
    this.list[name] = fn;
  }
}

export default new Bus<string>();
BCTP_A.vue:
<!-- 与 B 组件互为兄弟组件 -->
<script setup lang="ts">
import { ref, Ref } from "vue";
import Bus from "../../Bus";

const emit = defineEmits(["transferFlag"]);
let flag: Ref<boolean> = ref(false);

const emitFlag = () => {
  flag.value = !flag.value;
  console.log("A组件待传值flag:" + flag.value + "到父组件");
  emit("transferFlag", flag.value);
};

// 使用 bus 传值给 B 组件
const emitFlagToBByBus = () => {
  flag.value = !flag.value;
  Bus.emit("transferFlagToBByBus", flag.value);
};
</script>

<template>
  <div class="BCTP_A">
    <button @click="emitFlag">flag 取反并传给 parent</button>
    <button @click="emitFlagToBByBus">flag 取反并通过 Bus 派发给 B 组件</button>
  </div>
</template>

<style lang="less" scoped>
.BCTP_A {
  width: 200px;
  height: 200px;
  background: blue;
  color: #fff;
}
</style>
BCTP_B.vue:
<!-- 与 A 组件互为兄弟组件 -->
<script setup lang="ts">
import Bus from "../../Bus";
import { ref, Ref } from "vue";

let flagB = ref(false); // 定义一个 ref 变量, 用于接收 A 组件的 flag 值, 并且设置默认值为 false

type Props = {
  flag: boolean;
};
defineProps<Props>();

// 利用 Bus 接收 A 组件派发的 flag
Bus.on("transferFlagToBByBus", (flag: boolean) => {
  flagB.value = flag;
  console.log("B 组件接收到 A 组件的传值为:", flagB.value);
});
</script>

<template>
  <div class="BCTP_B">
    <div>B 组件接收到父组件传过来的值为: {{ flag }}</div>
    <div>B 组件从 Bus 接收到从 A 组件传过来的值为: {{ flagB }}</div>
  </div>
</template>

<style lang="less" scoped>
.BCTP_B {
  width: 200px;
  height: 200px;
  background: green;
  color: #fff;
}
</style>
全局组件
有些组件使用频率非常高, 几乎每个界面都在使用
此前的示例中我使用的是
vite构建的初始模板, 之后的组件注册主要是在模块系统中进行的局部注册组件注册-在模块系统中局部注册 | Vue.js (vuejs.org)
创建一个
components目录,并将每个组件放置在其各自的文件中。在局部注册之前导入每个你想使用的组件。例如,假设在
App.vue文件中:<script setup lang="ts"> // This starter template is using Vue 3 <script setup> SFCs // Check out https://v3.vuejs.org/api/sfc-script-setup.html#sfc-script-setup import HelloWorld from "./components/HelloWorld.vue"; import Marquee from "./components/Marquee.vue"; import VueOn from "./components/vueon.vue"; import VueModel from "./components/vuemodel.vue"; import VueBind from "./components/vuebind.vue"; import VueComputed from "./components/vuecomputed.vue"; import VueComputedT from "./components/vuecomputedt_test.vue"; import VueWatch from "./components/vuewatch.vue"; import Vuewatch from "./components/vuewatch.vue"; import Vuewatcheffect from "./components/vuewatcheffect.vue"; import lessLayout from "./layout_less/less_layout.vue"; </script> <template> <div class="vueLogo"> <img alt="Vue logo" src="./assets/logo.png" /> </div> <!-- <HelloWorld msg="Hello Vue 3 + TypeScript + Vite" /> --> <!-- <HelloWorld msg="233" /> --> <!-- <Marquee /> --> <!-- <VueOn /> --> <!-- <VueModel /> --> <!-- <VueBind /> --> <!-- <VueComputed /> --> <!-- <VueComputedT /> --> <!-- <Vuewatch /> --> <!-- <vuewatcheffect /> --> <lessLayout /> </template> <style lang="less"> html, body, #app { // font-family: Avenir, Helvetica, Arial, sans-serif; // -webkit-font-smoothing: antialiased; // -moz-osx-font-smoothing: grayscale; text-align: center; color: #2c3e50; // margin-top: 60px; height: 100%; overflow: hidden; } .vueLogo { height: 40%; border: 1px solid #ccc; } </style>
例如: 封装一个 Card 组件
card.vue:
<!-- 全局组件学习: 封装一个 Card 组件 -->
<script setup lang="ts">
type Props = {
  content: string;
};
defineProps<Props>();

// 两种写法是一致的
// defineProps<{
//     content: string
// }>()
</script>

<template>
  <div class="card">
    <div class="card-header">
      <div>标题</div>
      <div>副标题</div>
    </div>
    <div v-if="content" class="card-content">{{ content }}</div>
  </div>
</template>

<style lang="less" scoped>
@border: #ccc;
.card {
  width: 300px;
  border: 1px solid @border;
  border-radius: 3px;
  &:hover {
    box-shadow: 0 0 10px @border;
  }

  &-content {
    padding: 10px;
  }
  &-header {
    display: flex;
    justify-content: space-between;
    padding: 10px;
    border-bottom: 1px solid @border;
  }
}
</style>
然后在 main.ts 引入 card 组件跟随在 createApp(App) 后面;
切记不能放到
mount后面这是一个链式调用调用
component第一个参数组件名称 第二个参数组件实例
main.ts
import { createApp } from "vue";
import App from "./App.vue";
import "./assets/css/reset.less";
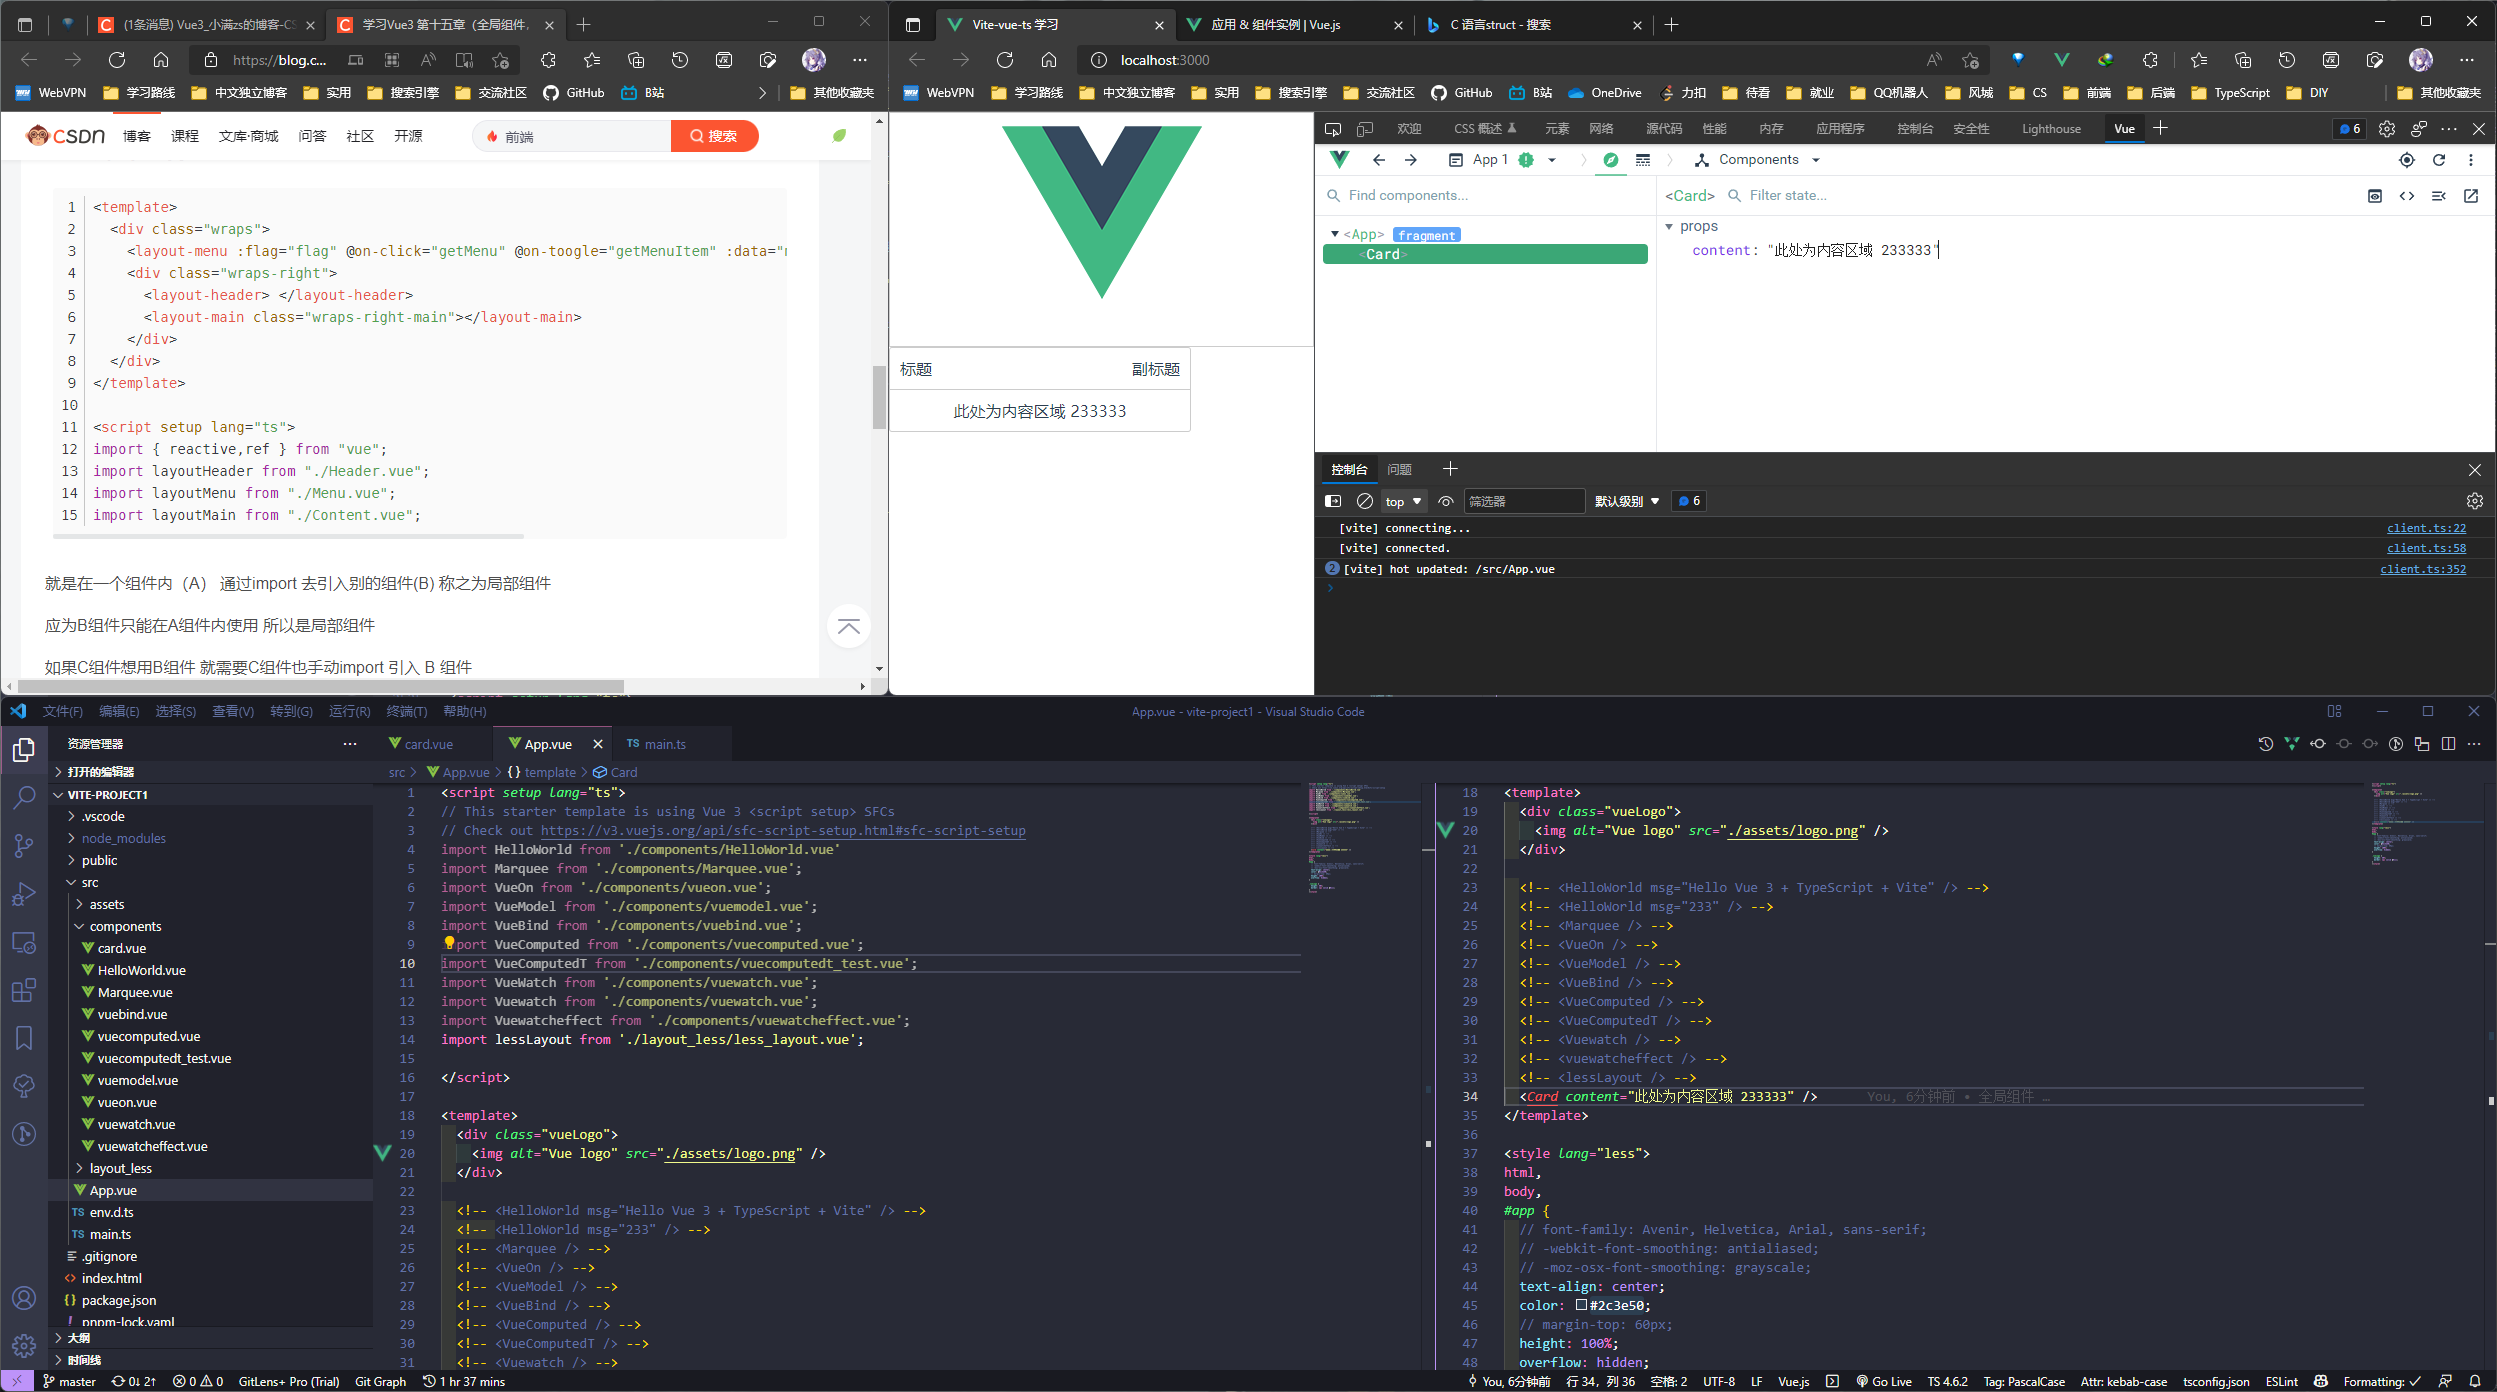
import Card from "./components/Card.vue";
createApp(App).component("Card", Card).mount("#app");
如此一来在其他 vue 页面无需引入 card 组件 可以直接使用
App.vue
<script setup lang="ts">
// This starter template is using Vue 3 <script setup> SFCs
// Check out https://v3.vuejs.org/api/sfc-script-setup.html#sfc-script-setup
import HelloWorld from "./components/HelloWorld.vue";
import Marquee from "./components/Marquee.vue";
import VueOn from "./components/vueon.vue";
import VueModel from "./components/vuemodel.vue";
import VueBind from "./components/vuebind.vue";
import VueComputed from "./components/vuecomputed.vue";
import VueComputedT from "./components/vuecomputedt_test.vue";
import VueWatch from "./components/vuewatch.vue";
import Vuewatch from "./components/vuewatch.vue";
import Vuewatcheffect from "./components/vuewatcheffect.vue";
import lessLayout from "./layout_less/less_layout.vue";
</script>

<template>
  <div class="vueLogo">
    <img alt="Vue logo" src="./assets/logo.png" />
  </div>

  <!-- <HelloWorld msg="Hello Vue 3 + TypeScript + Vite" /> -->
  <!-- <HelloWorld msg="233" /> -->
  <!-- <Marquee /> -->
  <!-- <VueOn /> -->
  <!-- <VueModel /> -->
  <!-- <VueBind /> -->
  <!-- <VueComputed /> -->
  <!-- <VueComputedT /> -->
  <!-- <Vuewatch /> -->
  <!-- <vuewatcheffect /> -->
  <!-- <lessLayout /> -->
  <Card content="此处为内容区域 233333" />
</template>

<style lang="less">
html,
body,
#app {
  // font-family: Avenir, Helvetica, Arial, sans-serif;
  // -webkit-font-smoothing: antialiased;
  // -moz-osx-font-smoothing: grayscale;
  text-align: center;
  color: #2c3e50;
  // margin-top: 60px;
  height: 100%;
  overflow: hidden;
}

.vueLogo {
  height: 40%;
  border: 1px solid #ccc;
}
</style>
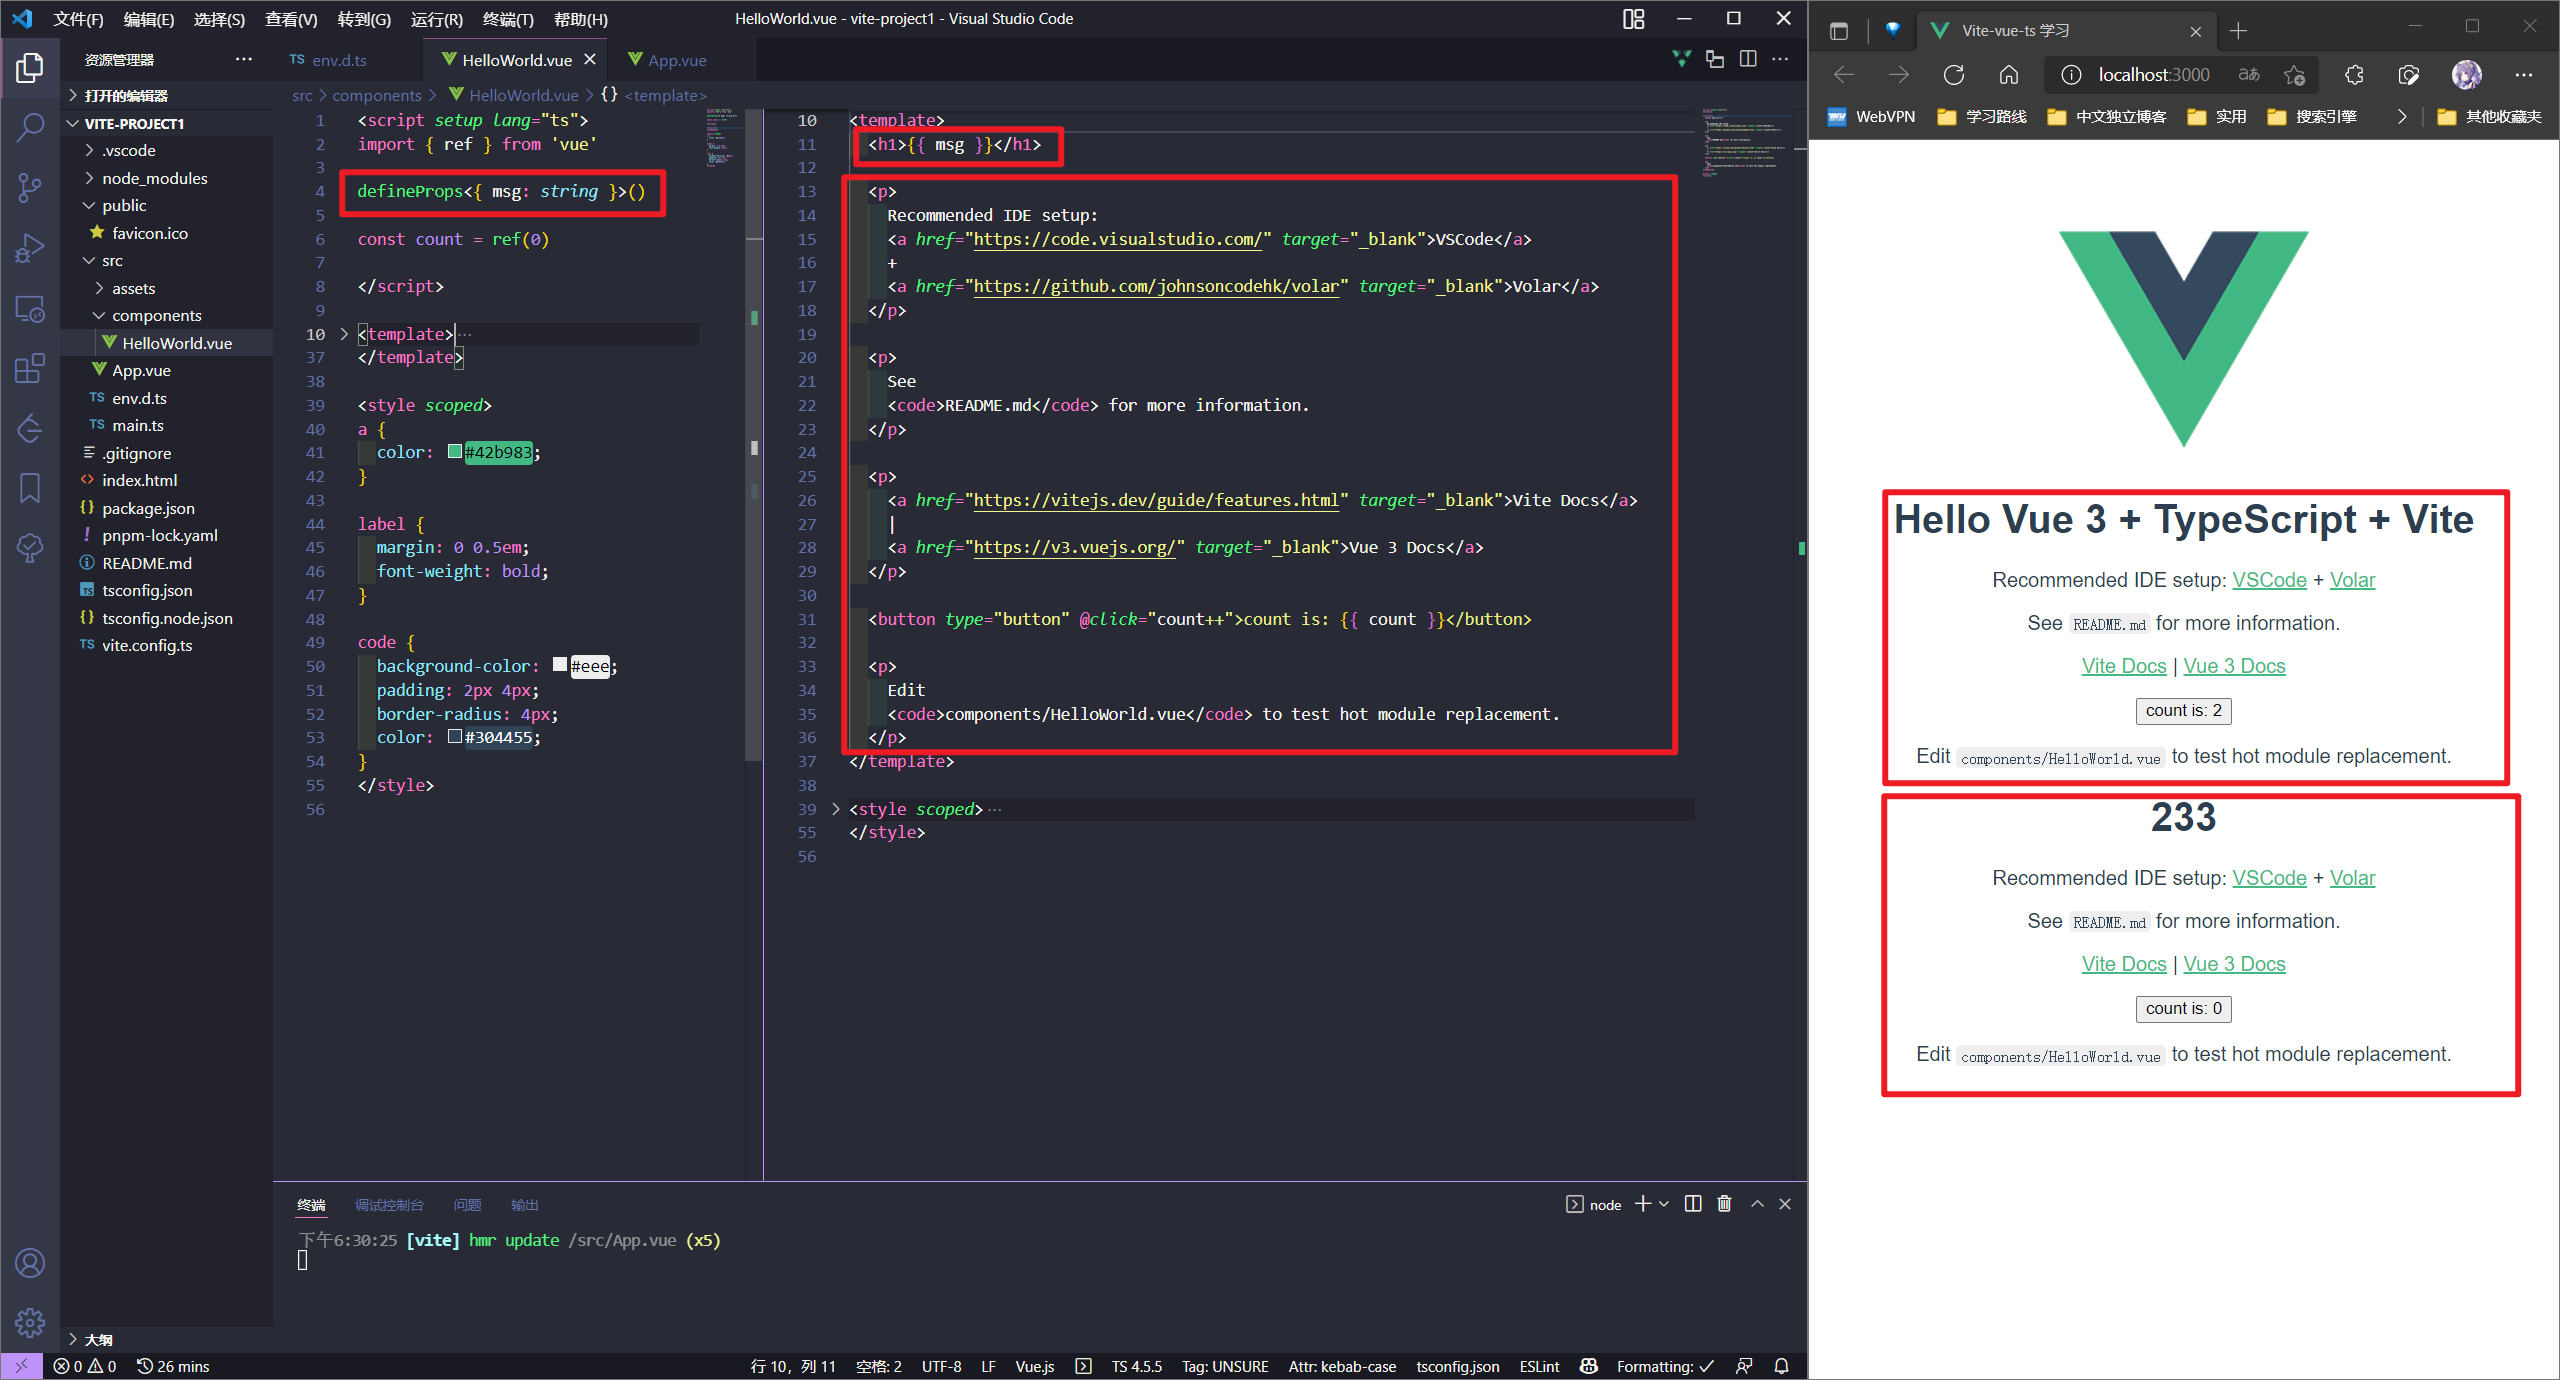
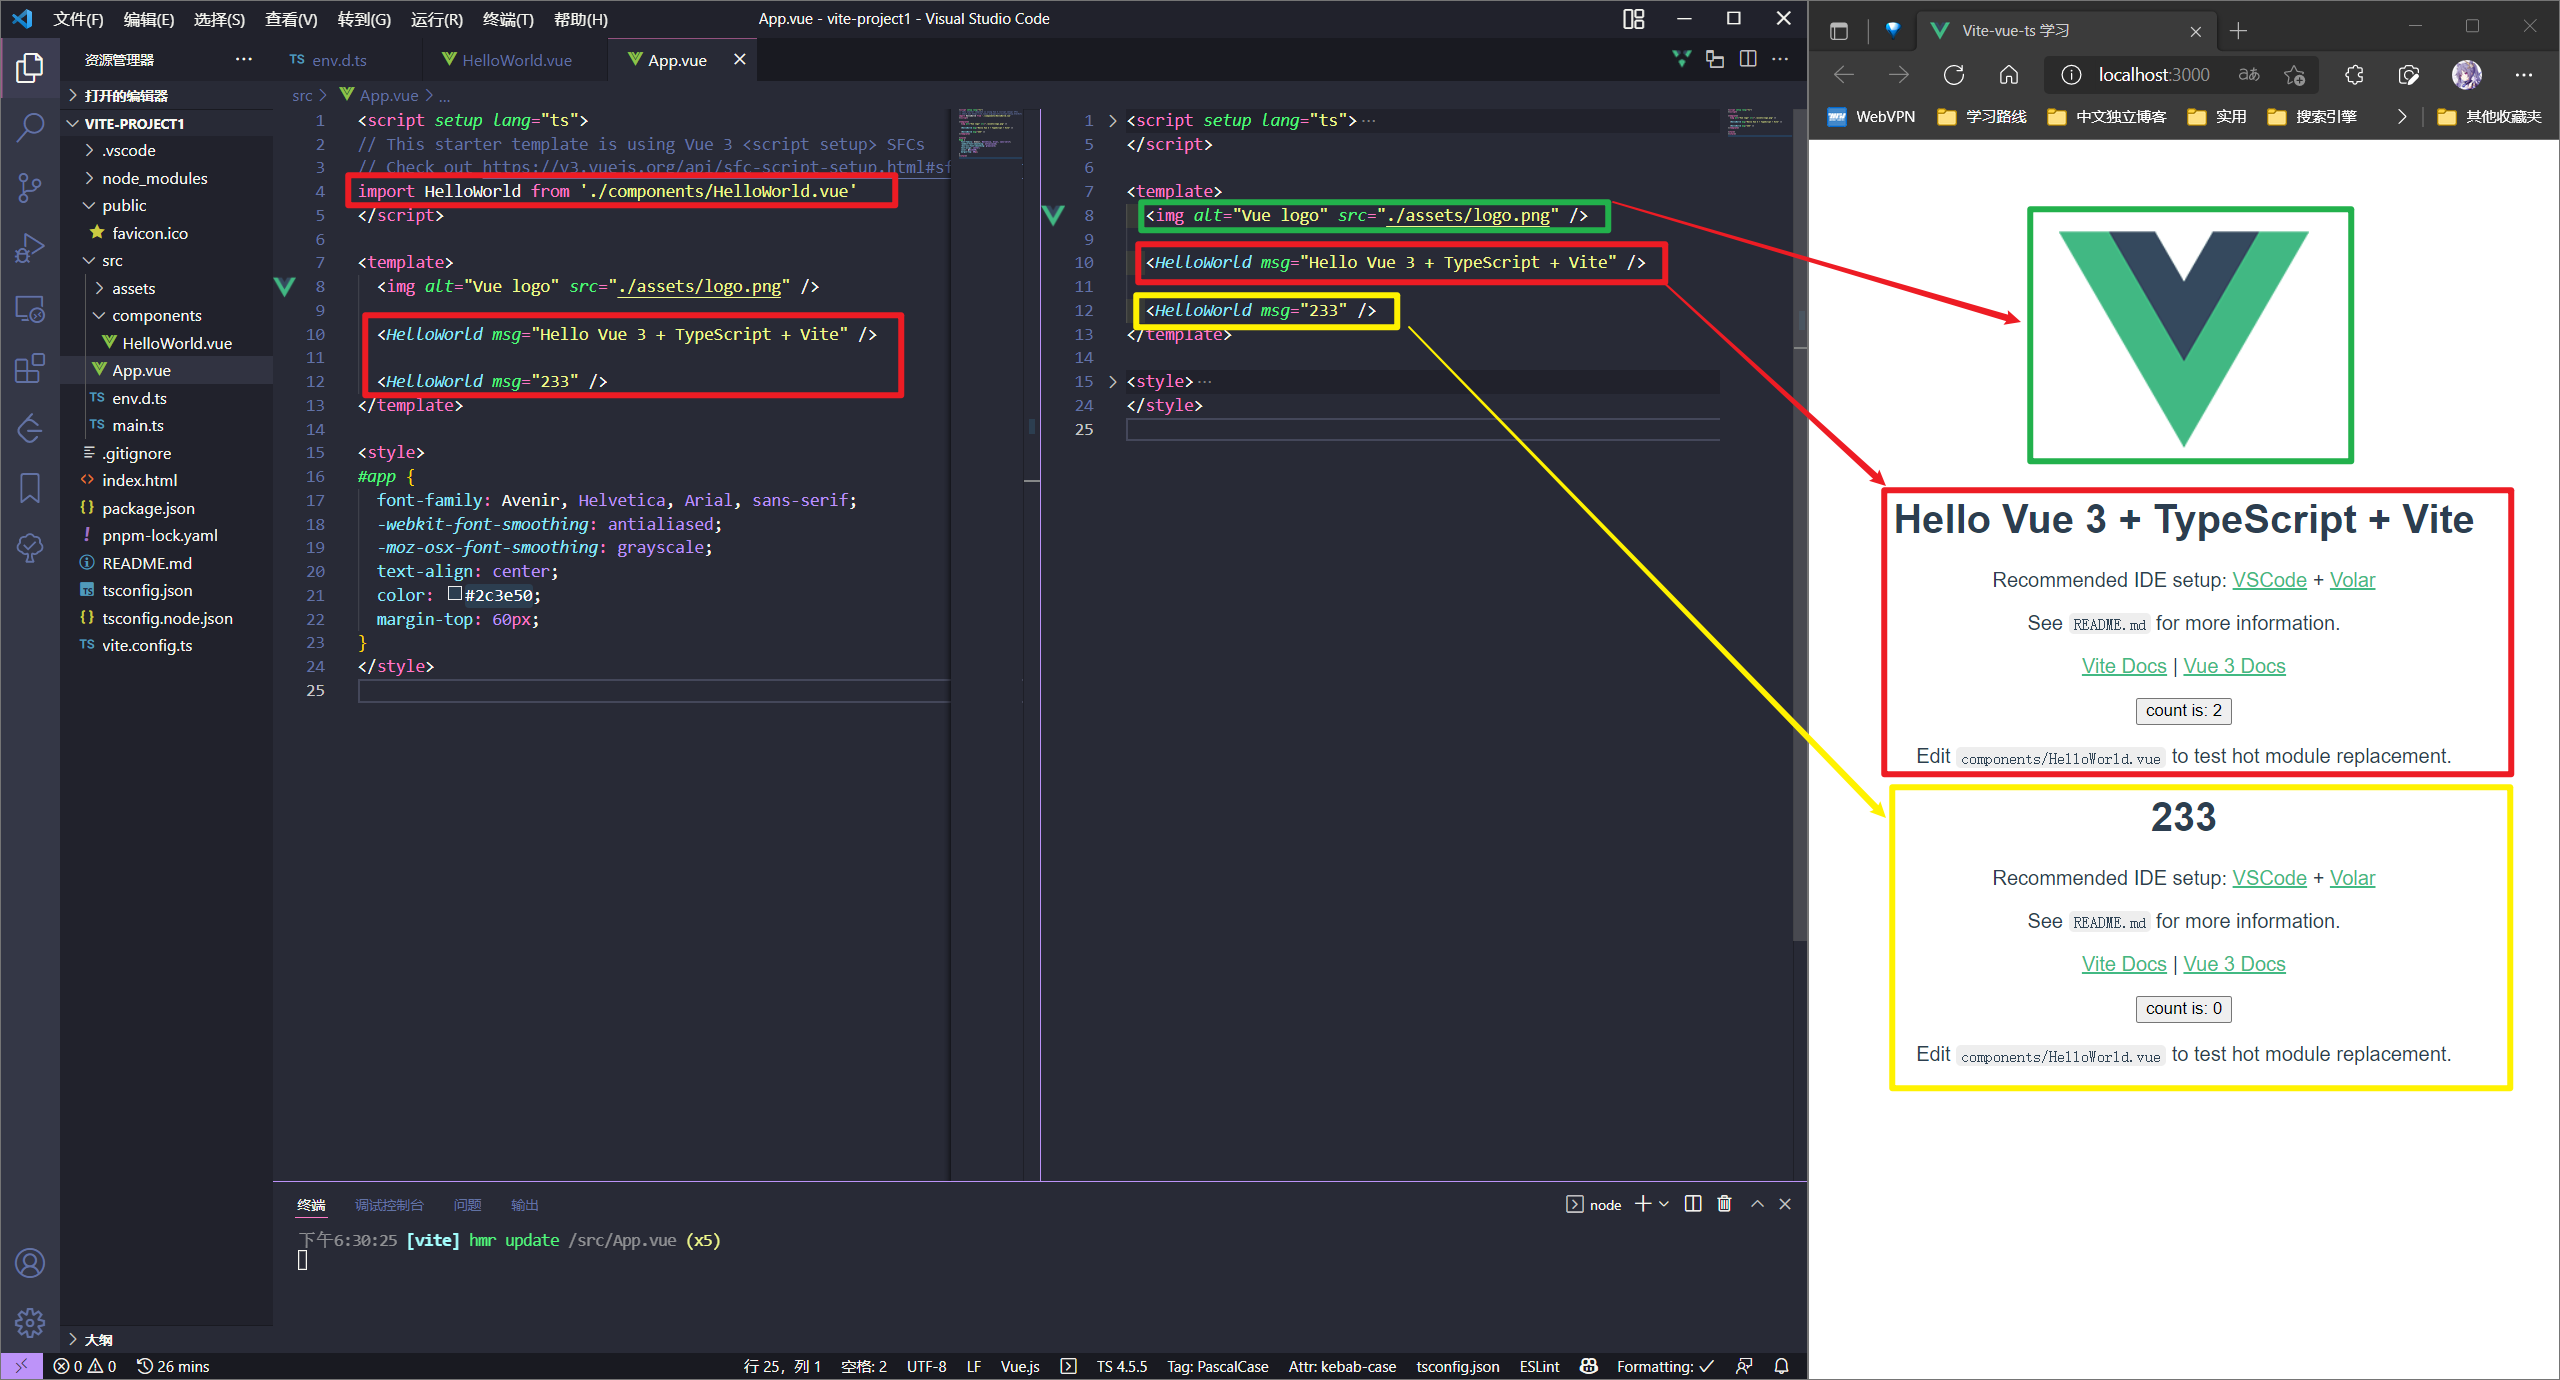
局部组件
在一个组件中通过引入另一个组件以达到在此组件中局部使用另一个组件的目的
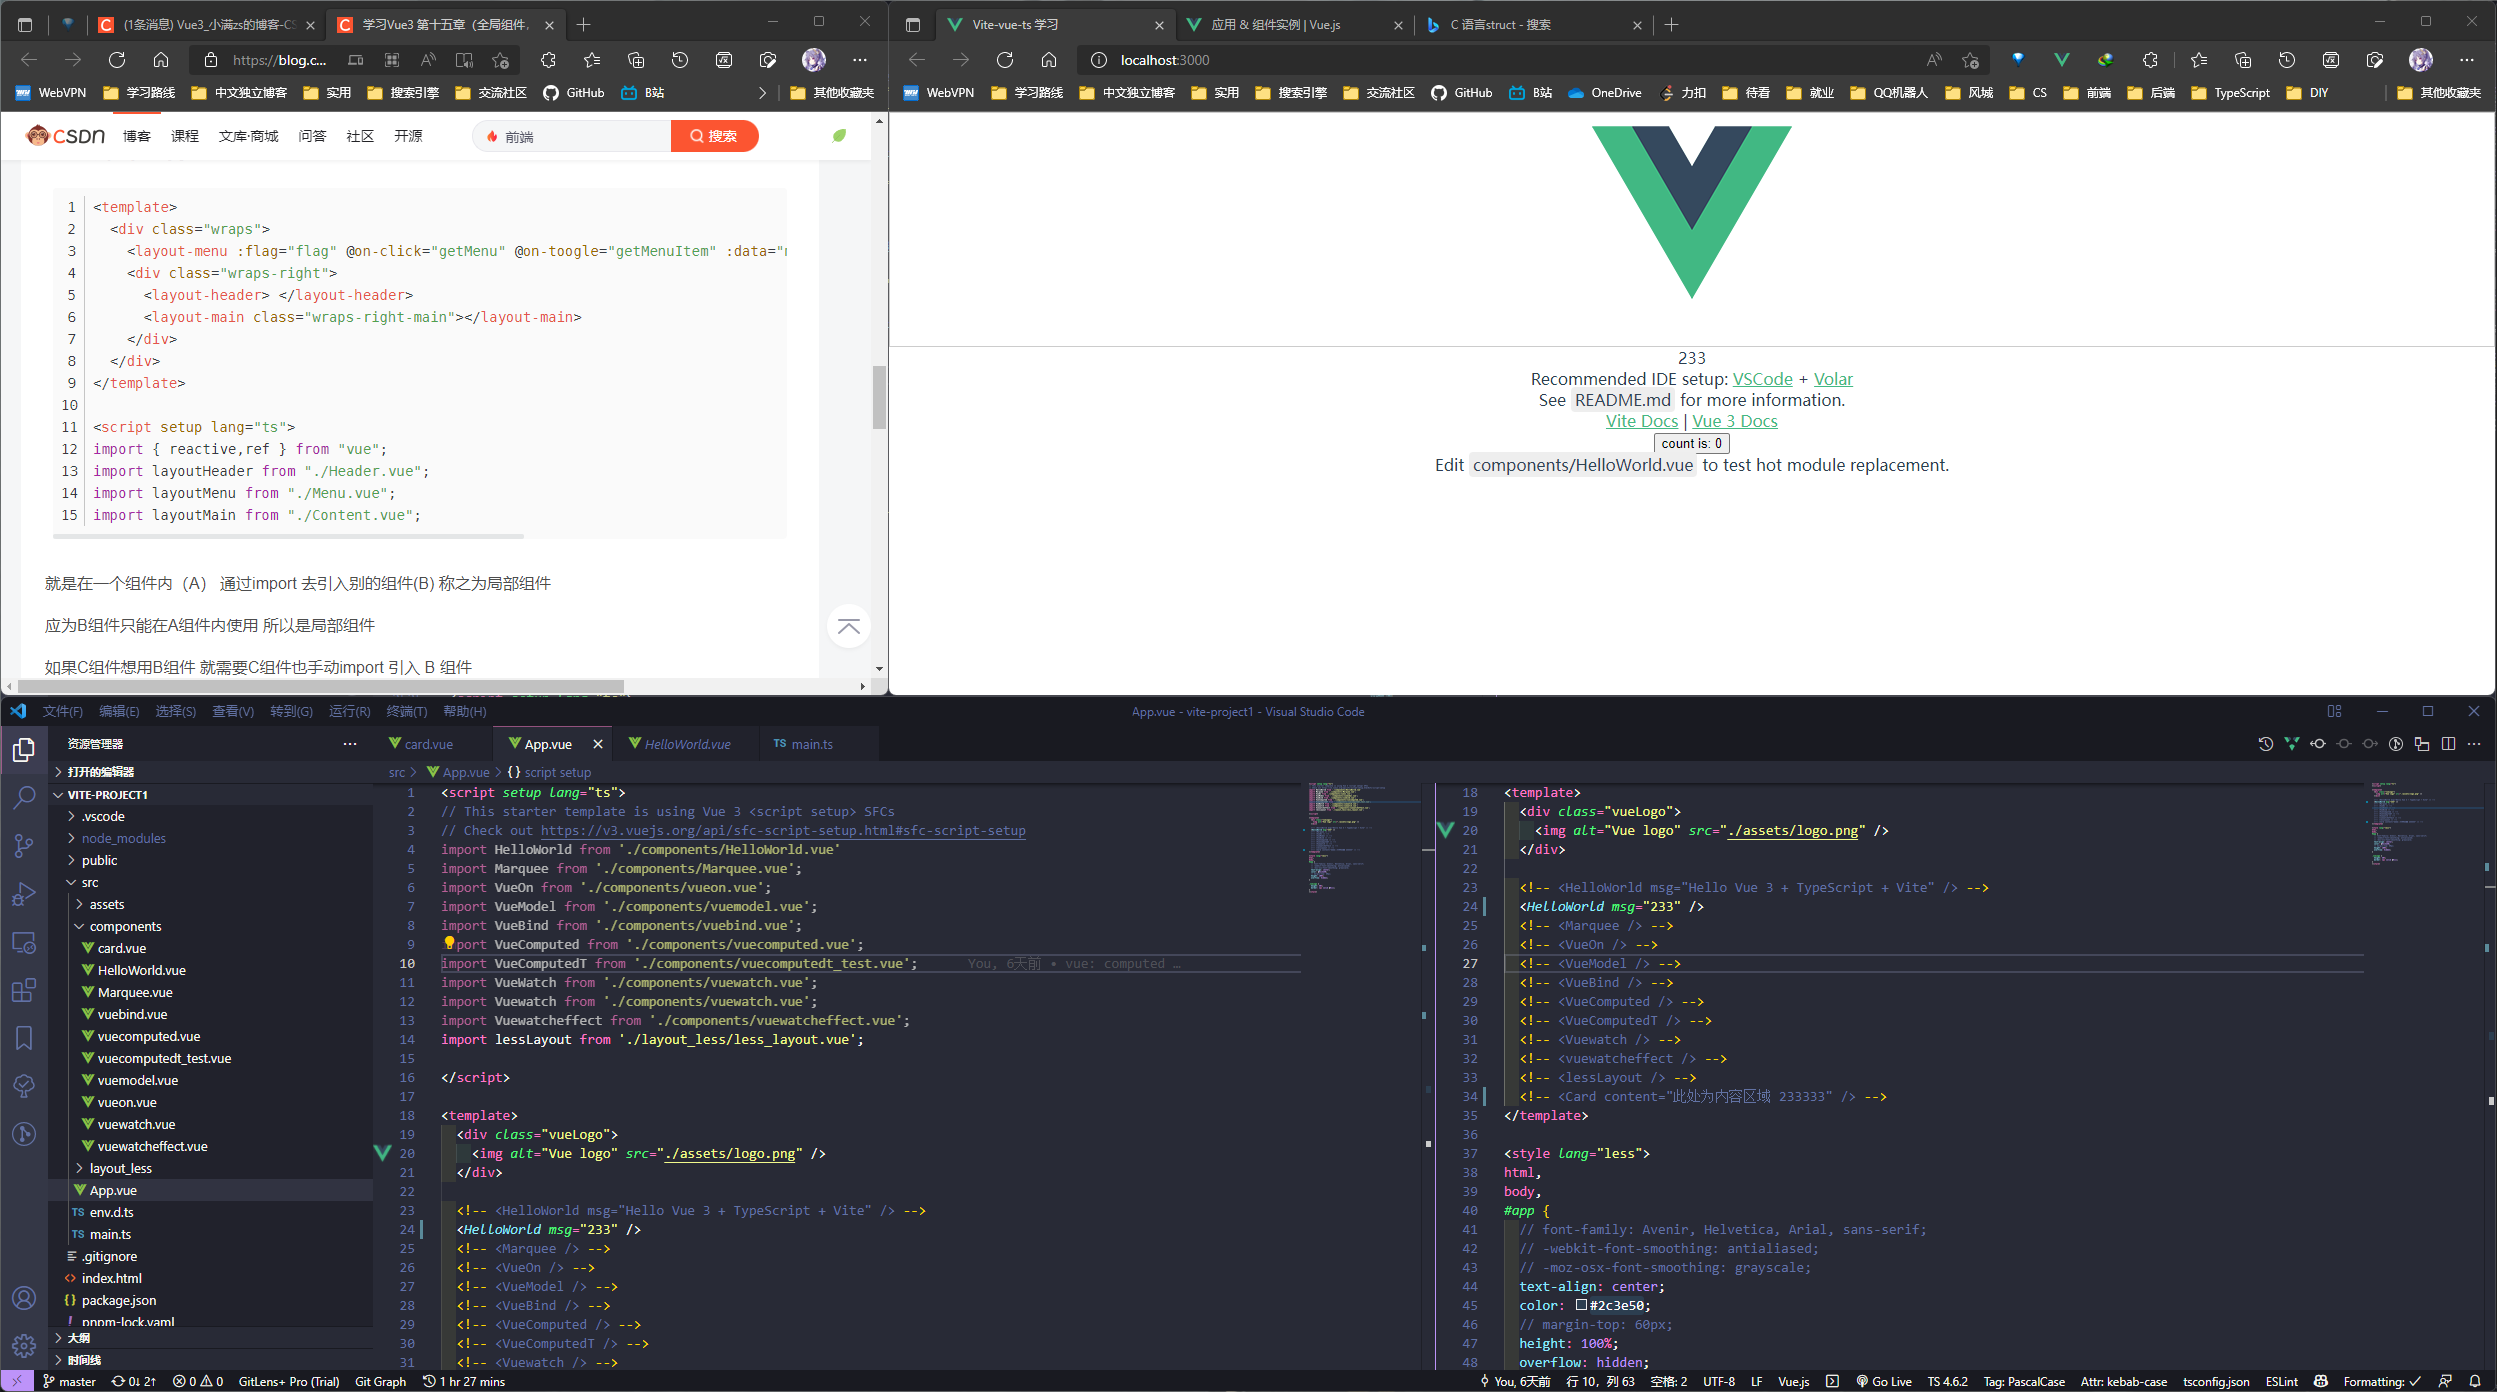
例如在 App 根组件 中引入并使用 Helloworld 组件 :
Helloworld.vue:
<script setup lang="ts">
import { ref } from "vue";
import { defineProps } from "vue";

defineProps<{ msg: string }>();

const count = ref(0);
</script>

<template>
  <h1>{{ msg }}</h1>

  <p>
    Recommended IDE setup:
    <a href="https://code.visualstudio.com/" target="_blank">VSCode</a>
    +
    <a href="https://github.com/johnsoncodehk/volar" target="_blank">Volar</a>
  </p>

  <p>
    See
    <code>README.md</code> for more information.
  </p>

  <p>
    <a href="https://vitejs.dev/guide/features.html" target="_blank"
      >Vite Docs</a
    >
    |
    <a href="https://v3.vuejs.org/" target="_blank">Vue 3 Docs</a>
  </p>

  <button type="button" @click="count++">count is: {{ count }}</button>

  <p>
    Edit
    <code>components/HelloWorld.vue</code> to test hot module replacement.
  </p>
</template>

<!-- 在<style>标签中使用 scoped 属性会限制样式只影响 <style> 标签的父元素和它所有的后代元素。 -->
<style scoped>
a {
  color: #42b983;
}

label {
  margin: 0 0.5em;
  font-weight: bold;
}

code {
  background-color: #eee;
  padding: 2px 4px;
  border-radius: 4px;
  color: #304455;
}
</style>
App.vue:
<script setup lang="ts">
// This starter template is using Vue 3 <script setup> SFCs
// Check out https://v3.vuejs.org/api/sfc-script-setup.html#sfc-script-setup
import HelloWorld from "./components/HelloWorld.vue";
import Marquee from "./components/Marquee.vue";
import VueOn from "./components/vueon.vue";
import VueModel from "./components/vuemodel.vue";
import VueBind from "./components/vuebind.vue";
import VueComputed from "./components/vuecomputed.vue";
import VueComputedT from "./components/vuecomputedt_test.vue";
import VueWatch from "./components/vuewatch.vue";
import Vuewatch from "./components/vuewatch.vue";
import Vuewatcheffect from "./components/vuewatcheffect.vue";
import lessLayout from "./layout_less/less_layout.vue";
</script>

<template>
  <div class="vueLogo">
    <img alt="Vue logo" src="./assets/logo.png" />
  </div>

  <!-- <HelloWorld msg="Hello Vue 3 + TypeScript + Vite" /> -->
  <HelloWorld msg="233" />
  <!-- <Marquee /> -->
  <!-- <VueOn /> -->
  <!-- <VueModel /> -->
  <!-- <VueBind /> -->
  <!-- <VueComputed /> -->
  <!-- <VueComputedT /> -->
  <!-- <Vuewatch /> -->
  <!-- <vuewatcheffect /> -->
  <!-- <lessLayout /> -->
  <!-- <Card content="此处为内容区域 233333" /> -->
</template>

<style lang="less">
html,
body,
#app {
  // font-family: Avenir, Helvetica, Arial, sans-serif;
  // -webkit-font-smoothing: antialiased;
  // -moz-osx-font-smoothing: grayscale;
  text-align: center;
  color: #2c3e50;
  // margin-top: 60px;
  height: 100%;
  overflow: hidden;
}

.vueLogo {
  height: 40%;
  border: 1px solid #ccc;
}
</style>
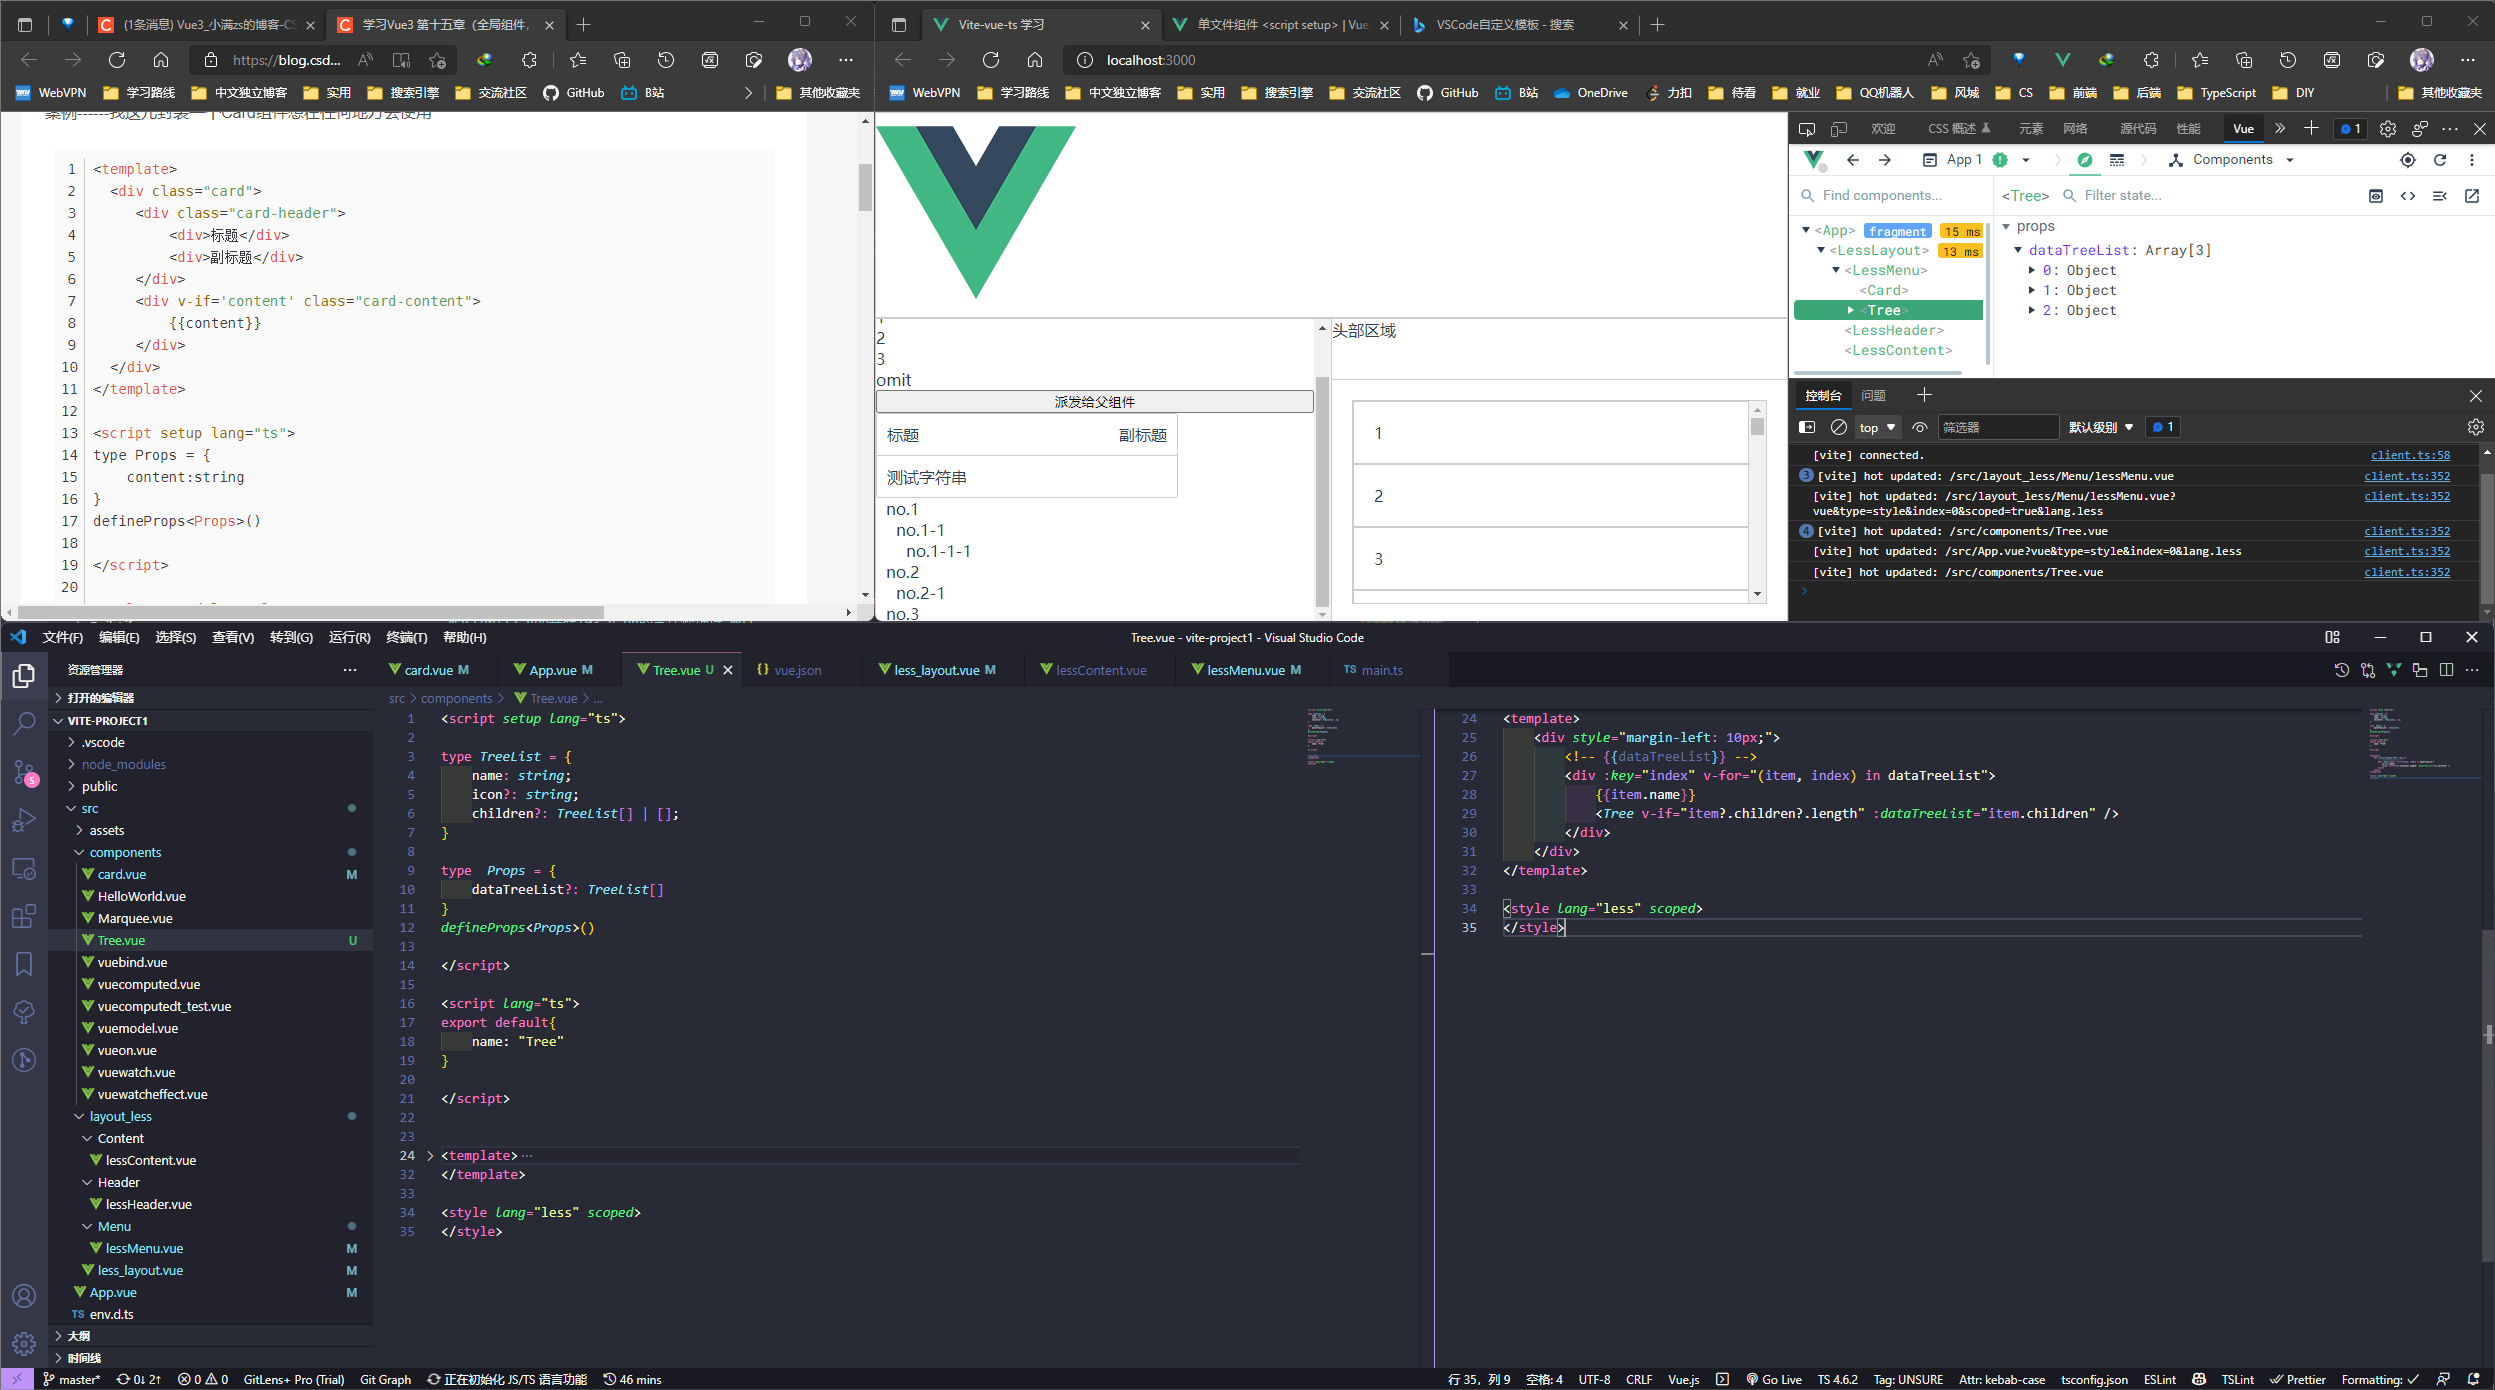
递归组件
递归组件自己调用自己, 通过一个条件来结束递归(否则将导致内存泄露)
例如:
Tree.vue
<script setup lang="ts">
type TreeList = {
  name: string;
  icon?: string;
  children?: TreeList[] | [];
};

type Props = {
  dataTreeList?: TreeList[];
};
defineProps<Props>();

const emit = defineEmits(["on-click"]);

const ClickItem = (item: TreeList) => {
  console.log(item, 2333);
  emit("on-click", item);
};
</script>

<script lang="ts">
export default {
  name: "Tree",
};
</script>

<template>
  <div style="margin-left: 10px;">
    <!-- {{dataTreeList}} -->
    <div
      :key="index"
      v-for="(item, index) in dataTreeList"
      @click.stop="ClickItem(item)"
    >
      {{ item.name }}
      <Tree
        v-if="item?.children?.length"
        :dataTreeList="item.children"
        @on-click="ClickItem"
      />
    </div>
  </div>
</template>

<style lang="less" scoped></style>
item?.children?.length:当读
item和item.children时读出undefined或null时不会继续调用.length而是直接返回undefined, 这样就避免了读undefined.length导致的报错可以配合
??使用:item?.children?.length ?? []:当
??前面的式子读出undefined时采用后面的[]
lessMenu.vue
<script setup lang="ts">
import { reactive } from "vue";
import Tree from "../../components/Tree.vue";

/* 子组件通过 defineExpose 将内部属性 exposeArray 暴露给父组件 */
const exposeArray = reactive<number[]>([7, 8, 9]);
defineExpose({
  exposeArray,
});

/* 子组件给父组件传参 */
const list = reactive<number[]>([4, 5, 6]);
const emit = defineEmits(["onclickTap"]);
const clickTap = () => {
  emit("onclickTap", list);
};

// 参数默认值
type Props = {
  message?: string;
  data_array?: number[];
  omit?: string;
};
withDefaults(defineProps<Props>(), {
  message: "Hello World",
  data_array: () => [1, 2, 3],
  omit: "omit",
});

// 递归组件测试
type TreeList = {
  name: string;
  icon?: string;
  children?: TreeList[] | [];
};
const dataArrayTreeList = reactive<TreeList[]>([
  {
    name: "no.1",
    children: [
      {
        name: "no.1-1",
        children: [
          {
            name: "no.1-1-1",
          },
        ],
      },
    ],
  },
  {
    name: "no.2",
    children: [
      {
        name: "no.2-1",
      },
    ],
  },
  {
    name: "no.3",
  },
]);

const getItem = (item: TreeList) => {
  console.log("父组件的item" + item.name);
};
</script>

<template>
  <div class="menu_less">
    <div>菜单区域</div>
    {{ message }}
    <div v-for="item in data_array" :key="item">{{ item }}</div>
    {{ omit }}
    <button @click="clickTap">派发给父组件</button>
    <Card content="测试字符串" />
    <Tree :dataTreeList="dataArrayTreeList" @on-click="getItem" />
  </div>
</template>

<style lang="less" scoped>
.menu_less {
  width: 200px;
  border-right: 1px solid #ccc;
  display: flex;
  flex-direction: column; // 垂直方向
  flex: 1;
  overflow: auto;
}
</style>
less_layout.vue
<script setup lang="ts">
import lessMenu from "./Menu/lessMenu.vue";
import lessHeader from "./Header/lessHeader.vue";
import lessContent from "./Content/lessContent.vue";
import { reactive, ref } from "vue";

const exposeArrayFromMenu = ref(null);

const data_array = reactive<number[]>([1, 2, 3]);

// 父组件接收子组件传参
const getList = (list: number[]) => {
  console.log(list, "父组件接收子组件");
};
</script>

<template>
  <div class="layout_less">
    <!-- <div>{{ exposeArrayFromMenu }}</div> -->
    <lessMenu
      message="传递一个字符串"
      v-bind:data_array="data_array"
      @onclickTap="getList"
      ref="exposeArrayFromMenu"
    />
    <div class="layout_less-right">
      <lessHeader />
      <lessContent />
    </div>
  </div>
</template>

<style lang="less" scoped>
.layout_less {
  display: flex;
  height: 60%;
  overflow: hidden;
  border: 1px solid #ccc;
  &-right {
    display: flex;
    flex-direction: column; // 垂直方向
    flex: 1;
  }
}
</style>
App.vue
<script setup lang="ts">
// This starter template is using Vue 3 <script setup> SFCs
// Check out https://v3.vuejs.org/api/sfc-script-setup.html#sfc-script-setup
import HelloWorld from "./components/HelloWorld.vue";
import Marquee from "./components/Marquee.vue";
import VueOn from "./components/vueon.vue";
import VueModel from "./components/vuemodel.vue";
import VueBind from "./components/vuebind.vue";
import VueComputed from "./components/vuecomputed.vue";
import VueComputedT from "./components/vuecomputedt_test.vue";
import VueWatch from "./components/vuewatch.vue";
import Vuewatch from "./components/vuewatch.vue";
import Vuewatcheffect from "./components/vuewatcheffect.vue";
import lessLayout from "./layout_less/less_layout.vue";
</script>

<template>
  <div class="vueLogo">
    <img alt="Vue logo" src="./assets/logo.png" />
  </div>

  <!-- <HelloWorld msg="Hello Vue 3 + TypeScript + Vite" /> -->
  <!-- <HelloWorld msg="233" /> -->
  <!-- <Marquee /> -->
  <!-- <VueOn /> -->
  <!-- <VueModel /> -->
  <!-- <VueBind /> -->
  <!-- <VueComputed /> -->
  <!-- <VueComputedT /> -->
  <!-- <Vuewatch /> -->
  <!-- <vuewatcheffect /> -->
  <lessLayout />
  <!-- <Card content="此处为内容区域 233333" /> -->
</template>

<style lang="less">
html,
body,
#app {
  // font-family: Avenir, Helvetica, Arial, sans-serif;
  // -webkit-font-smoothing: antialiased;
  // -moz-osx-font-smoothing: grayscale;
  // text-align: center;
  color: #2c3e50;
  // margin-top: 60px;
  height: 100%;
  overflow: hidden;
}

.vueLogo {
  height: 40%;
  border: 1px solid #ccc;
}
</style>
动态组件
动态组件就是让多个组件使用同一个挂载点并动态切换
在挂载点使用 component 标签, 然后使用 v-bind: is=“组件”, 用法如下:
<!-- 引入组件 -->
import A from './A.vue' import B from './B.vue'
<!-- 通过 is 切换 A B 组件 -->
<component :is="A"></component>
使用场景 tab 切换居多
示例:
A.vue:
<script setup lang="ts"></script>

<template>
  <div class="styleA">A组件内容</div>
</template>

<style lang="less" scoped>
.styleA {
  background: red;
  height: 300px;
  border: 1px solid #ccc;
}
</style>
B.vue
<script setup lang="ts"></script>

<template>
  <div class="styleB">B组件内容</div>
</template>

<style lang="less" scoped>
.styleB {
  background: greenyellow;
  height: 300px;
  border: 1px solid #ccc;
}
</style>
C.vue
<script setup lang="ts"></script>

<template>
  <div class="styleC">C组件内容</div>
</template>

<style lang="less" scoped>
.styleC {
  background: burlywood;
  height: 300px;
  border: 1px solid #ccc;
}
</style>
lessContent.vue
<script setup lang="ts">
import A from "./A.vue";
import B from "./B.vue";
import C from "./C.vue";
import { reactive, markRaw } from "vue";

type Tabs = {
  name: string;
  comName: any;
};

type Com = Pick<Tabs, "comName">;

const data = reactive<Tabs[]>([
  {
    name: "我是 A 组件",
    comName: markRaw(A),
  },
  {
    name: "我是 B 组件",
    comName: markRaw(B),
  },
  {
    name: "我是 C 组件",
    comName: markRaw(C),
  },
]);

let current = reactive<Com>({
  comName: data[0].comName,
});

const switchCom = (item: Tabs) => {
  current.comName = item.comName;
};
</script>

<template>
  <div class="content_layout">
    <div class="tab">
      <div :key="item.name" v-for="item in data" @click="switchCom(item)">
        {{ item.name }}
      </div>
    </div>
    <component :is="current.comName" />
    <div class="content_layout-items" :key="item" v-for="item in 100">
      {{ item }}
    </div>
  </div>
</template>

<style lang="less" scoped>
.content_layout {
  flex: 1;
  margin: 20px;
  border: 1px solid #ccc;
  overflow: auto;
  &-items {
    padding: 20px;
    border: 1px solid #ccc;
  }
}

.tab {
  display: flex;
  flex: 1;
  flex-direction: row;
  div {
    flex: 1;
    padding: 10px;
    border: 1px solid #ccc;
    cursor: pointer;
    &:hover {
      background: #eee;
    }
  }
}
</style>
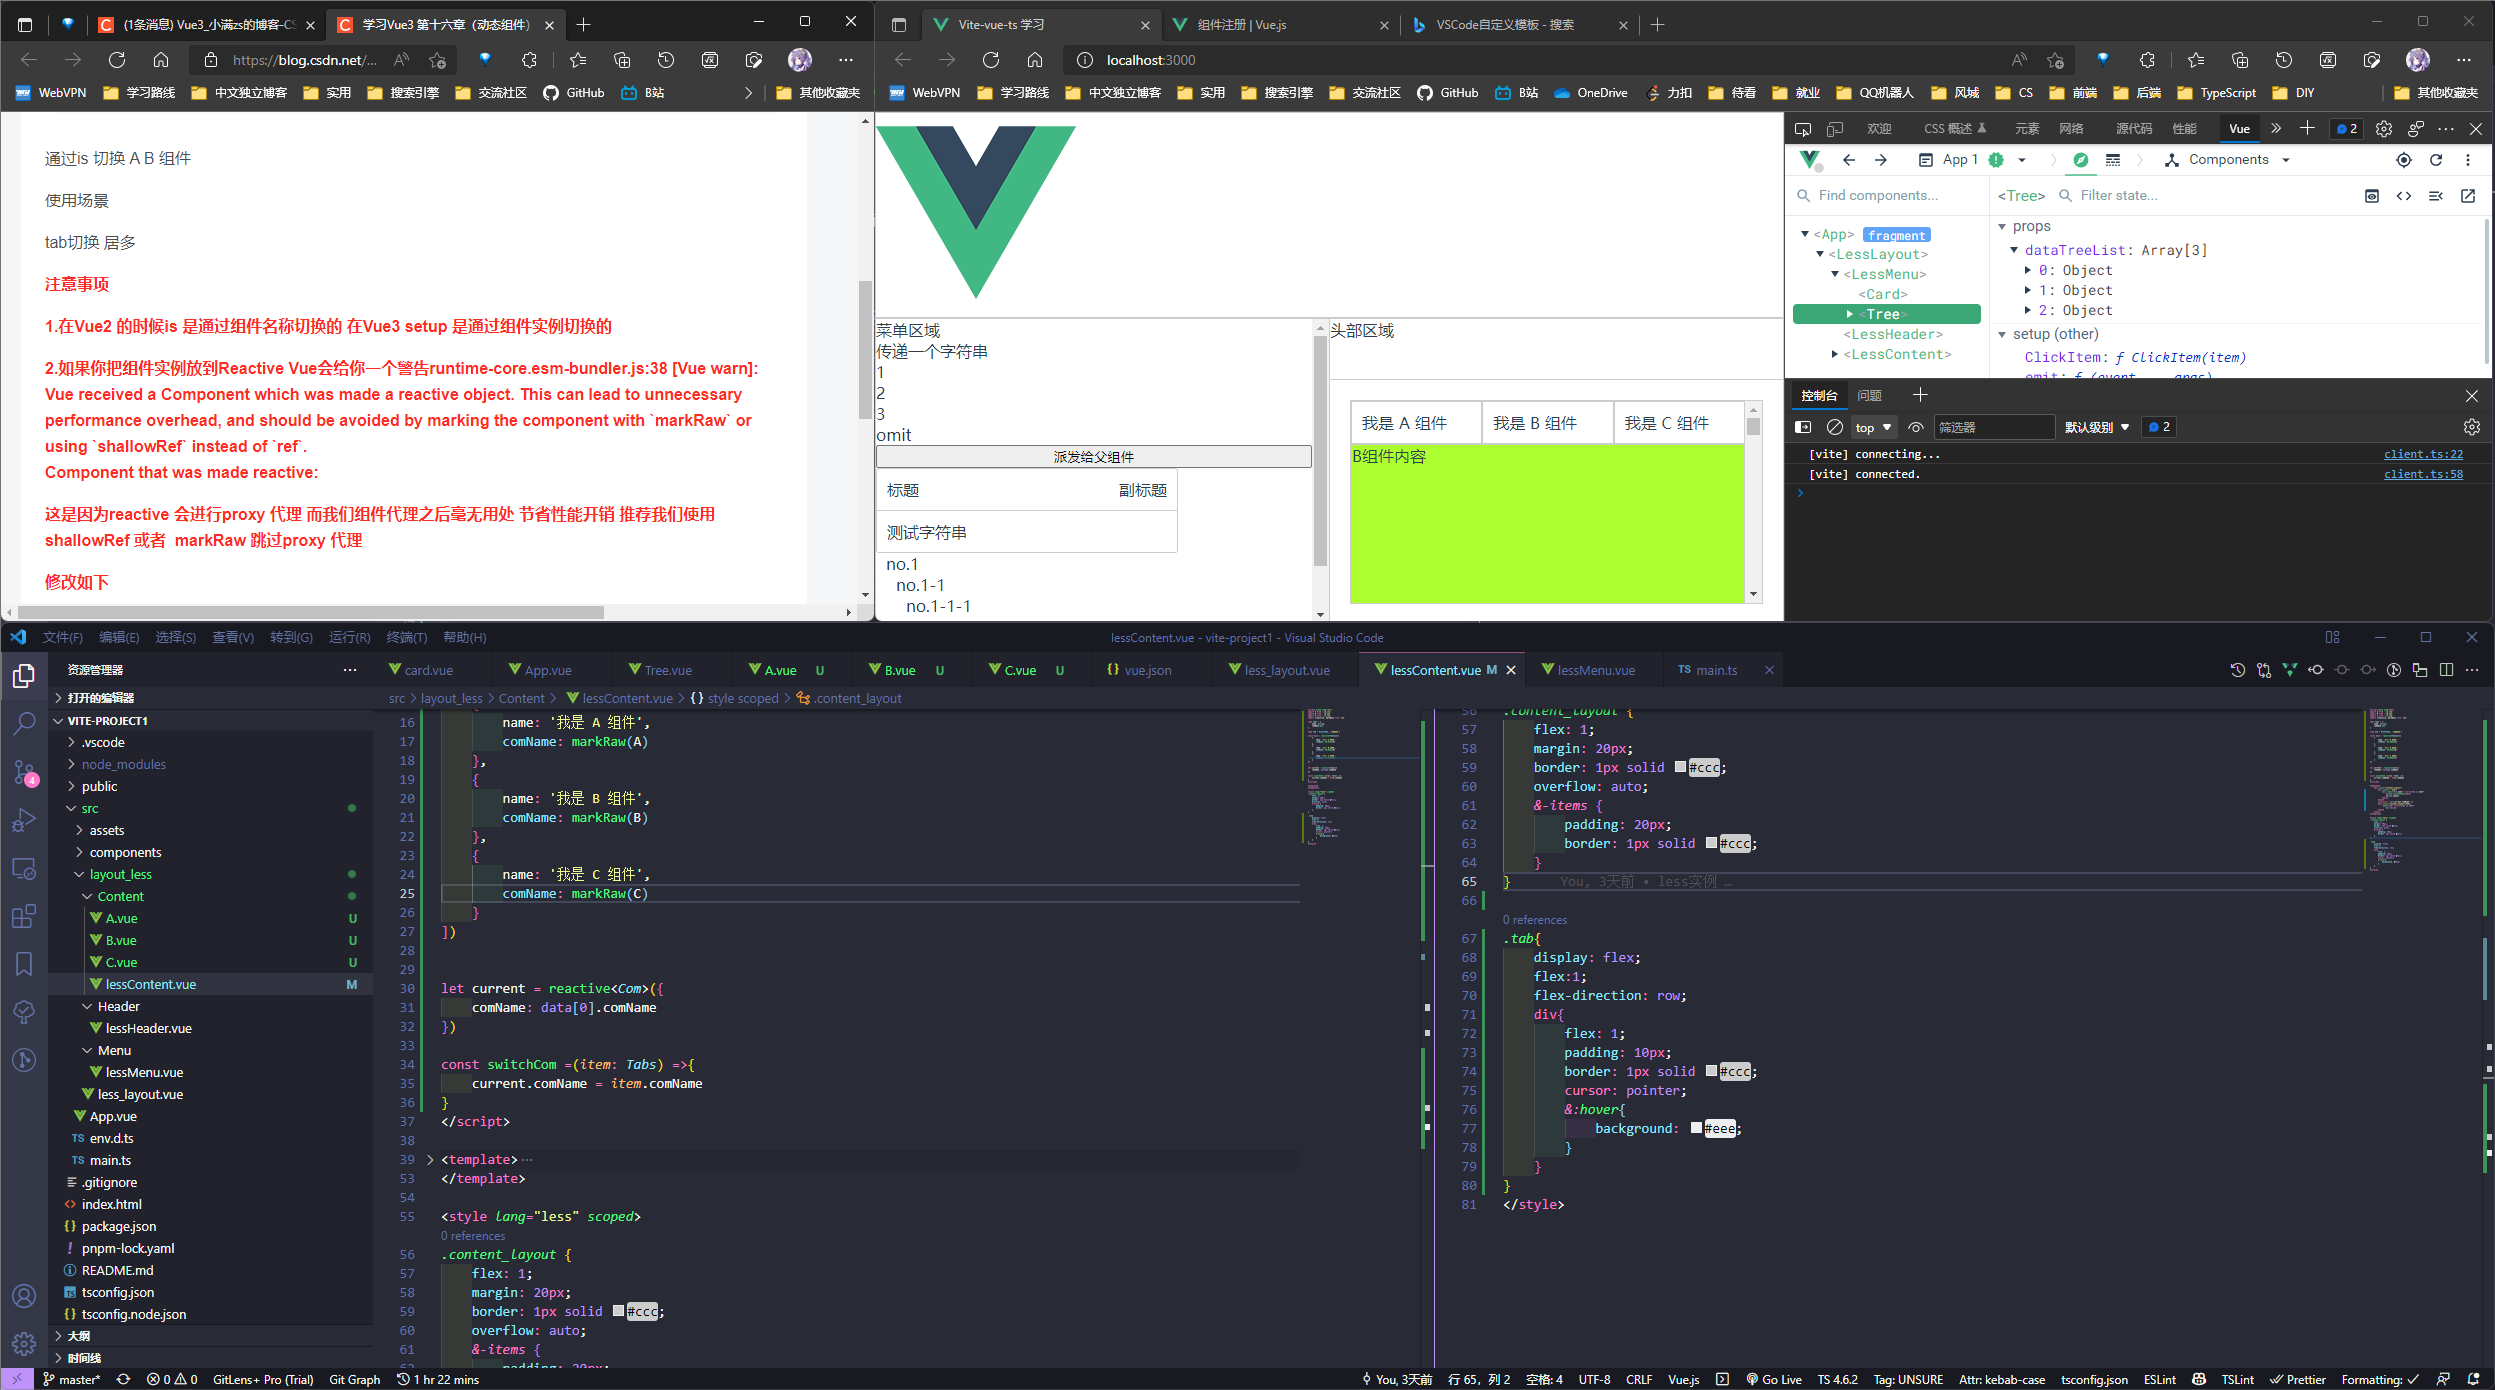
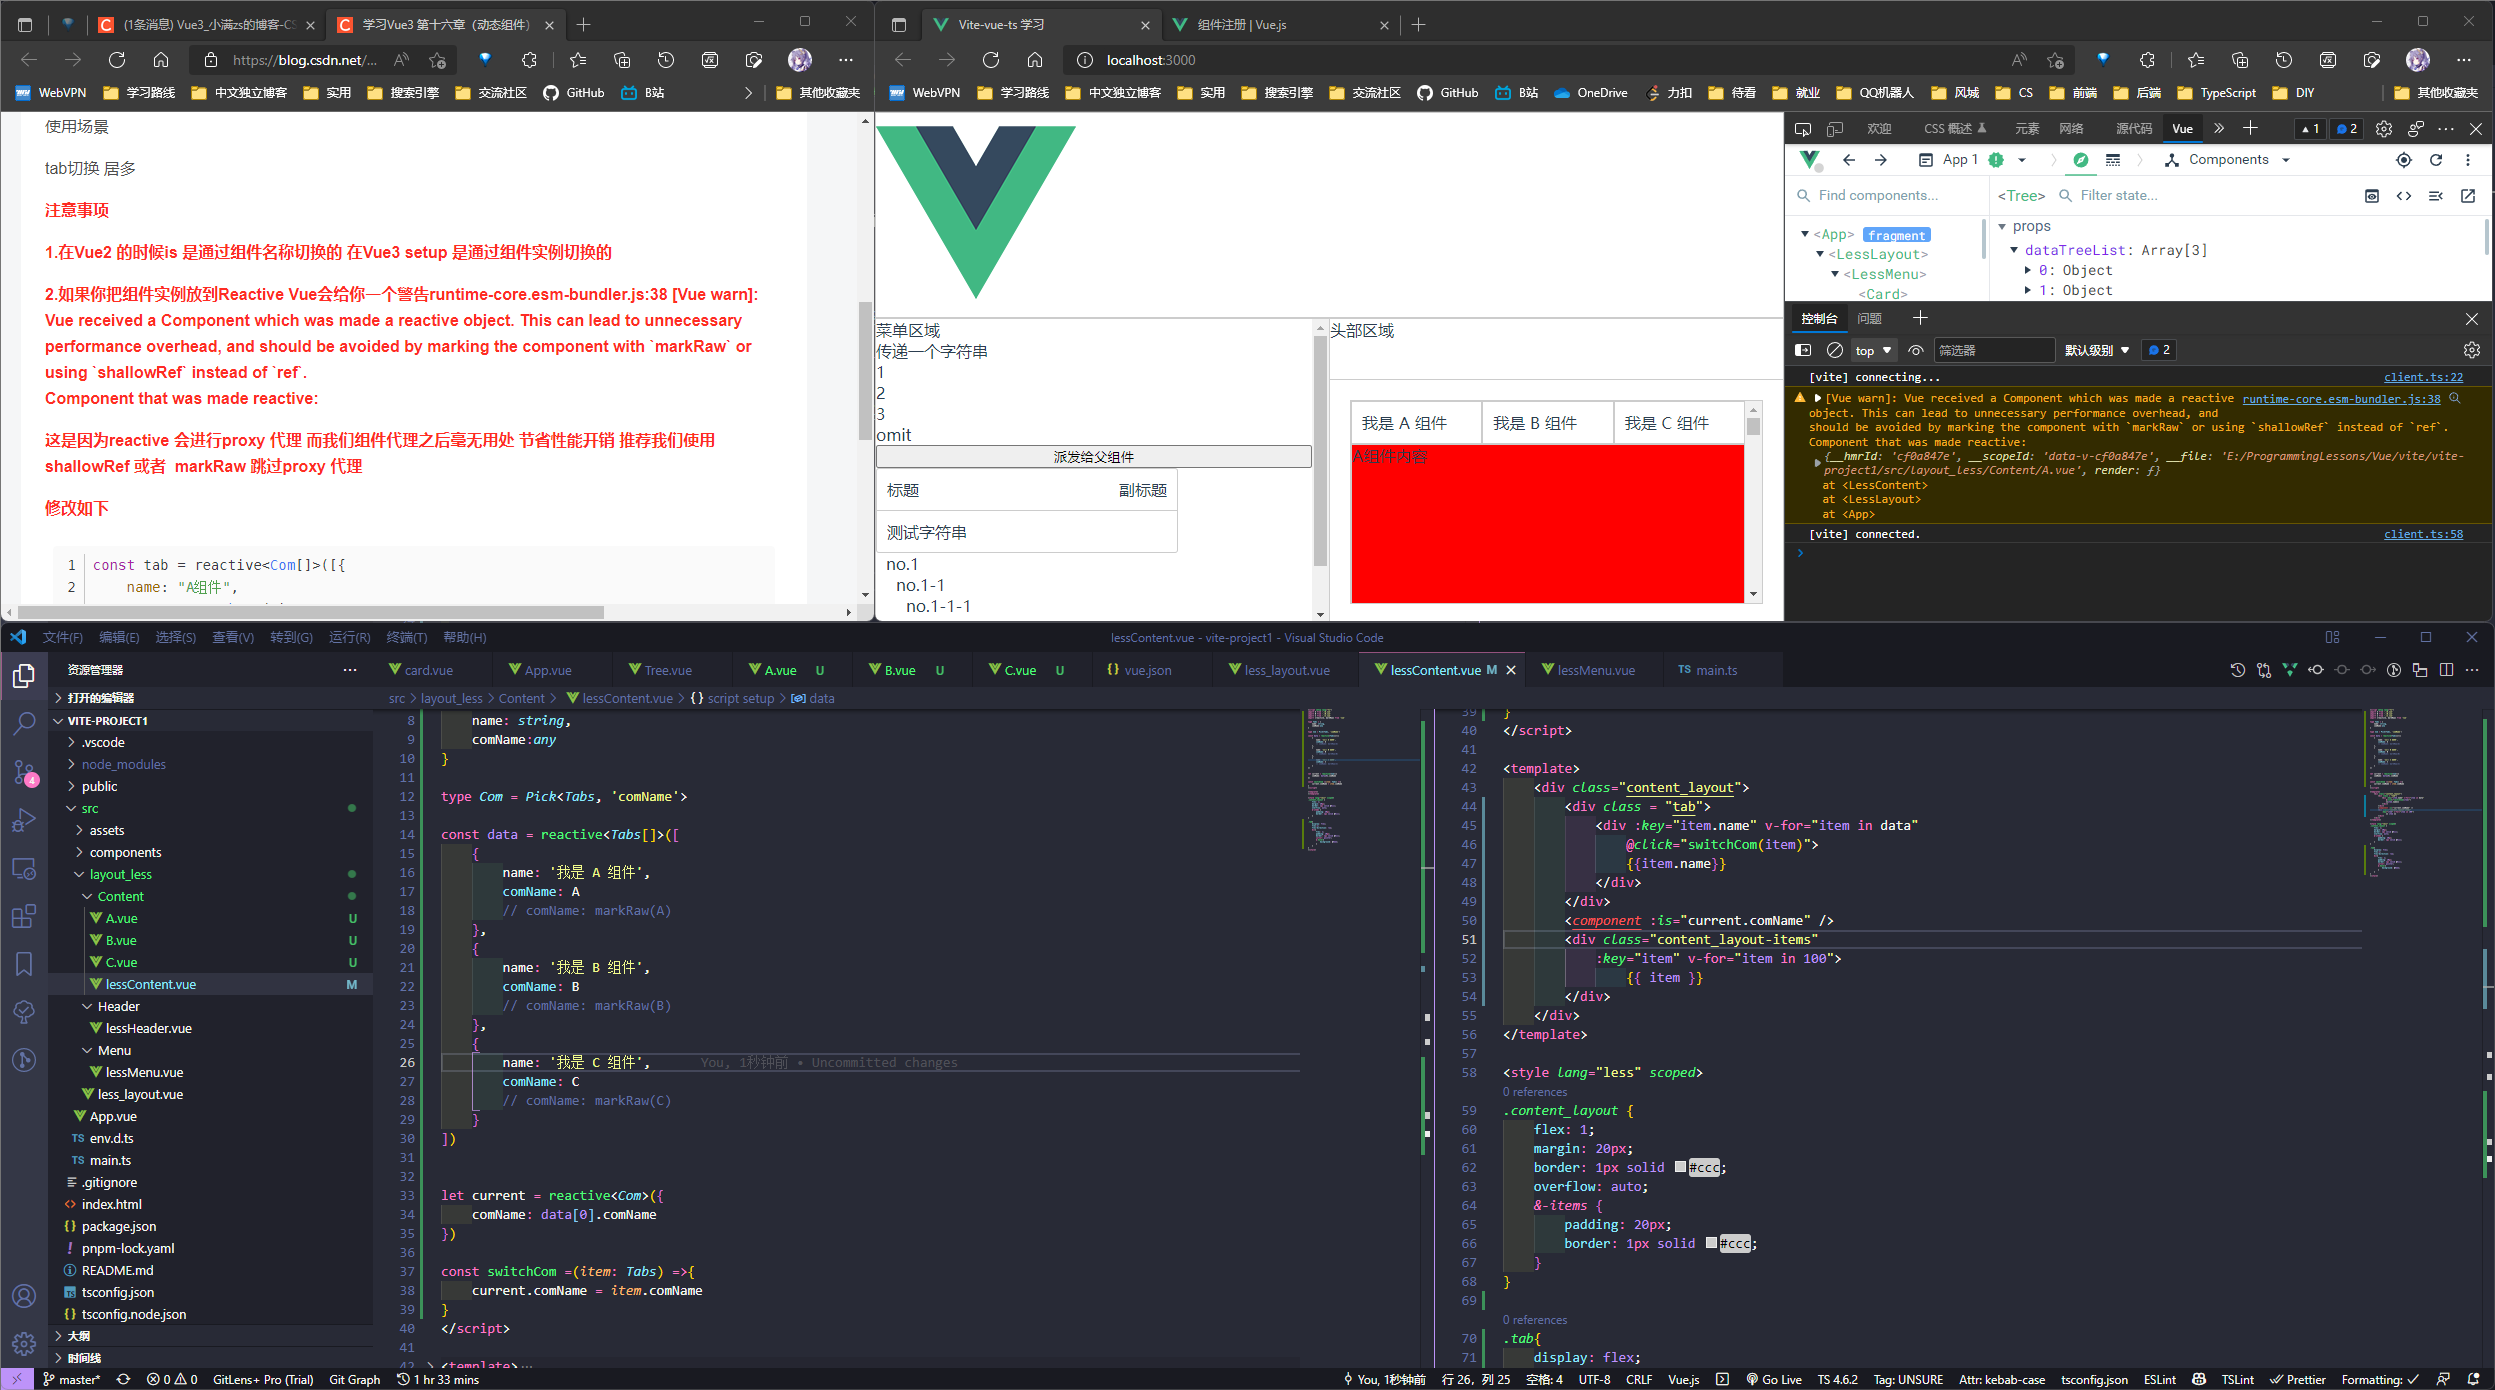
注意事项
在
Vue2的时候:is是通过组件名称切换的, 而在Vue3 setup中是通过组件实例切换的如果把组件实例放到
Reactive中那么Vue会给你一个警告runtime-core.esm-bundler.js:38 [Vue warn]: Vue received a Component which was made a reactive object. This can lead to unnecessary performance overhead, and should be avoided by marking the component with markRaw or using shallowRef instead of ref. Component that was made reactive:
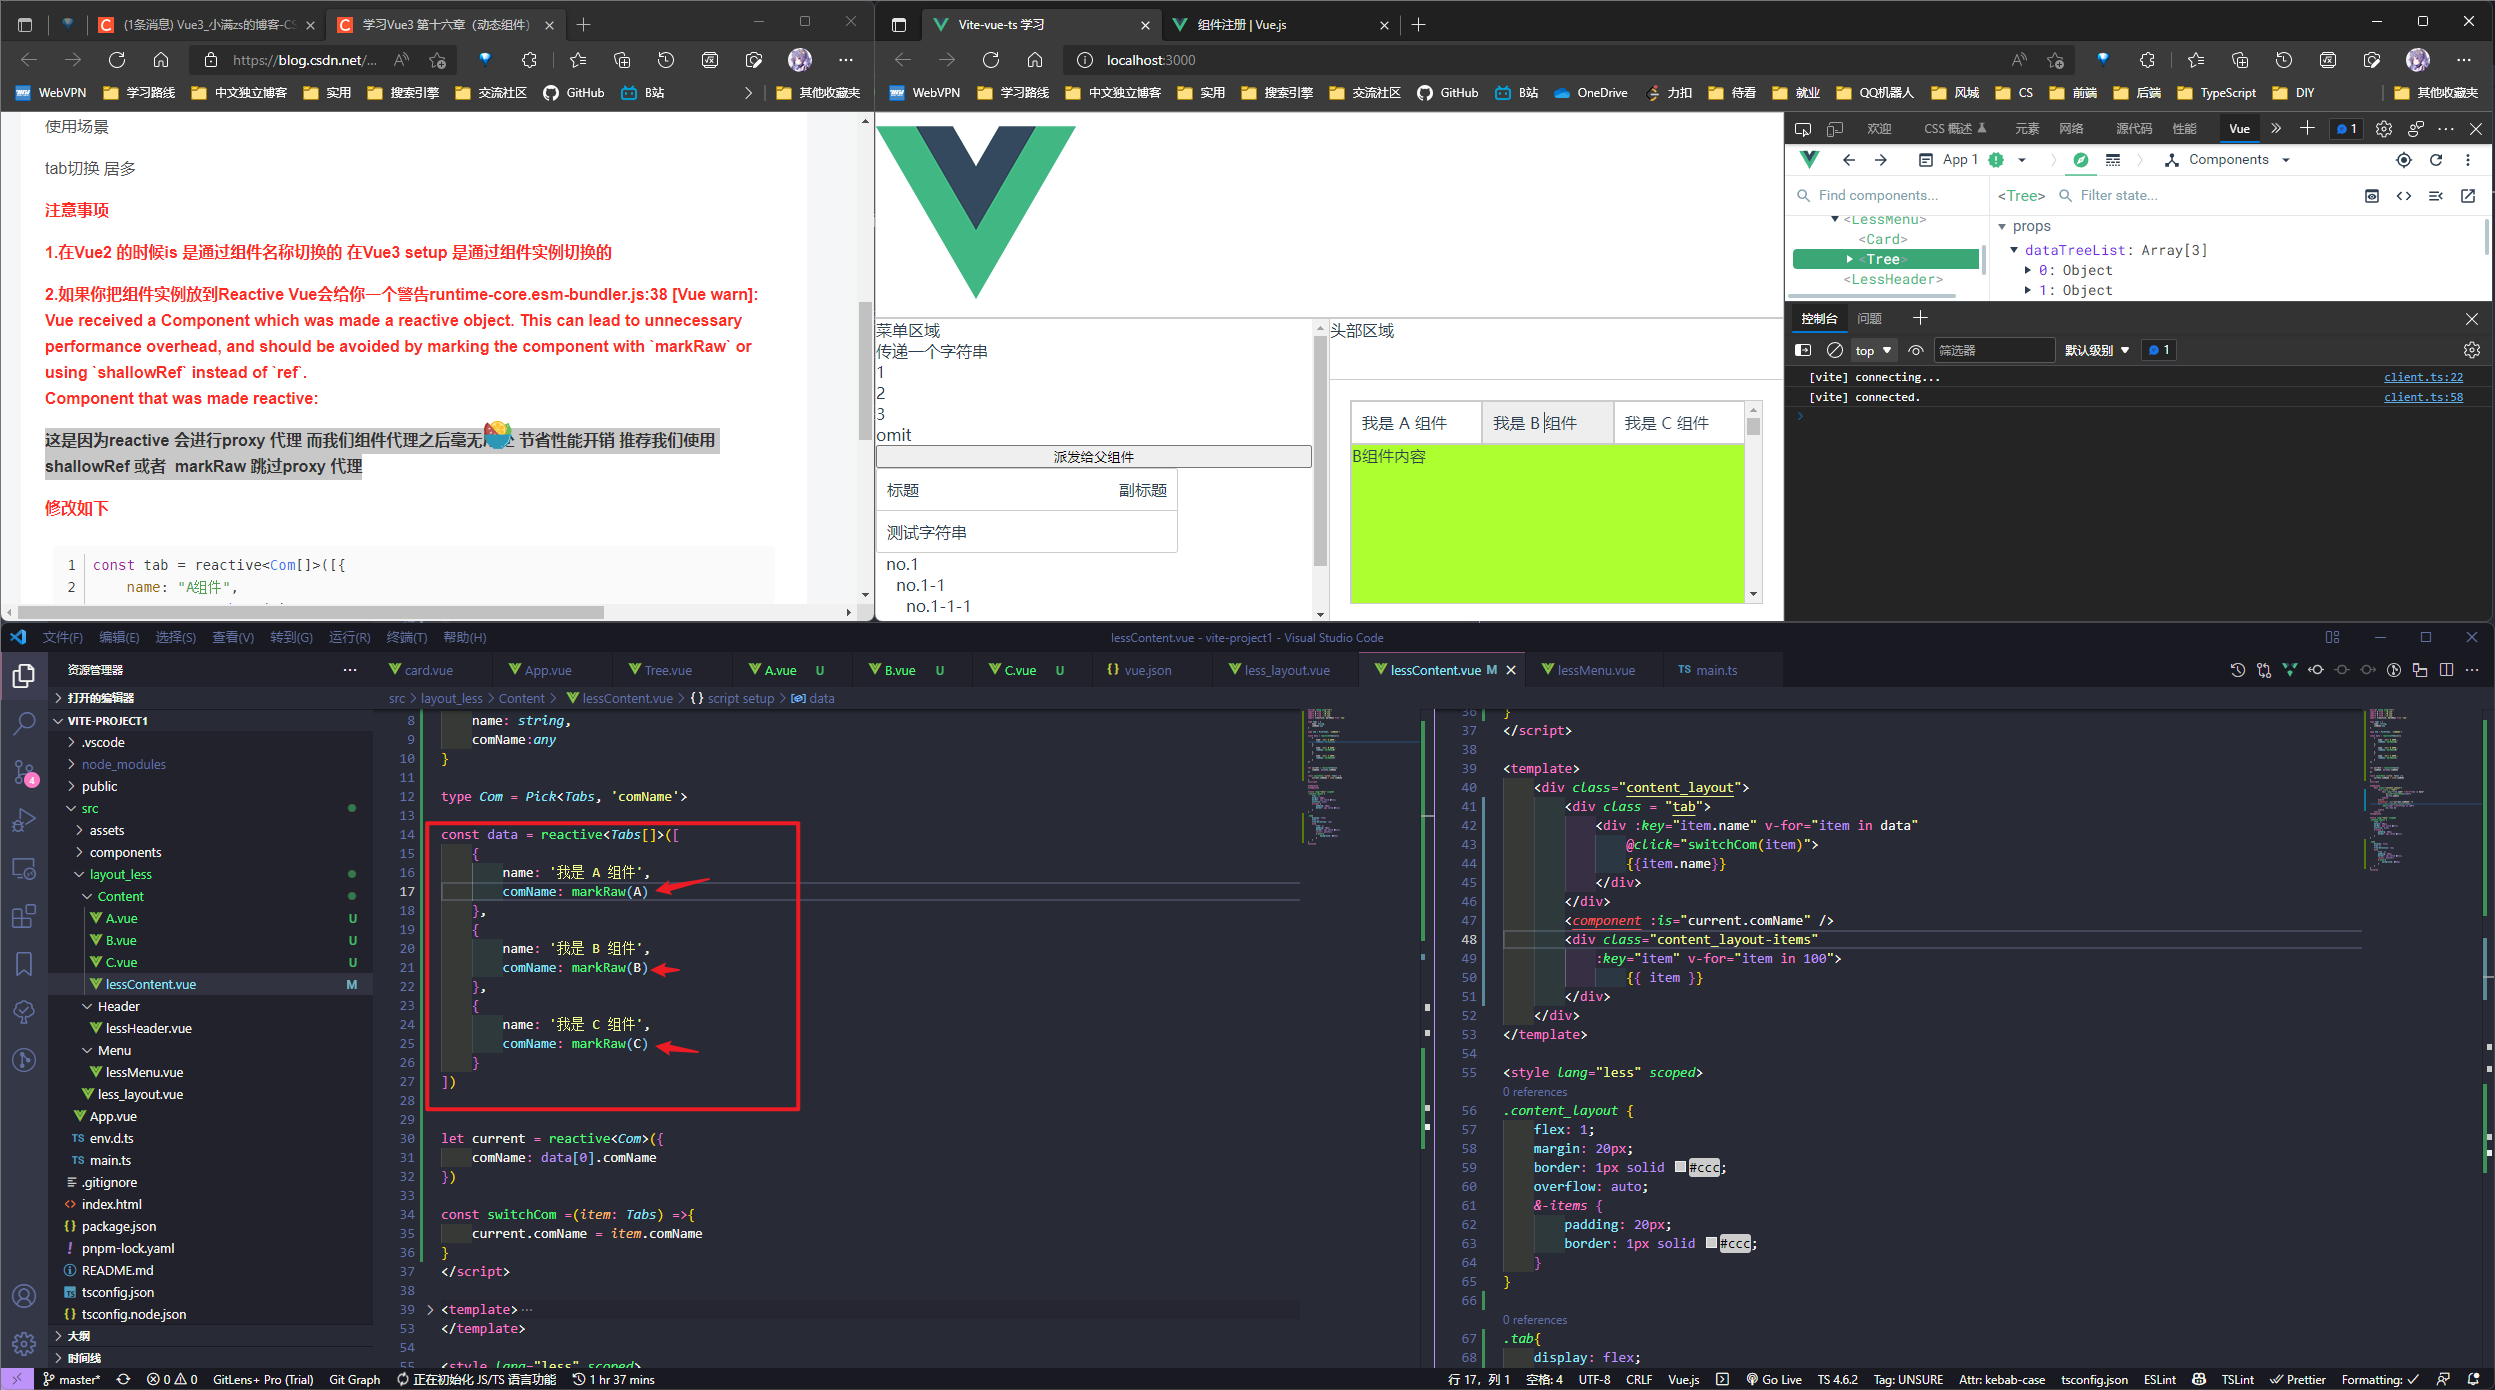
这是因为
reactive会进行proxy 代理; 而我们组件代理之后毫无用处; 为节省性能开销推荐我们使用shallowRef或者markRaw跳过proxy代理:
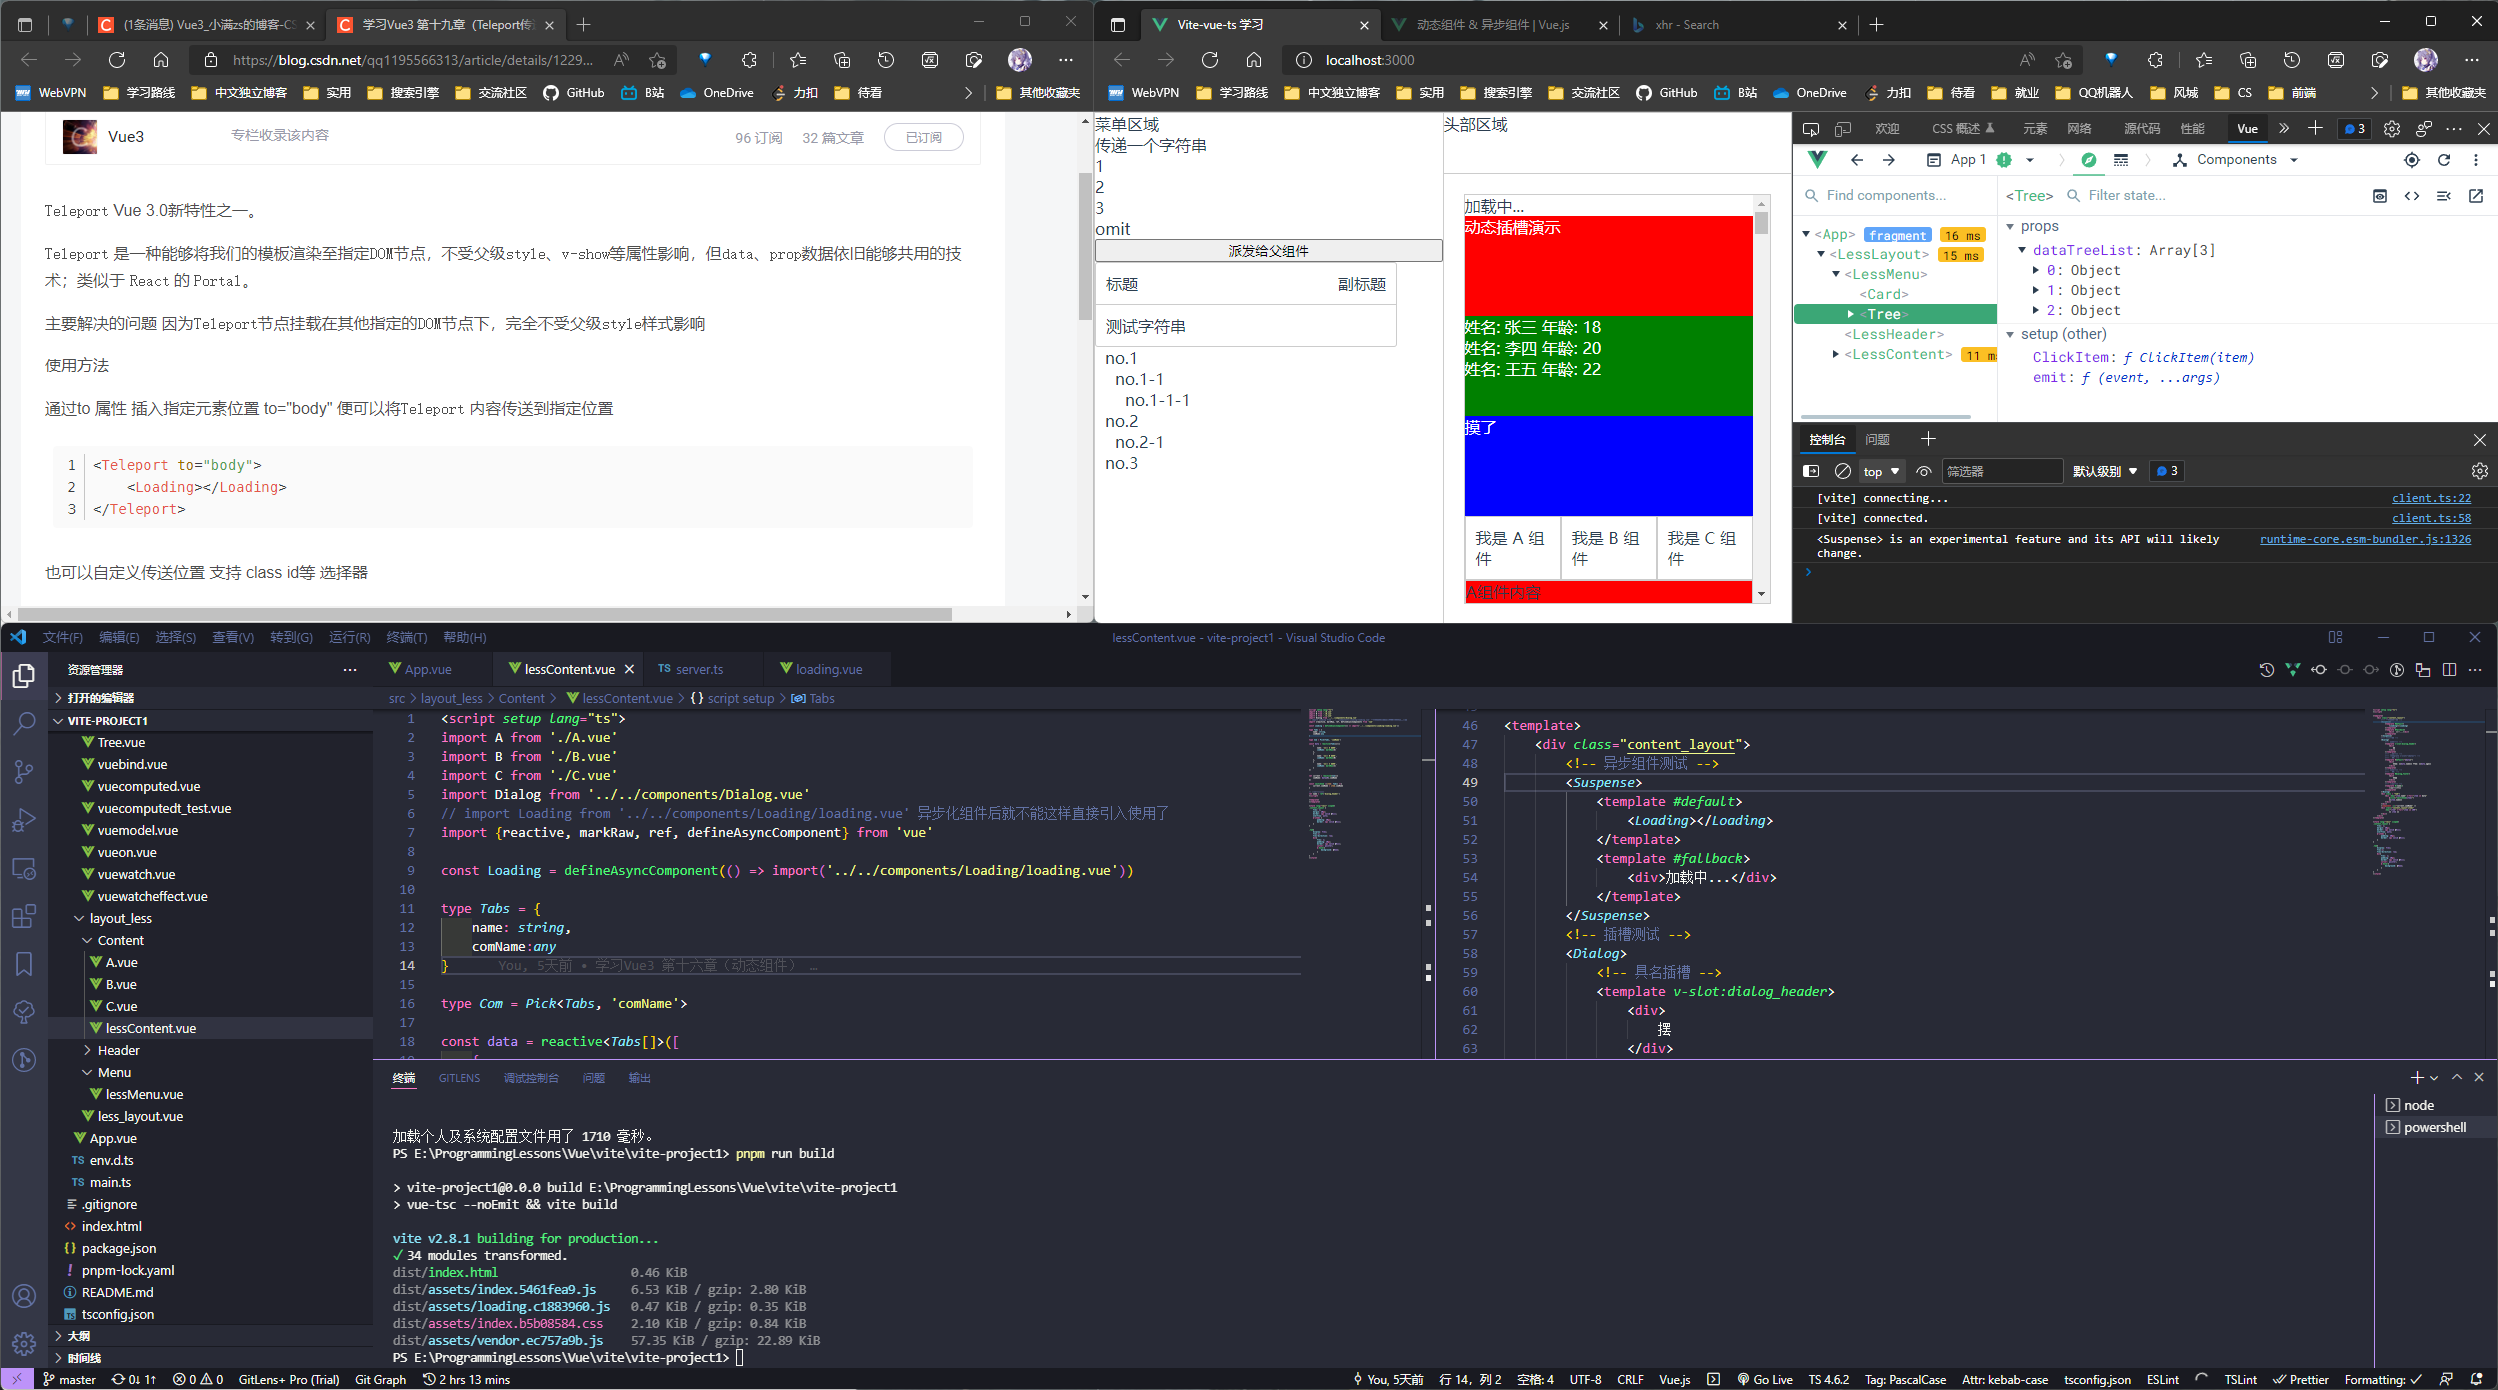
异步组件
在大型应用中,我们可能需要将应用分割成小一些的代码块,并且只在需要的时候才从服务器加载一个模块。为了实现这个效果,Vue 有一个 defineAsyncComponent 方法配合 Suspense 及其插槽可以使用异步组件
data.json
[
  {
    "name": "张三"
  },
  {
    "name": "李四"
  },
  {
    "name": "王五"
  },
  {
    "name": "赵六"
  }
]
loading.vue
<script setup lang="ts">
import { axios } from "./server";

const list = await axios("./data.json");
console.log(list);
</script>

<template>
  <div v-for="item in list">
    {{ item.name }}
  </div>
</template>

<style lang="less" scoped></style>
server.ts
type NameList = {
  name: string;
};

export const axios = (url: string): Promise<NameList[]> => {
  return new Promise((resolve) => {
    let xhr: XMLHttpRequest = new XMLHttpRequest();

    xhr.open("GET", url);

    xhr.onreadystatechange = () => {
      if (xhr.readyState === 4 && xhr.status === 200) {
        // 等 2s 返回信息
        setTimeout(() => {
          resolve(JSON.parse(xhr.responseText));
        }, 2000);
      }
    };

    xhr.send();
  });
};
lessContent.vue
<script setup lang="ts">
import A from "./A.vue";
import B from "./B.vue";
import C from "./C.vue";
import Dialog from "../../components/Dialog.vue";
// import Loading from '../../components/Loading/loading.vue' 异步化组件后就不能这样直接引入使用了
import { reactive, markRaw, ref, defineAsyncComponent } from "vue";

const Loading = defineAsyncComponent(
  () => import("../../components/Loading/loading.vue")
);

type Tabs = {
  name: string;
  comName: any;
};

type Com = Pick<Tabs, "comName">;

const data = reactive<Tabs[]>([
  {
    name: "我是 A 组件",
    comName: markRaw(A),
  },
  {
    name: "我是 B 组件",
    comName: markRaw(B),
  },
  {
    name: "我是 C 组件",
    comName: markRaw(C),
  },
]);

let current = reactive<Com>({
  comName: data[0].comName,
});

const switchCom = (item: Tabs) => {
  current.comName = item.comName;
};

// 动态插槽相关
let name = ref("dialog_header");
</script>

<template>
  <div class="content_layout">
    <!-- 异步组件测试 -->
    <Suspense>
      <template #default>
        <Loading></Loading>
      </template>
      <template #fallback>
        <div>加载中...</div>
      </template>
    </Suspense>
    <!-- 插槽测试 -->
    <Dialog>
      <!-- 具名插槽 -->
      <template v-slot:dialog_header>
        <div>摆</div>
      </template>
      <!-- 匿名插槽 -->
      <!-- <template v-slot="{data}"> -->
      <!-- 简写: -->
      <template #default="{ data }">
        <div>姓名: {{ data.name }} 年龄: {{ data.age }}</div>
      </template>
      <!-- 具名插槽 -->
      <!-- 简写: -->
      <template #dialog_footer>
        <div>摸了</div>
      </template>
      <!-- 动态插槽 -->
      <template #[name]> 动态插槽演示 </template>
    </Dialog>
    <div class="tab">
      <div :key="item.name" v-for="item in data" @click="switchCom(item)">
        {{ item.name }}
      </div>
    </div>
    <component :is="current.comName" />
    <div class="content_layout-items" :key="item" v-for="item in 100">
      {{ item }}
    </div>
  </div>
</template>

<style lang="less" scoped>
.content_layout {
  flex: 1;
  margin: 20px;
  border: 1px solid #ccc;
  overflow: auto;
  &-items {
    padding: 20px;
    border: 1px solid #ccc;
  }
}

.tab {
  display: flex;
  flex: 1;
  flex-direction: row;
  div {
    flex: 1;
    padding: 10px;
    border: 1px solid #ccc;
    cursor: pointer;
    &:hover {
      background: #eee;
    }
  }
}
</style>
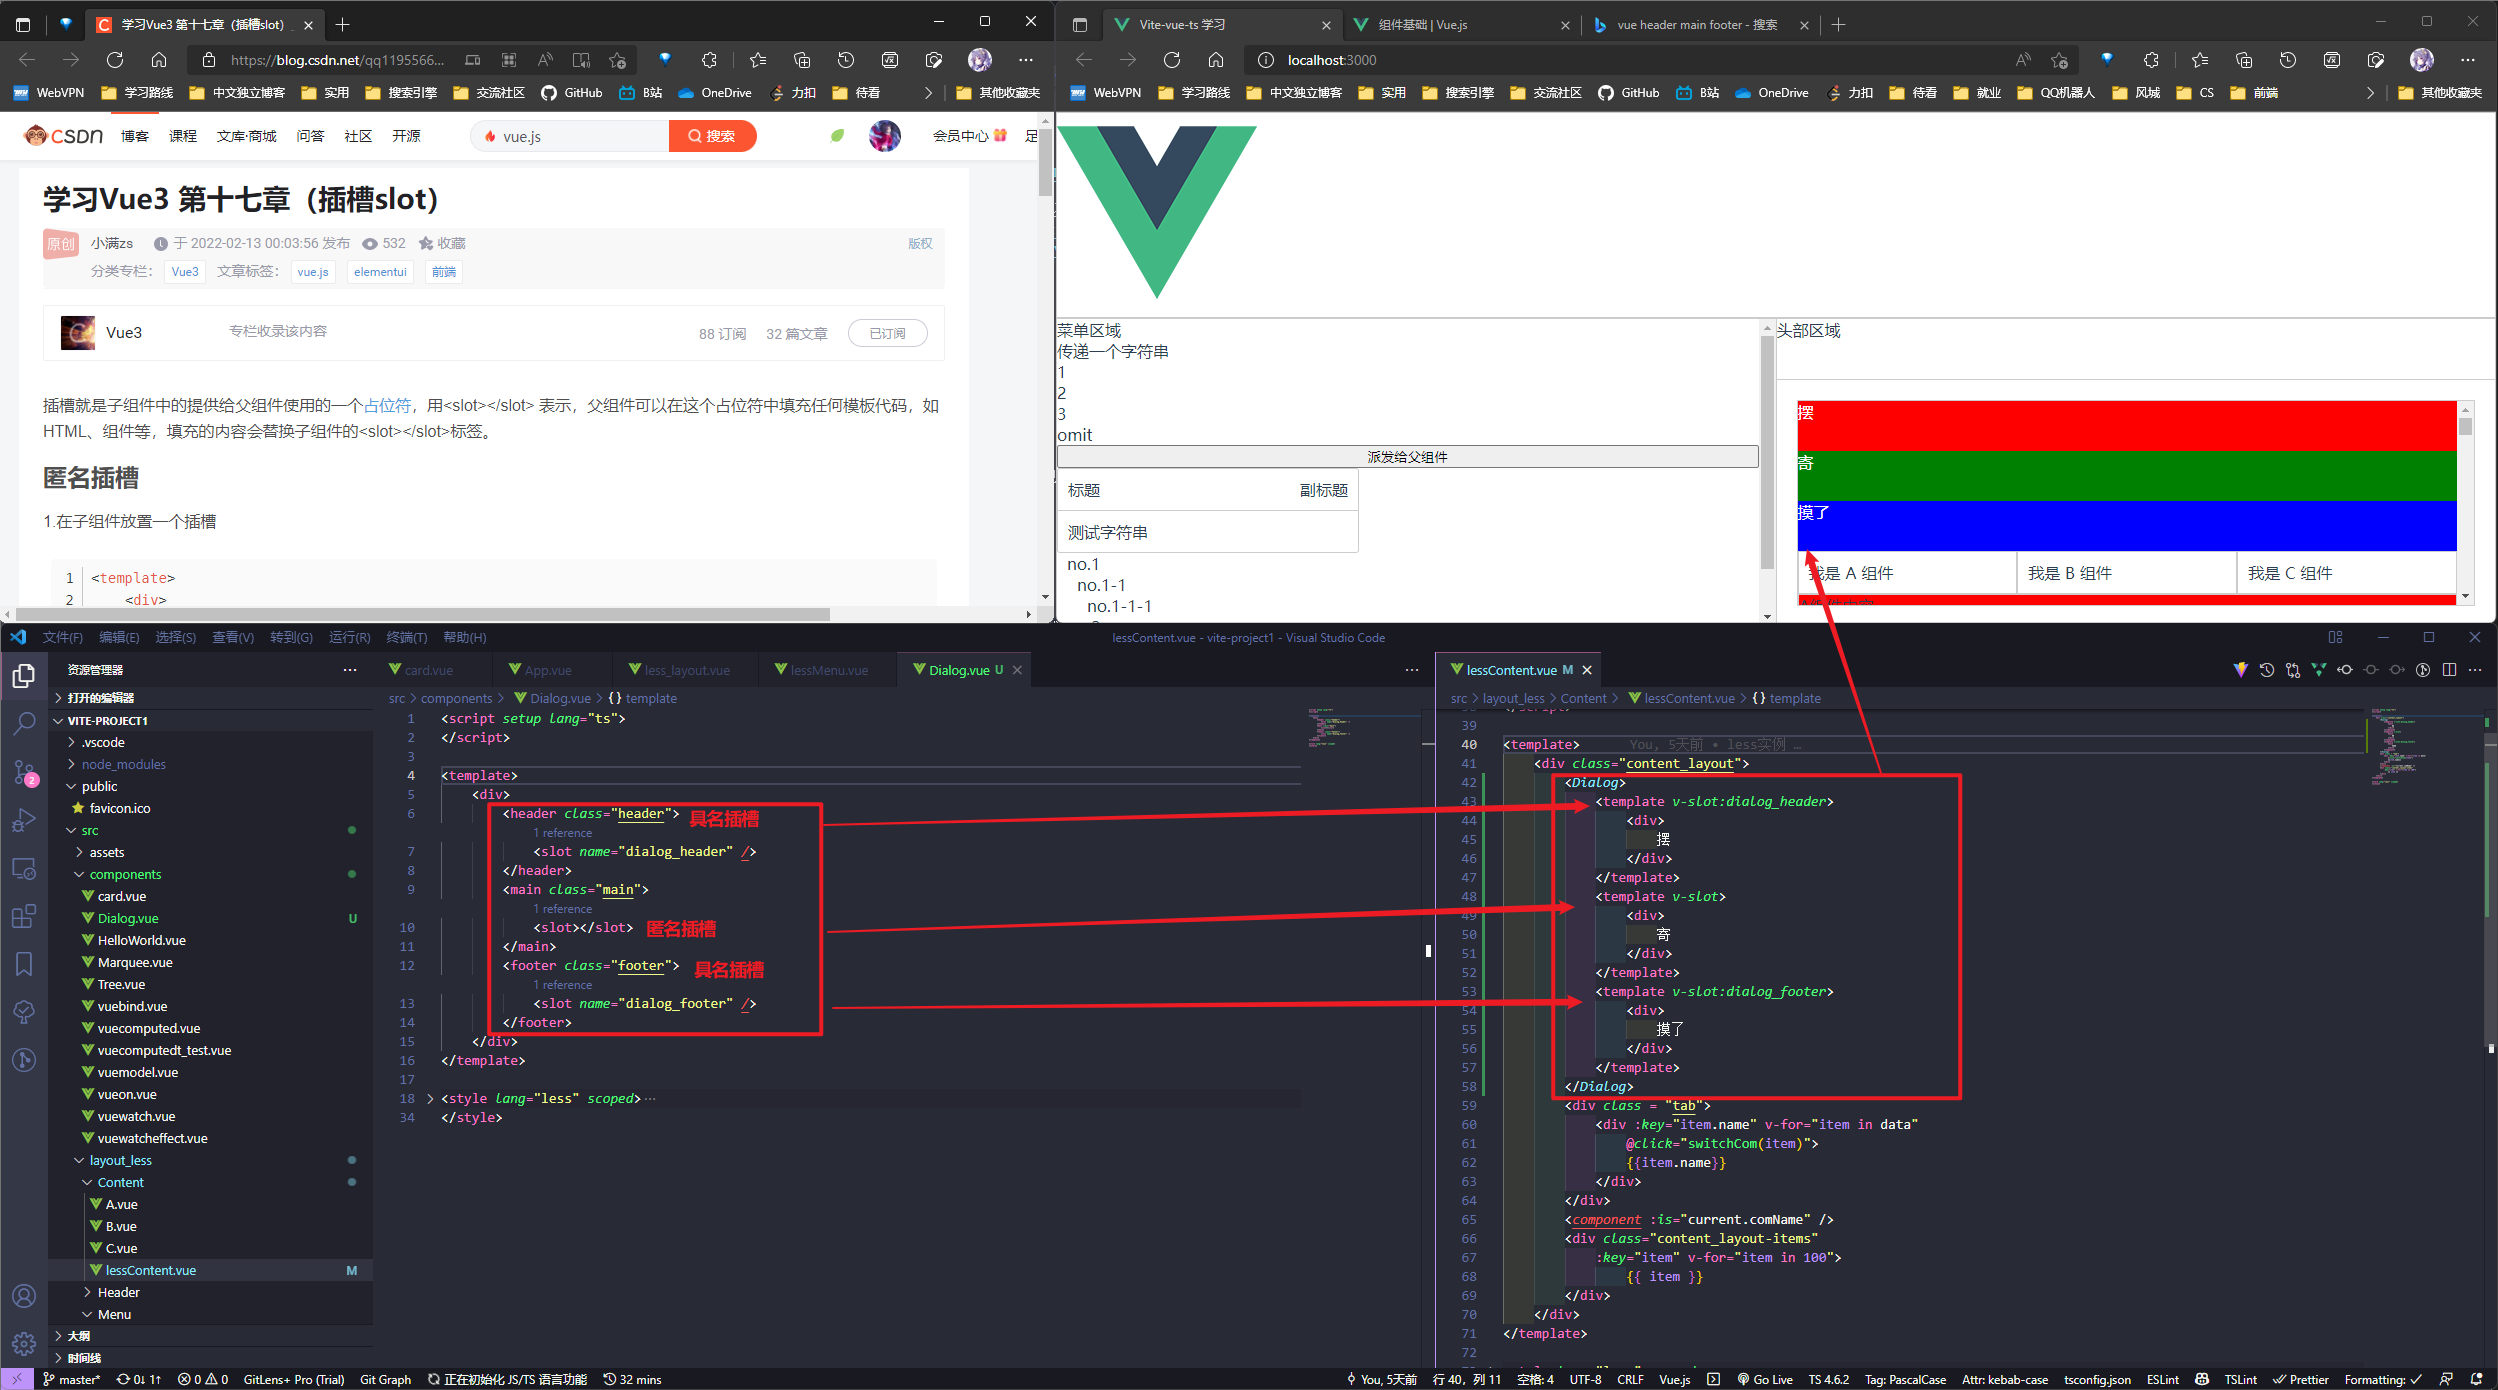
通过插槽分发内容
插槽就是子组件中的提供给父组件使用的一个占位符,用 <slot></slot> 表示,父组件可以在这个占位符中填充任何模板代码,如 HTML、组件等,填充的内容会替换子组件的 <slot></slot> 标签。
匿名插槽
在子组件放置一个插槽:
<template>
  <div>
    <slot></slot>
  </div>
</template>
在父组件中使用插槽并给其填充内容:
<Dialog>
           <template v-slot>
               <div>寄</div>
           </template>
        </Dialog>
具名插槽
给插槽起个名字, 父组件中通过不同的插槽名调用不同插槽
<div>
        <slot name="header"></slot>
        <slot></slot>

        <slot name="footer"></slot>
    </div>
<Dialog>
            <!-- 具名插槽 -->
            <template v-slot:dialog_header>
                <div>
                    摆
                </div>
            </template>
            <!-- 具名插槽 -->
            <!-- 简写: -->
            <template #dialog_footer>
                <div>
                    摸了
                </div>
        </Dialog>
作用域插槽
在子组件插槽中动态绑定参数并派发给父组件调用插槽时使用
<script setup lang="ts">
import { reactive } from "vue";

type names = {
  name: string;
  age: number;
};
const data = reactive<names[]>([
  {
    name: "张三",
    age: 18,
  },
  {
    name: "李四",
    age: 20,
  },
  {
    name: "王五",
    age: 22,
  },
]);
</script>

<template>
  <div>
    <main class="main">
      <div v-for="item in data">
        <slot :data="item"></slot>
      </div>
    </main>
  </div>
</template>
通过结构方式取值
<Dialog>
            <!-- 匿名插槽 -->
            <!-- <template v-slot="{data}"> -->
            <!-- 简写: -->
            <template #default="{data}">
                <div>
                    姓名: {{data.name}} 年龄: {{data.age}}
                </div>
            </template>
        </Dialog>
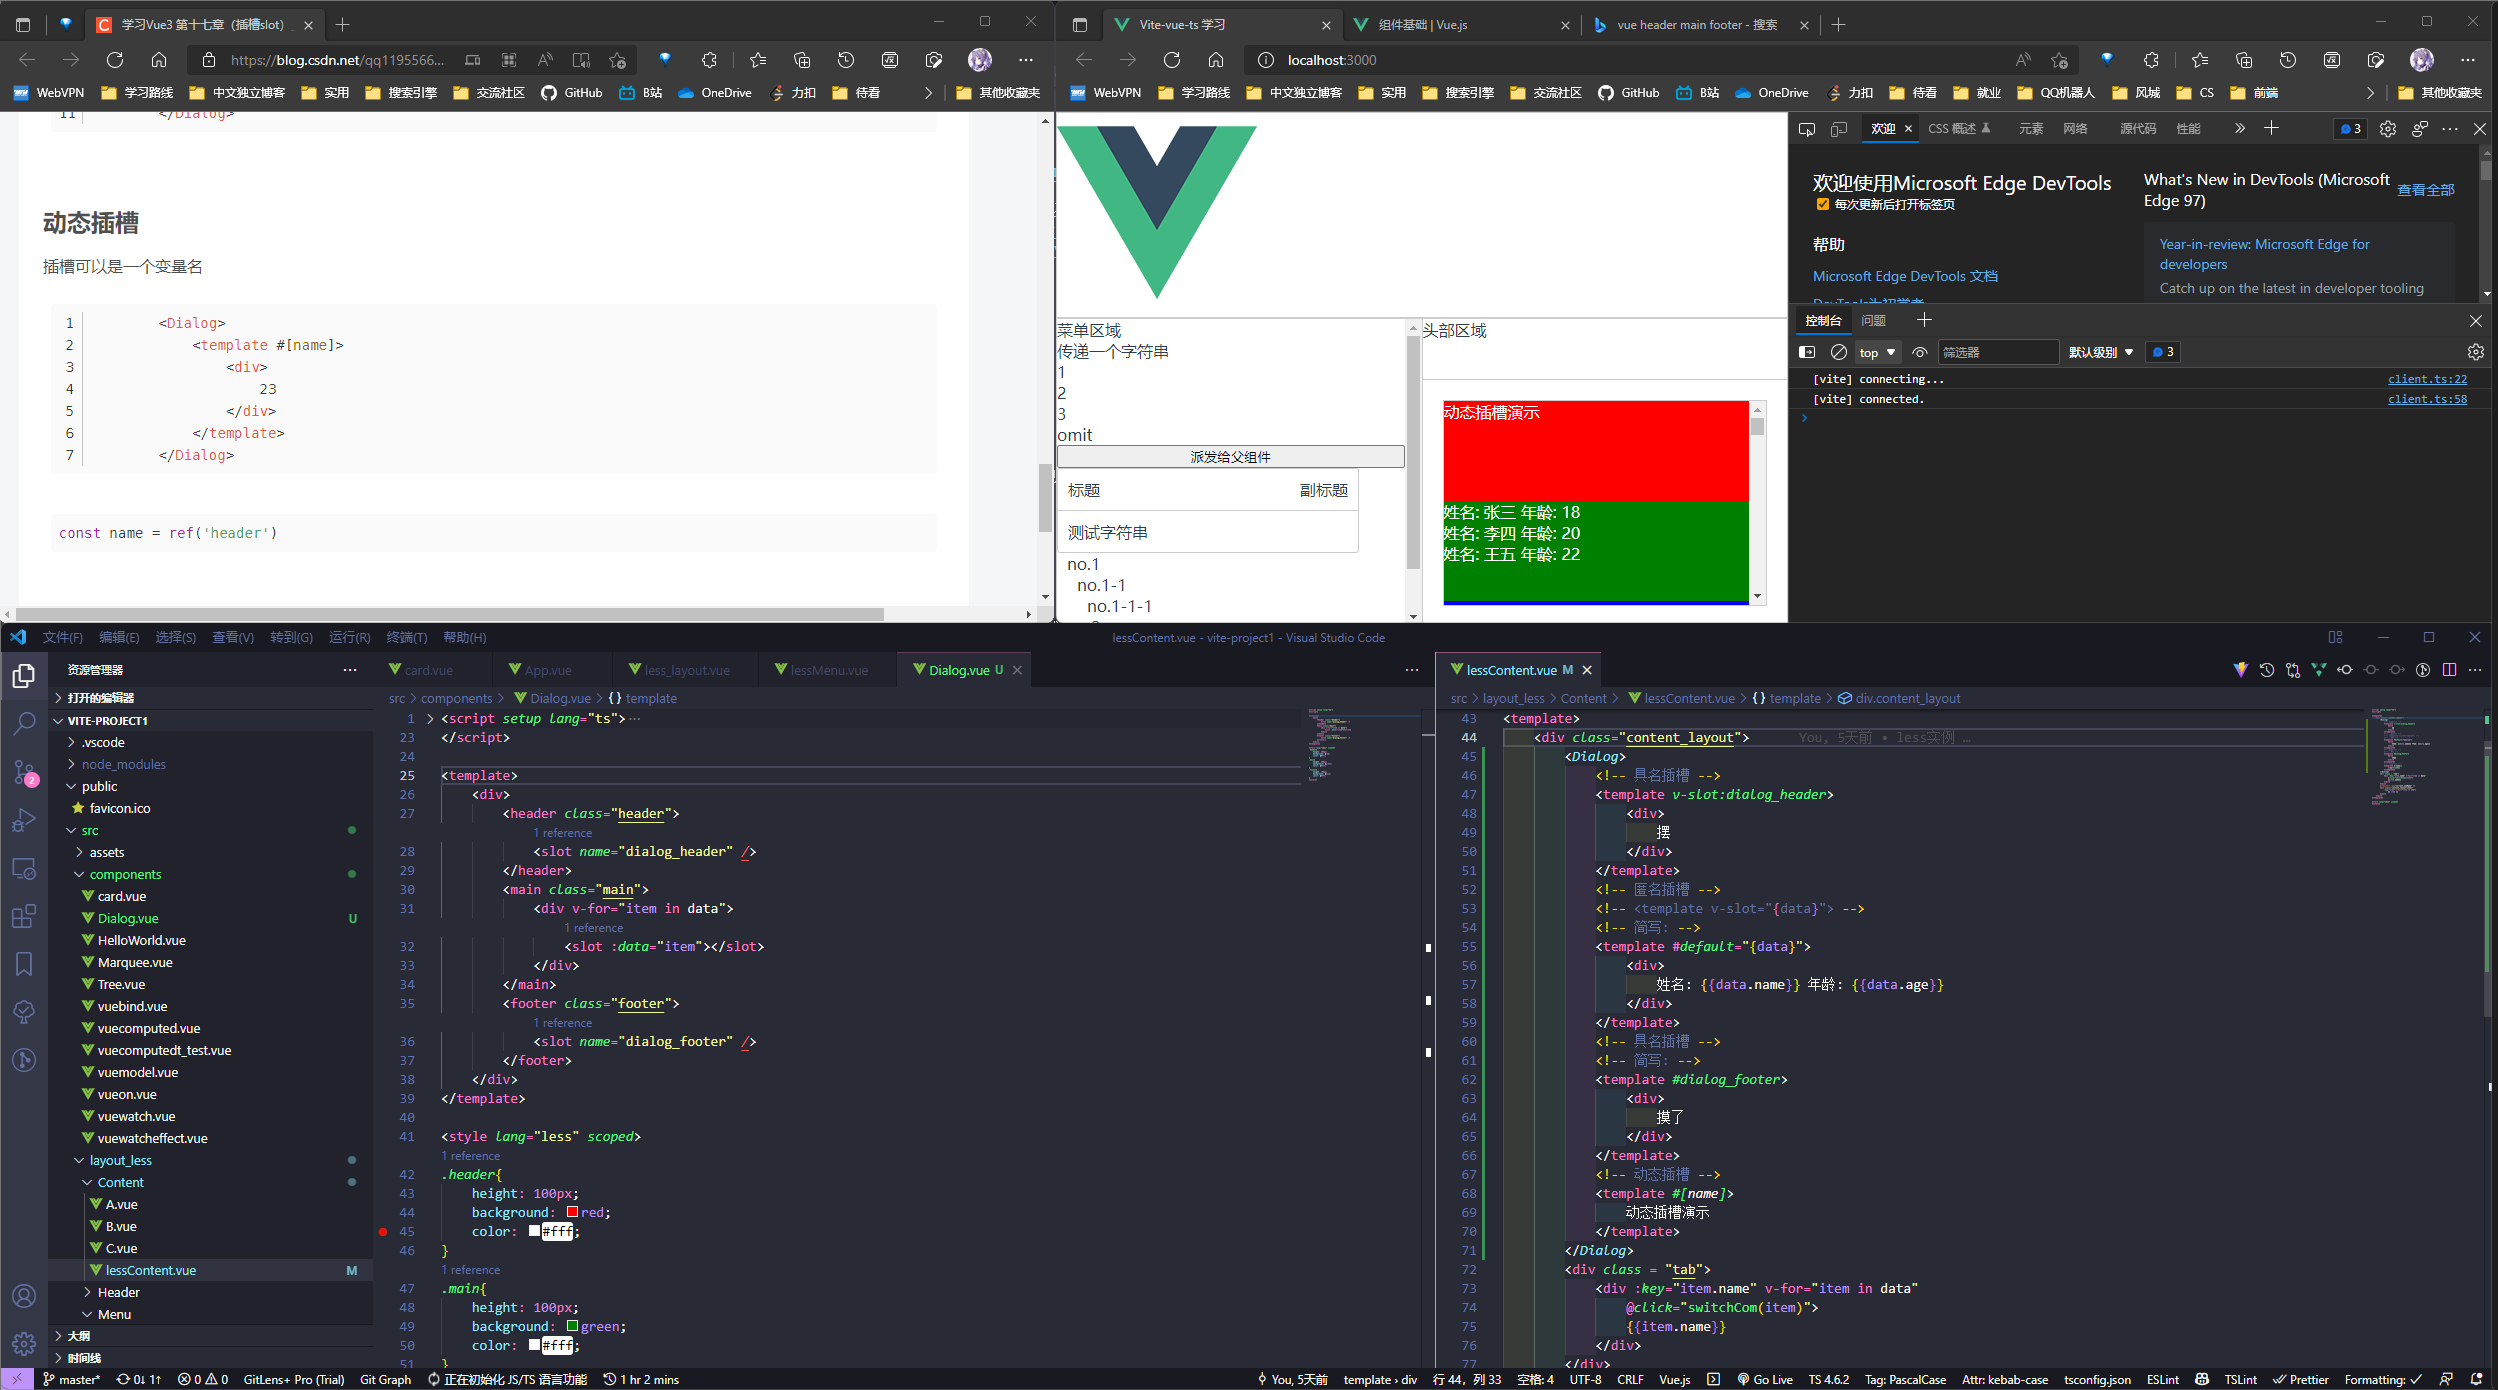
动态插槽
父组件中调用插槽时插槽名可以是个变量名, 通过改变变量调用不同名称对应插槽
const name = ref('header')

<Dialog>
    <template #[name]>
		<div>
    		233
        </div>
    </template>
</Dialog>
Dialog.vue
<script setup lang="ts">
import { reactive } from "vue";

type names = {
  name: string;
  age: number;
};
const data = reactive<names[]>([
  {
    name: "张三",
    age: 18,
  },
  {
    name: "李四",
    age: 20,
  },
  {
    name: "王五",
    age: 22,
  },
]);
</script>

<template>
  <div>
    <header class="header">
      <slot name="dialog_header" />
    </header>
    <main class="main">
      <div v-for="item in data">
        <slot :data="item"></slot>
      </div>
    </main>
    <footer class="footer">
      <slot name="dialog_footer" />
    </footer>
  </div>
</template>

<style lang="less" scoped>
.header {
  height: 100px;
  background: red;
  color: #fff;
}
.main {
  height: 100px;
  background: green;
  color: #fff;
}
.footer {
  height: 100px;
  background: blue;
  color: #fff;
}
</style>
lessContent.vue:
<script setup lang="ts">
import A from "./A.vue";
import B from "./B.vue";
import C from "./C.vue";
import Dialog from "../../components/Dialog.vue";
import { reactive, markRaw, ref } from "vue";

type Tabs = {
  name: string;
  comName: any;
};

type Com = Pick<Tabs, "comName">;

const data = reactive<Tabs[]>([
  {
    name: "我是 A 组件",
    comName: markRaw(A),
  },
  {
    name: "我是 B 组件",
    comName: markRaw(B),
  },
  {
    name: "我是 C 组件",
    comName: markRaw(C),
  },
]);

let current = reactive<Com>({
  comName: data[0].comName,
});

const switchCom = (item: Tabs) => {
  current.comName = item.comName;
};

// 动态插槽相关
let name = ref("dialog_header");
</script>

<template>
  <div class="content_layout">
    <Dialog>
      <!-- 具名插槽 -->
      <template v-slot:dialog_header>
        <div>摆</div>
      </template>
      <!-- 匿名插槽 -->
      <!-- <template v-slot="{data}"> -->
      <!-- 简写: -->
      <template #default="{ data }">
        <div>姓名: {{ data.name }} 年龄: {{ data.age }}</div>
      </template>
      <!-- 具名插槽 -->
      <!-- 简写: -->
      <template #dialog_footer>
        <div>摸了</div>
      </template>
      <!-- 动态插槽 -->
      <template #[name]> 动态插槽演示 </template>
    </Dialog>
    <div class="tab">
      <div :key="item.name" v-for="item in data" @click="switchCom(item)">
        {{ item.name }}
      </div>
    </div>
    <component :is="current.comName" />
    <div class="content_layout-items" :key="item" v-for="item in 100">
      {{ item }}
    </div>
  </div>
</template>

<style lang="less" scoped>
.content_layout {
  flex: 1;
  margin: 20px;
  border: 1px solid #ccc;
  overflow: auto;
  &-items {
    padding: 20px;
    border: 1px solid #ccc;
  }
}

.tab {
  display: flex;
  flex: 1;
  flex-direction: row;
  div {
    flex: 1;
    padding: 10px;
    border: 1px solid #ccc;
    cursor: pointer;
    &:hover {
      background: #eee;
    }
  }
}
</style>