Github
Github
加速
通用的加速方案最好的措施就是用代理
对于不方便使用代理的场景, 如果是 clone 或者下载项目压缩包, releases 的场景, 可以使用镜像
除此以外, watt Toolkit 等工具也可以用
最不济可以手动改 host
Github 镜像
eryajf/Thanks-Mirror: 整理记录各个包管理器,系统镜像,以及常用软件的好用镜像,Thanks Mirror。 走过路过,如觉不错,麻烦点个赞👆🌟 (github.com)
Mirrors
GitHub 相关的国内镜像,有不同的使用方式,这里仅列出目前可用的国内镜像,具体用法请查阅镜像的官方说明。
https://hub.fastgit.xyz/
提供了 GitHub 全站镜像,但注意不要在这个站登陆你的 GitHub 账号。详见官方文档。
类似fastgit的还有:
- https://hub.yzuu.cf/
- https://hub.njuu.cf/
https://gitclone.com/
提供了
GitHub全面的加速,详见官方文档。https://ghproxy.com/
GitHub文件 , Releases , archive , gist ,raw.githubusercontent.com文件代理加速下载服务,使用细则参见官方。https://toolwa.com/github/
https://github.91chi.fun/
https://github.abskoop.workers.dev/
https://pd.zwc365.com/
https://gh.con.sh/
https://www.7ed.net/#/raw-cdn
也可以通过其他方式提供的加速方案。
镜像测速
# 读取源列表每一行的地址, 将每个地址拆分为 [协议, 域名, 路径], 然后对每个域名 ping 4次, 按照响应时间递增排序, 输出到目的文件
import os
import re


def ping_linux(host: str, count: int = 4) -> float:
    """Linux 下的 ping 命令
    :param host: 域名
    :param count: ping 的次数
    :return: 返回平均响应时长
    """
    output = os.popen(f'ping {host} -c {count}').read()
    try:
        min, avg, max, mdev = re.findall(r'rtt min/avg/max/mdev = (\d+\.\d+)/(\d+\.\d+)/(\d+\.\d+)/(\d+\.\d+) ms', output)[0]
        print(f'{host} {avg}ms')
    # 全丢包的情况下就找不到了, 此时返回一个很大的数
    except IndexError:
        print(f'{host} 超时')
        return 999999
    return float(avg)


def split_url_to_hosts(source_path: str) -> list:
    """将源列表每个条目拆分成 [协议, 域名, 路径] 的格式并返回所有条目拆分完后的嵌套列表
    :param source_path: 源文件
    :return: 拆分后的嵌套列表
    """
    with open(source_path, 'r') as f:
        hosts = f.read().splitlines()
        for i in range(len(hosts)):
            hosts[i] = hosts[i].strip()
            # 根据 :// 进行拆分, 拆分结果作为继续拆分 协议, 域名, 路径 的依据
            main_split = hosts[i].split('://')

            # 第一片为 协议://
            first_fragment = main_split[0] + '://'
            # 第二片为 域名
            second_fragment = main_split[1].split('/')[0]
            # 第三片为 路径
            third_fragment = '/' + '/'.join(main_split[1].split('/')[1:])

            # 将拆分后的三片组合成一个列表
            hosts[i] = [first_fragment, second_fragment, third_fragment]
        # 返回拆分后的嵌套列表
        return hosts


def sort_write_hosts(hosts: list, target_path: str) -> None:
    """根据对源文件拆分后的嵌套列表中的域名进行 ping 操作, 并将结果按响应时间升序输出到目的文件
    :param hosts: 源文件拆分后的嵌套列表
    :param target_path: 目标输出文件路径
    :return: None
    """
    # 遍历 hosts 中的每个域名, 并对其进行 ping 操作, 将平均响应时间插入到 hosts 尾部
    for i in range(len(hosts)):
        hosts[i].append(ping_linux(hosts[i][1]))
    # 按照响应时间升序排序
    hosts.sort(key=lambda x: x[3])
    # 将排序后的 hosts 写入到目的文件
    with open(target_path, 'w') as f:
        for host in hosts:
            f.write(f'{host[0]}{host[1]}{host[2]} {host[3]}ms \n')


def sort_sources(source_path: str, target_path: str) -> None:
    """对源文件(kali 镜像列表)进行排序, 并按照响应时间升序输出到目的文件
    :param source_path: kali 镜像列表文件路径
    :param target_path: 按照相应时间升序输出的目的文件路径
    """
    print("开始拆分源文件...")
    # 将源文件拆分为嵌套列表
    hosts = split_url_to_hosts(source_path)
    print("拆分完成, 开始排序...")
    # 对拆分后的嵌套列表进行排序并输出到目的文件
    sort_write_hosts(hosts, target_path)
    print("排序完成, 请查看目的文件")


if __name__ == '__main__':
    source_path = os.path.join(os.path.dirname(__file__), 'sources_github.txt')
    target_path = os.path.join(os.path.dirname(__file__), 'result_github.txt')
    sort_sources(source_path, target_path)
PC网页端用户头像加载不出来
- 解决Github网页上图片显示失败的问题[参考链接]
- 当前无法显示用户头像的页面下
Ctrl+Shift+C打开元素选择器选择未加载出的头像定位到其在源码中的标签并记下其域名 - 打开
https://www.ipaddress.com/输入域名并回车得到一个ip - 打开路径
C:\Windows\System32\drivers\etc - 修改该路径下的
host文件的文件属性中的安全一栏中的Users组的权限,勾选完全控制 - 用记事本打开
host文件,在末尾粘贴以下文字并保存退出,返回原网页刷新即可# GitHub Start(更新于2021.1.22) 140.82.113.3 github.com 140.82.114.20 gist.github.com 199.232.96.133 assets-cdn.github.com 199.232.96.133 raw.githubusercontent.com 199.232.96.133 gist.githubusercontent.com 199.232.96.133 cloud.githubusercontent.com 199.232.96.133 camo.githubusercontent.com 199.232.96.133 avatars.githubusercontent.com 199.232.68.133 avatars.githubusercontent.com 199.232.96.133 avatars0.githubusercontent.com 199.232.68.133 avatars0.githubusercontent.com 199.232.28.133 avatars1.githubusercontent.com 199.232.96.133 avatars1.githubusercontent.com 199.232.96.133 avatars2.githubusercontent.com 199.232.28.133 avatars2.githubusercontent.com 199.232.96.133 avatars3.githubusercontent.com 199.232.68.133 avatars3.githubusercontent.com 199.232.96.133 avatars4.githubusercontent.com 199.232.68.133 avatars4.githubusercontent.com 199.232.96.133 avatars5.githubusercontent.com 199.232.68.133 avatars5.githubusercontent.com 199.232.96.133 avatars6.githubusercontent.com 199.232.68.133 avatars6.githubusercontent.com 199.232.96.133 avatars7.githubusercontent.com 199.232.68.133 avatars7.githubusercontent.com 199.232.96.133 avatars8.githubusercontent.com 199.232.68.133 avatars8.githubusercontent.com # GitHub End如若你得到的ip并非
199.232.96.133则只需把上面代码中的199.232.96.133利用查找替换替换为你得到的ip即可(当再次无法看到头像时可以试着重查一次ip然后替换掉原ip)
Git配置
- 设置用户名
git config --global user.name "GitHub用户名"- 用户名随个人喜好即可,并非必须要Github的用户名,可以起一个能够代表当前修改环境的名字
- 设置用户邮箱
git config --global user.email "GitHub绑定邮箱"- GitHub绑定邮箱请根据自己注册的账号邮箱填写
- 查看当前配置项列表
git config --list - 删除某个配置项(以
user.name为例)git config --global --unset user.name - 编辑某个配置项
git config --global --edit user.name '用户名'
使用 VSCode 拉取更新与推送修改经常出错, 需要配置代理(以本地 7890 端口为例), 在本地项目根目录下打开命令行进行代理配置:
git config http.proxy http://127.0.0.1:7890
git config https.proxy http://127.0.0.1:7890
git config core.gitPorxy socks5://127.0.0.1:7890
可以配置全局代理, 但是由于本地还有在用内网的 gitlab, 所以不适合配全局, 这里是针对项目配的
取消代理配置如下:
git config --global --unset http.proxy
git config --global --unset https.proxy
git config --global --unset core.gitPorxy
SSH Key
在主机创建 ssh key
ssh-keygen -t rsa -C "youremail@example.com"-C(comment)随便填, 有辨识度就行运行命令后一路回车默认配置, 根据运行提示找到 公钥
id_rsa.pubGithub 右上角头像 -> Settings -> SSH and GPG keys -> add new ssh keytitle 随便填, key 粘贴
id_rsa.pub的全部内容在主机上使用
git clone 仓库SSH路径来 clone 仓库
需要注意的是在 Linux 上使用不同的用户创建的 ssh-key 加入到 github 后也只有对应的用户可以使用, 当切换用户后需要将该用户的 ssh-key 也加入到 Github 的 SSH-key 中方可使用
本地仓库切换 https 到 ssh
【求助】开启OpenClash之后,无法使用 git clone/push,kex ssh 密钥错误 · Issue #1960 · vernesong/OpenClash (github.com)
[Correct way to set git proxy - Kirovj's Chaos --- 设置 git 代理的正确方法 - Kirovj's Chaos (wuyiting.cn)](https://www.wuyiting.cn/blog/Correct way to set git proxy)
使用Git时报错Connection reset by 20.205.243.166 port 22_Wrysmile0308的博客-CSDN博客
We updated our RSA SSH host key - The GitHub Blog --- 我们更新了 RSA SSH 主机密钥 - GitHub 博客
可以使用如下命令查看当前仓库的远程 URL:
git remote -v

要想从 https(ssh) 切到 ssh(https) 的话可以如下设置:
# git remote set-url origin xxx
git remote set-url origin git@github.com:Ayusummer/DailyNotes.git
SSH 代理
最近更新仓库时总是莫名其妙被重置, 见到了好多奇怪的报错, 包括但不限于
Connection reset by 20.205.243.166 port 22
fatal: Could not read from remote repository.

Please make sure you have the correct access rights
and the repository exists.
Error: Unable to Fetch from Remote(s)
kex_exchange_identification: Connection closed by remote host
Connection closed by UNKNOWN port 65535
fatal: Could not read from remote repository.

Please make sure you have the correct access rights
and the repository exists.
Error: Unable to Fetch from Remote(s)
Host key verification failed.
fatal: Could not read from remote repository.

Please make sure you have the correct access rights
and the repository exists.
最终达成的解决方案是
把本地的密钥对删了, 重新新建一对密钥并将公钥添加到 github ssh key
清除本地
know_hosts中的 github 条目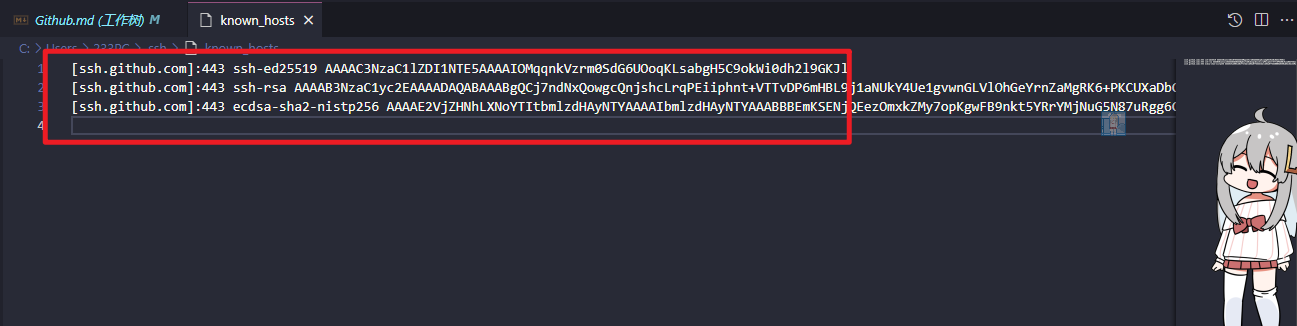
如果有
know_hosts.old文件, 可以直接把这个 old 删了
配置 ssh 使用本地代理, 以 clash 默认 7890 端口为例
配置文件在
~/.ssh/config, 不存在则新建, 对于 windows 而言可以是: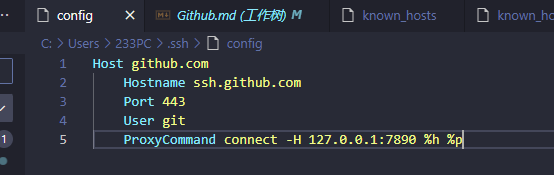
写入如下配置
Host github.com
    Hostname ssh.github.com
    Port 443
    User git
    ProxyCommand connect -H 127.0.0.1:7890 %h %p
关闭 VSCode, 重新打开即可, 可以 git fetch 看下效果


至少我如此操作成功修复了, 后续再遇到类似问题再看吧(
简介
Commit
- 提交代码
规范
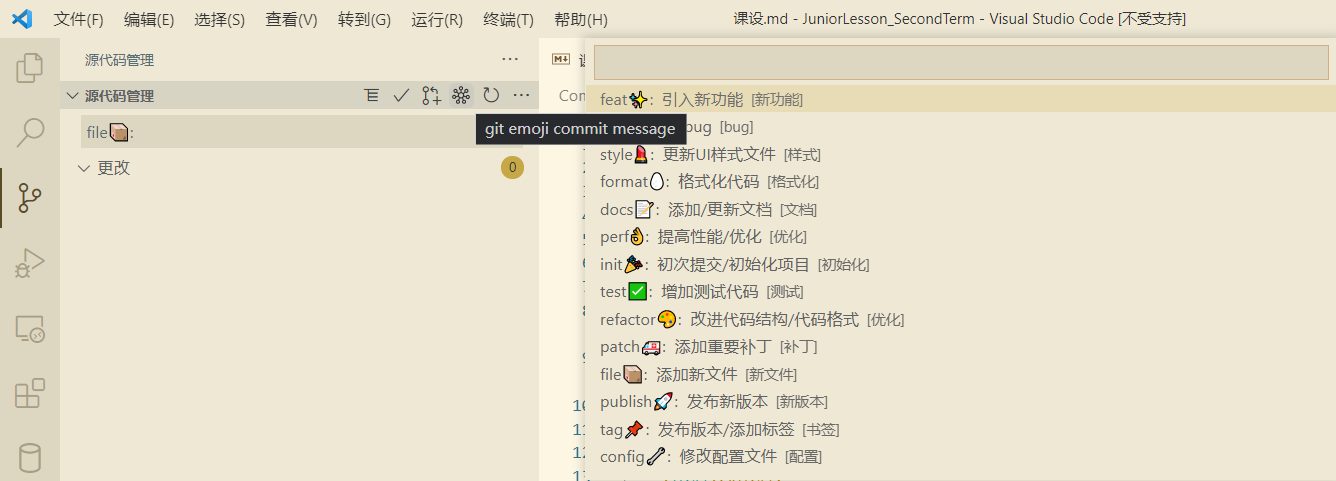
UvDream/git-commit-lint-vscode: vscode一款git 规范化提交插件 (github.com)
参照 Angular 社区的提交规范并结合 emoji, 上面参考链接里这位老哥开发了一款 VSCode git 规范化提交插件 git-commit-lint-vscode, 提交的时候可视化选择类型然后再手打详细信息
Issues
Pull Request
- 参考链接
- 以下为文章原文:
- 我尝试用类比的方法来解释一下 pull reqeust。想想我们中学考试,老师改卷的场景吧。
- 你做的试卷就像仓库,你的试卷肯定会有很多错误,就相当于程序里的 bug。
- 老师把你的试卷拿过来,相当于先 fork。
- 在你的卷子上做一些修改批注,相当于 git commit。
- 最后把改好的试卷给你,相当于发 pull request,
- 你拿到试卷重新改正错误,相当于 merge。
Actions
持续集成由很多操作组成,比如抓取代码、运行测试、登录远程服务器,发布到第三方服务等等。GitHub 把这些操作就称为 actions。
很多操作在不同项目里面是类似的,完全可以共享。GitHub 允许开发者把每个操作写成独立的脚本文件,存放到代码仓库,使得其他开发者可以引用。
如果你需要某个 action,不必自己写复杂的脚本,直接引用他人写好的 action 即可,整个持续集成过程,就变成了一个 actions 的组合。这就是 GitHub Actions 最特别的地方。
GitHub 做了一个官方市场,可以搜索到他人提交的 actions。另外,还有一个 awesome actions 的仓库,也可以找到不少 action。
每个 action 就是一个独立脚本,因此可以做成代码仓库,使用userName/repoName的语法引用 action。比如,actions/setup-node就表示github.com/actions/setup-node这个仓库,它代表一个 action,作用是安装 Node.js。事实上,GitHub 官方的 actions 都放在 github.com/actions 里面。
actions 是代码仓库,有版本的概念,用户可以引用某个具体版本的 action。下面都是合法的 action 引用,用的就是 Git 的指针概念,详见官方文档。
actions/setup-node@74bc508 # 指向一个 commit
actions/setup-node@v1.0    # 指向一个标签
actions/setup-node@master  # 指向一个分支
基本概念
workflow: 持续集成一次运行的过程,就是一个 workflow。job: 一个 workflow 由一个或多个 jobs 构成,含义是一次持续集成的运行,可以完成多个任务。step: 每个 job 由多个 step 构成,一步步完成。action: 每个 step 可以依次执行一个或多个命令(action) 。
workflow
GitHub Actions 的配置文件叫做 workflow 文件,存放在代码仓库的.github/workflows目录。
workflow 文件采用 YAML 格式,文件名可以任意取,但是后缀名统一为.yml,比如foo.yml。一个库可以有多个 workflow 文件。GitHub 只要发现.github/workflows目录里面有.yml文件,就会自动运行该文件。
workflow 文件的配置字段非常多,详见官方文档。下面是一些基本字段。
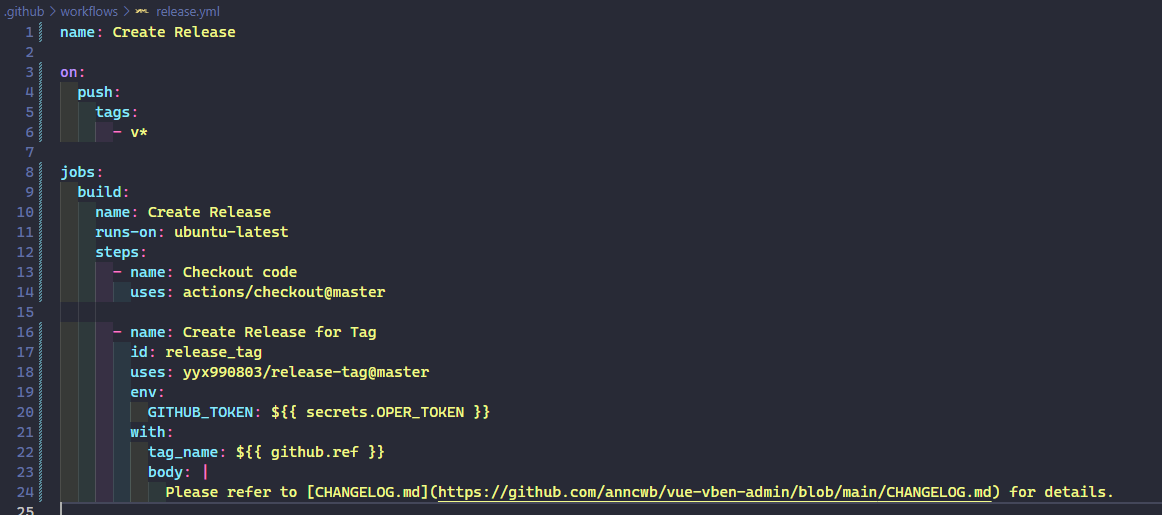
name:name字段是 workflow 的名称。如果省略该字段,默认为当前 workflow 的文件名。name: Create Releaseon:on字段指定触发 workflow 的条件,通常是某些事件。on: push上面代码指定,
push事件触发 workflow。on字段也可以是事件的数组。on: [push, pull_request]完整的事件列表,请查看官方文档。除了代码库事件,GitHub Actions 也支持外部事件触发,或者定时运行。
on.<push|pull_request>.<tags|branches>: 指定触发事件时,可以限定分支或标签。on: push: branches: - master当使用
push事件时, 可以配置workflow运行在指定的branch或是tag上如果希望包含
branch名称模式,或者希望同时包含和排除branch名称模式,可以使用branch筛选器。当只想排除分支名称模式时,使用branches-ignore筛选器。注意不能对工作流中的同一事件同时使用branches和branches-ignore筛选器对于
tag处理和上述branch处理相似像这样类似的
paths以及paths-gnore关键词支持使用*和**通配符匹配多个路径名的 glob pattern; 更多信息请参阅“过滤器模式备忘清单”。jobs.<job_id>.nameworkflow 文件的主体是
jobs字段,表示要执行的一项或多项任务。jobs字段里面,需要写出每一项任务的job_id,具体名称自定义。job_id里面的name字段是任务的说明。jobs: my_first_job: name: My first job my_second_job: name: My second job上面代码的
jobs字段包含两项任务,job_id分别是my_first_job和my_second_job。jobs: build: name: Create Releasejob_id: build;name: Create Releasejobs.<job_id>.needs:needs字段指定当前任务的依赖关系,即运行顺序。jobs: job1: job2: needs: job1 job3: needs: [job1, job2]上面代码中,
job1必须先于job2完成,而job3等待job1和job2的完成才能运行。因此,这个 workflow 的运行顺序依次为:job1、job2、job3。jobs.<job_id>.runs-on:runs-on字段指定运行所需要的虚拟机环境。它是必填字段。目前可用的虚拟机如下。ubuntu-latest,ubuntu-18.04或ubuntu-16.04 windows-latest,windows-2019或windows-2016 macOS-latest或macOS-10.14jobs.<job_id>.steps:steps字段指定每个 Job 的运行步骤,可以包含一个或多个步骤。每个步骤都可以指定以下三个字段。jobs.<job_id>.steps.name:步骤名称。jobs.<job_id>.steps.run:该步骤运行的命令或者 action。jobs.<job_id>.steps.env:该步骤所需的环境变量。
Markdown
数学公式
- 访问该地址
- 下载
Source code(zip) - 解压到`C:/Users/"你的用户名"/AppDataLocal/Google/Chrome/User Data/Default/Extensions
- 注意解压后的文件夹表层和里一层都是一样的文件夹名
- 只要里层的
- 注意解压后的文件夹表层和里一层都是一样的文件夹名
- 打开Chrome扩展程序,打开开发者模式
- 加载已解压的扩展程序
- 就是刚才放到上面目录里的整个文件夹
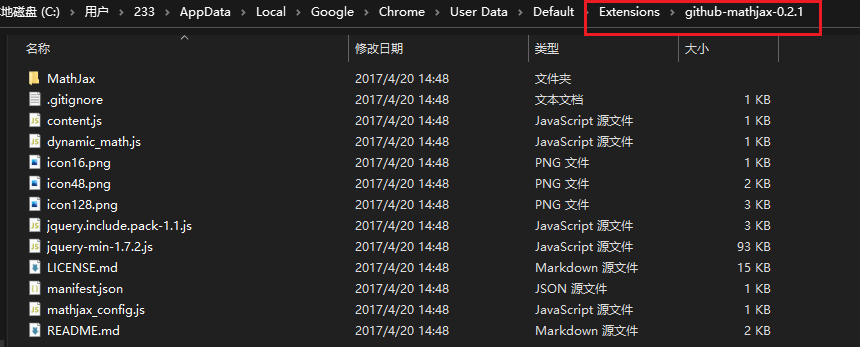
- 此时再打开Github查看源码就能显示markdown的数学公式了

- 下载
webhooks
借助钉钉的Github机器人将仓库变动通知到钉钉群里
- 参考链接
- 进入钉钉群聊
- 侧边栏第一个图标
群设置 - 智能群助手
- 添加机器人
- 更多
... - Github机器人
- 添加
- 复制Webhook链接
- 侧边栏第一个图标
- 打开Github仓库
- Settings
- 左侧边栏
Webhooks Add webhookPayload URL填刚才从钉钉Github机器人那里复制来的webhook链接- 其余选项自行发挥
- 记得勾选Active
Add webhook
- push一次提交
- 这时候就会有钉~的提醒啦
开源许可证选择

Copilot
Copilot+ChatNextWeb
有GitHub Copilot?那就可以搭建你的ChatGPT4服务 - Jiajun的技术笔记 (jiajunhuang.com)
用 neovim/vim 加上 github CLI 为 vim 添加 Copilot 支持, 然后找 ~/.config/github-copilot/hosts.json中可以看到 Copilot token
然后两步 docker 即可
docker run -d \
    -e COPILOT_TOKEN=<刚才找到的Copilot里的token,ghu_ 开头的那个> \
    -e SUPER_TOKEN=<自定义的token,等会儿给 ChatGPT-Next-Web使用> \
    -e ENABLE_SUPER_TOKEN=true \
    --name copilot-gpt4-service \
    --restart always \
    -p 8080:8080 \
    aaamoon/copilot-gpt4-service:latest
docker run -d -p 3000:3000 \
    -e BASE_URL=<你配置的域名> \
    -e OPENAI_API_KEY=<刚才设置的 SUPER_TOKEN,也就是自定义的token> \
    -e CODE=<等于一个登录密码,防止 ChatGPT-Next-Web 被他人滥用> \
    yidadaa/chatgpt-next-web
域名那里可以不用设置, 改成
http://docker能访问到的主机的ip:8080
然后登录 3000 端口的 web 服务, 设置登录密码以及 GPT4 即可开始使用
常见问题
.git过大
- 初用git时有时会错把资源文件传到源码仓库里去,这样下来仓库本身就会变得特别大,即使是后来删掉了资源文件也会导致
.git文件过大从而直接clone的时候可能会因为仓库过大而失败 - 提交次数过多也会让
.git越来越大 - 解决方法@Ever-Lose:如果确定之前的提交对现在已经没有用了,那么在
clone仓库的时候在最后加上--depth 1只克隆最后一次commit
腾讯云 github 连接超时问题
- 使用腾讯云北京的轻量应用服务器推送更新时总是连接超时,最终找到了有效的如下解决方案
- 打开 ipaddress.com,查询github.com域名,记录下其对应的ip(IP Address项内容)
- 修改并保存
/etc/hosts:末尾加上查询到的域名 github.com
报错处理
Failed to connect to github.com port 443 after 21063 ms: Timed out
网不好, 换个结点
OpenSSL SSL_read: Connection was reset, errno 10054
【Git/GitHub】解决Git上传时OpenSSL SSL_read: Connection was reset, errno 10054的错误_memcpy0的博客-CSDN博客
我碰到的情况是本地 git 配置错了, 前阵子在 github 上更改了主邮箱, 相应的本地配置要改下邮箱
git config --global user.email "xxx"
未成功归档/TODO
Nginx 反代 Github(TODO: mark下, 没成功跑起来)
本地测试环境 - ubuntu 20.04 LTS
nginx本地反代github - 知乎 (zhihu.com)
安装 Nginx 和 OpenSSL
如何在 Ubuntu 20.04 上安装 Nginx - 知乎 (zhihu.com)
sudo apt update
sudo apt install nginx
一旦安装完成,Nginx 将会自动被启动。你可以运行下面的命令来验证它:
sudo systemctl status nginx
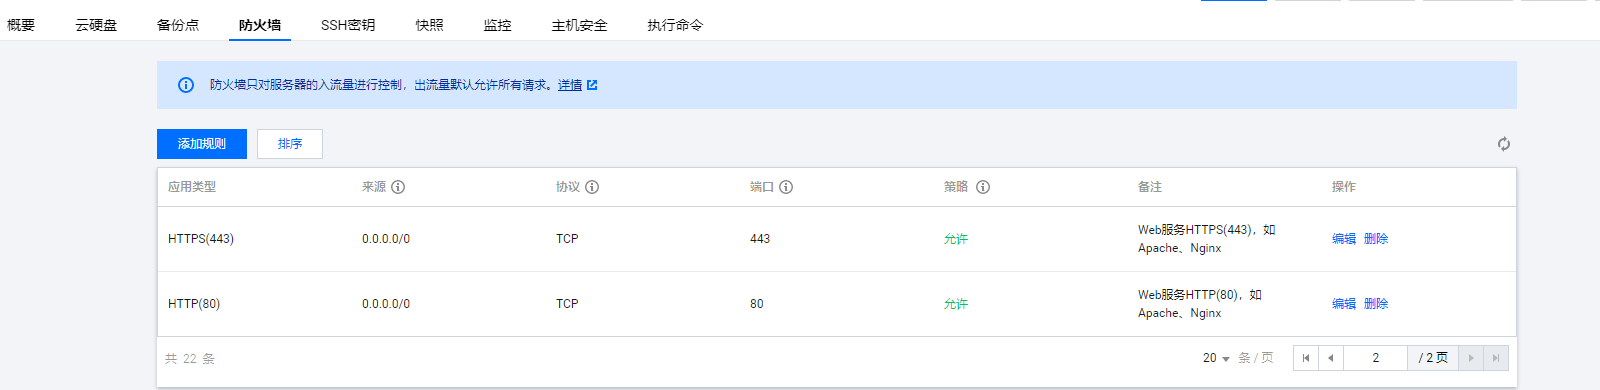
在你已经在你的服务器上安装和运行了 Nginx,你需要确保你的防火墙被配置好,允许流量通过 HTTP(80) 和 HTTPS(443) 端口。
假设你正在使用
UFW,你可以做的是启用 ‘Nginx Full’ profile,它包含了这两个端口:sudo ufw allow 'Nginx Full'想要验证状态,输入:
sudo ufw status而如果使用的是厂商的云服务器则需要在服务器的控制面板的防火墙管理面板处放通端口(一般都是默认放通的)
服务器默认已经安装了 OpenSSL, 可以使用如下命令查看其版本及位置
openssl version
whereis openssl
制作 CA 证书与签名证书
#### 制作CA证书,如果你没有CA证书的话,必须执行
openssl genrsa 2048 > ca.key # 这是你的CA证书,你可以选择要不要信任CA证书

#### CA证书的公钥,用于信任CA证书,这样你就不必亲自信任每一个用这个CA签名的证书了
export SUBJ="/C=CN/ST=ST$RANDOM/O=O$RANDOM/OU=OU$RANDOM/CN=CN$RANDOM/emailAddress=$RANDOM@localhost"
# $SUB这一行的意思请稍后自行领悟,这里RANDOM的用意是,防止大家生成重复的CA然后产生未知问题
# 如果不知道-subj是什么,不要改。CN写0CN是为了让证书好找(会排到最前面)
openssl req -new -x509 -days `expr \( \`date -d 99991231 +%s\` - \`date +%s\` \) / 86400 + 1` \
  -key ca.key -out ca.pem -subj $SUBJ -extensions v3_ca
# 上面这节其实是一整行命令(用\换行,于是显示成了两行)
# 这里 `expr \( \`date -d 99991231 +%s\` - \`date +%s\` \) / 86400 + 1` 是计算当前时间到yyyymmdd=99991231的日期
# 整段内容的意思是,让这个证书的有效期到9999年12月31日
# 我保证RSA失效日期一定比这个日期早……
# 请不要学习这个把签名签到9999年的坏习惯,涉及网络活动的,最好每年换一个签名。
# 这里签到9999年的原因是……谁闲着没事监听你的nginx拿到只有你用的证书之后会对你开展中间人攻击呢?

#### 生成nginx需要的证书
openssl genrsa 1024 > nginx.key # 密钥
openssl req -new -nodes -key nginx.key -out nginx.csr -subj $SUBJ

#### CA签名
openssl x509 -req -days `expr \( \`date -d 99991231 +%s\` - \`date +%s\` \) / 86400 + 1` \
 -in nginx.csr -out nginx.pem -CA ca.pem -CAkey ca.key -set_serial 0 -extensions CUSTOM_STRING_LIKE_SAN_KU\
 -extfile <( cat << EOF
[CUSTOM_STRING_LIKE_SAN_KU]
subjectAltName=IP:127.0.0.1, IP: ::1 ,DNS:github.com, DNS:*.github.com, DNS:githubusercontent.com, DNS:*.githubusercontent.com
keyUsage = nonRepudiation, digitalSignature, keyEncipherment
EOF
)

# 这里,使用-extfile对配置文件做临时修改
# 这样就完成了签名工作
# 事实上,这里可以多写几个subjectAltName,比如subjectAltName=IP:127.0.0.1, IP: ::1 ,DNS:ads-pixiv.net, DNS:*.ads-pixiv.net, DNS:akamaihd.net, DNS:*.akamaihd.net, DNS:arkoselabs.com, DNS:*.arkoselabs.com, DNS:artstation.com, DNS:*.artstation.com, DNS:discordapp.com, DNS:*.discordapp.com, DNS:discordapp.net, DNS:*.discordapp.net, DNS:discord.com, DNS:*.discord.com, DNS:ext-twitch.tv, DNS:*.ext-twitch.tv, DNS:github.com, DNS:*.github.com, DNS:githubusercontent.com, DNS:*.githubusercontent.com, DNS:google.com, DNS:*.google.com, DNS:hcaptcha.com, DNS:*.hcaptcha.com, DNS:pinimg.com, DNS:*.pinimg.com, DNS:pinterest.com, DNS:*.pinterest.com, DNS:pixiv.net, DNS:*.pixiv.net, DNS:pixivsketch.net, DNS:*.pixivsketch.net, DNS:pximg.net, DNS:*.pximg.net, DNS:steam-chat.com, DNS:*.steam-chat.com, DNS:steamcommunity.com, DNS:*.steamcommunity.com, DNS:steampowered.com, DNS:*.steampowered.com, DNS:steamstatic.com, DNS:*.steamstatic.com, DNS:twitch.tv, DNS:*.twitch.tv, DNS:ubi.com, DNS:*.ubi.com, DNS:v2ex.com, DNS:*.v2ex.com
# 多写几个的好处就不说了,说多了可能犯法[狗头]

# openssl x509 -noout -text -in nginx.pem
# 如果你需要检查你生成的pem,或者
# ( openssl x509 -noout -text -in nginx.pem && cat nginx.pem ) > nginx.crt
# 上面这句没测试,也不是本讲的内容……
安装证书
如何将证书颁发机构(CA) 添加到Ubuntu? (qastack.cn)
Ubuntu安装系统根证书_孙海峰VIP的博客-CSDN博客_ubuntu安装根证书
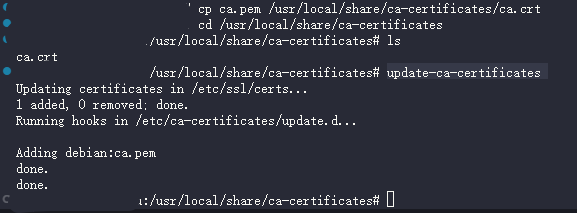
cp ca.pem /usr/local/share/ca-certificates/ca.crt
update-ca-certificates
mkdir /etc/nginx/ca && sudo cp nginx.pem nginx.key /etc/nginx/ca