Docker
Docker
- Docker
- 安装
- 换源
- 镜像
- 容器
- 常见问题
- ERROR: could not find an available, non-overlapping IPv4 address pool among the defaults to assign to the network
- unable to connect to deb.debian.org:http
- There is no public key
- debconf: delaying package configuration, since apt-utils is not installed
- 安装插件失败 - failed to extract plugin [/usr/share/elasticsearch/plugins/head.zip]: ZipException[zip file is empty]
安装
ubuntu安装docker详细步骤 - 腾讯云开发者社区-腾讯云 (tencent.com)
Docker 入门指南:如何在 Ubuntu 上安装和使用 Docker - 卡拉云 (kalacloud.com)
使用如下脚本来安装 docker 即可:
# Install the latest version docker
curl -s https://get.docker.com/ | sh

# Run docker service
systemctl start docker
旧版安装指令:
# 更新现有的软件包列表
apt update
# 安装所需工具包
sudo apt install apt-transport-https ca-certificates curl gnupg-agent  software-properties-common
# 然后将官方 Docker 版本库的 GPG 密钥添加到系统中:
curl -fsSL https://download.docker.com/linux/ubuntu/gpg | sudo apt-key add -
# 将 Docker 版本库添加到APT源:
sudo add-apt-repository "deb [arch=amd64] https://download.docker.com/linux/ubuntu focal stable"
# 用新添加的 Docker 软件包来进行升级更新。
sudo apt update
# 确保要从 Docker 版本库,而不是默认的 Ubuntu 版本库进行安装:
apt-cache policy docker-ce
# 安装 Docker :
sudo apt install docker-ce
# 现在 Docker 已经安装完毕。我们启动守护程序。检查 Docker 是否正在运行:
sudo systemctl status docker
# 设置 docker 开机自动启动
sudo systemctl enable docker.service
在Kali Linux版本中安装Docker(Docker CE社区版) 和Docker Compose_Linux教程_云网牛站 (ywnz.com)
# 更新现有的软件包列表
sudo apt update
# 安装所需工具包
sudo apt -y install curl gnupg2 apt-transport-https software-properties-common ca-certificates
# 导入用于签署Docker软件包的Docker GPG密钥:
curl -fsSL https://download.docker.com/linux/debian/gpg | sudo apt-key add -
# 添加包含Docker CE最新稳定版本的Docker存储库:
echo "deb [arch=amd64] https://download.docker.com/linux/debian buster stable" | sudo tee  /etc/apt/sources.list.d/docker.list
# 更新apt包索引
sudo apt update
# 在Kali Linux上安装Docker CE
sudo apt install docker-ce docker-ce-cli containerd.io
# 检查安装的Docker版本
docker version
在 Debian 上安装 Docker 引擎 | Docker 文档 --- Install Docker Engine on Debian | Docker Docs
设置 Docker 的
apt存储库# Add Docker's official GPG key: sudo apt-get update sudo apt-get install ca-certificates curl sudo install -m 0755 -d /etc/apt/keyrings sudo curl -fsSL https://download.docker.com/linux/debian/gpg -o /etc/apt/keyrings/docker.asc sudo chmod a+r /etc/apt/keyrings/docker.asc # Add the repository to Apt sources: echo \ "deb [arch=$(dpkg --print-architecture) signed-by=/etc/apt/keyrings/docker.asc] https://download.docker.com/linux/debian \ $(. /etc/os-release && echo "$VERSION_CODENAME") stable" | \ sudo tee /etc/apt/sources.list.d/docker.list > /dev/null sudo apt-get update如果用的是 kali 的话


需要把 kali-rolling 换成其他版本
Kali Rolling 是基于 Debian 的 Testing 分支,而不是 Debian 的稳定版。Debian 的 Testing 分支是用于开发和测试即将发布为稳定版的新功能和软件包的地方。因此,虽然 Kali Rolling 会包含许多最新的软件包,但这些软件包可能还在测试中,可能不如 Debian 稳定版稳定。
一般可以认为 kali rolling 基于 Debian 的最新版本, 比如当前的 Debian12 bookworm
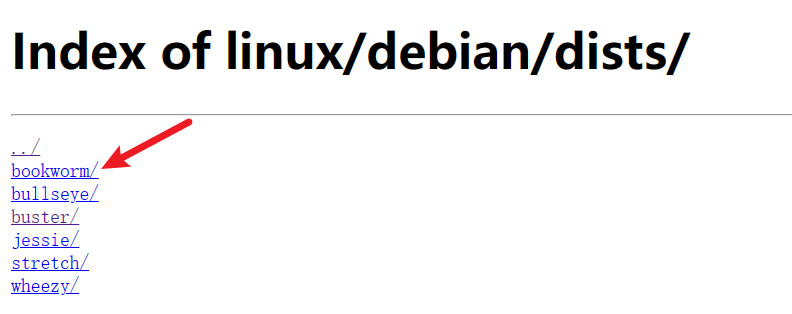
可以手动改下文件

安装 Docker packages
sudo apt-get install docker-ce docker-ce-cli containerd.io docker-buildx-plugin docker-compose-plugin通过运行
hello-worldimage 验证安装是否成功sudo docker run hello-world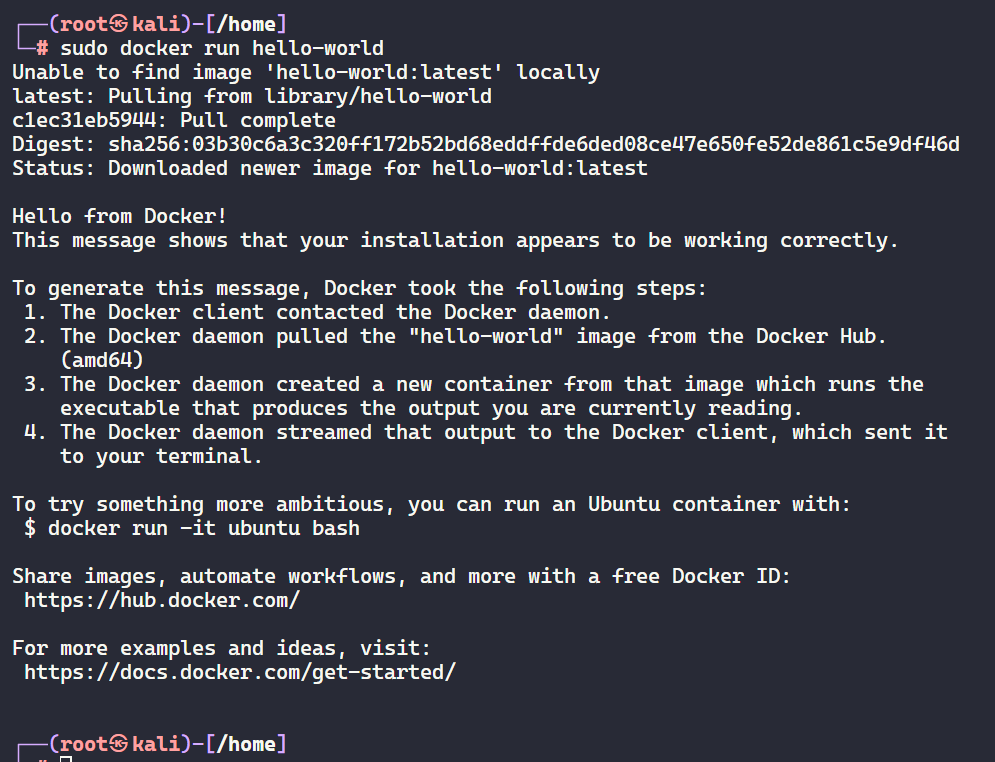
如图所示, 可以看到已经安装成功了
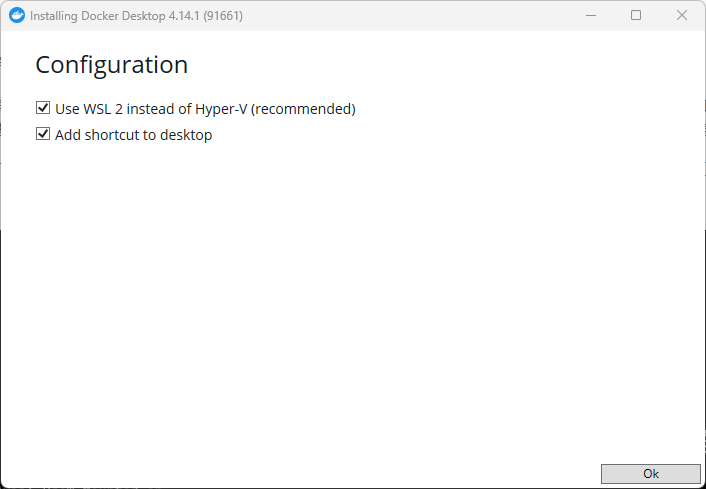
docker wsl2启动不了_win10利用WSL2安装docker的2种方式_weixin_39786155的博客-CSDN博客
curl -fsSL https://get.docker.com -o get-docker.sh
sudo sh get-docker.sh
sudo service docker start
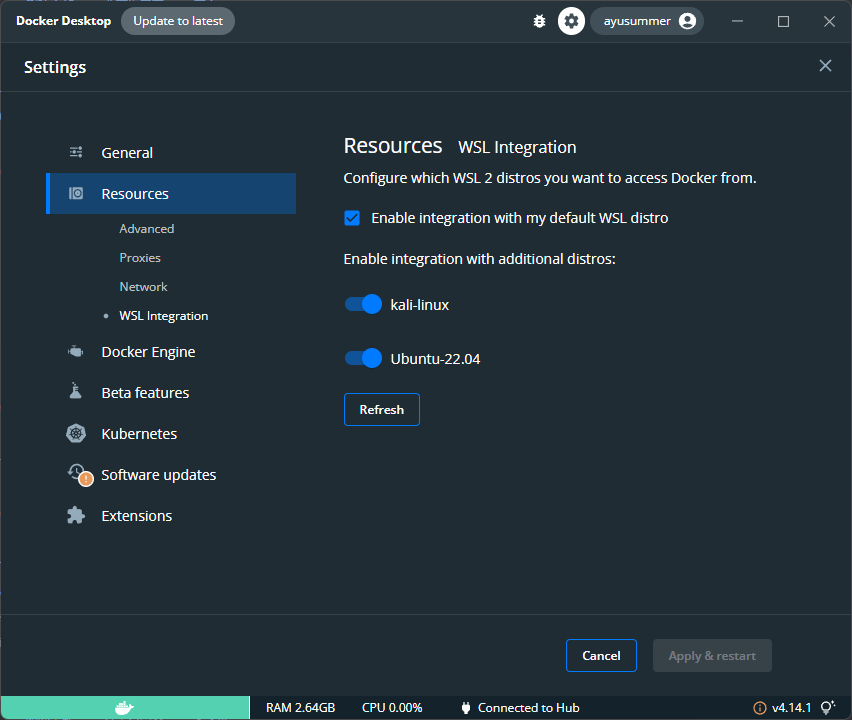
wsl2-kali 是不支持以此种方式安装的, 可以在 Windows 上装 Docker Desktop 并启用 WSL2 访问
换源
Docker-hub 换源
打开 /etc/docker/daemon.json 并输入
{
    "registry-mirrors": [
      "https://hub-mirror.c.163.com",
      "https://ustc-edu-cn.mirror.aliyuncs.com"
      ]
}
然后重启 docker
service docker restart
镜像

常用指令
拉取镜像
# docker pull [镜像名]
# vuldocker/lamp映像包括(php+apache+MySQL) ,只需要下载dvwa源码即可
docker pull vuldocker/lamp
docker pull下来的镜像默认存在/var/lib/docker/目录下
查看当前镜像列表
docker images修改镜像 Tag
# docker tag [镜像ID] [镜像名称]:[tag版本信息]
docker tag 8ef375298394 MySQL:v5.7

# docker tag [原tag][新tag]
docker tag MySQL:v5.7 http://100.1.1.111:8080/MySQL:v5.7
删除镜像
# 根据 镜像名称 来删除镜像
docker rmi centos
# 根据 镜像:标签名称 来删除镜像
docker rmi centos:v2
# 根据 镜像ID 来删除镜像,
docker rmi 7e6257c9f8d8
删除两个 id 相同的镜像
通过 docker rmi [镜像:tag] 来删除对应标签的镜像, 实际上
镜像导出与导入
将镜像跑为容器
Docker run 命令 | 菜鸟教程 (runoob.com)
docker run [OPTIONS] IMAGE [COMMAND] [ARG...]
-a stdin: 指定标准输入输出内容类型,可选 STDIN/STDOUT/STDERR 三项;-d: 后台运行容器,并返回容器ID;-i: 以交互模式运行容器,通常与 -t 同时使用;-P: 随机端口映射,容器内部端口随机映射到主机的端口-p: 指定端口映射,格式为:主机(宿主)端口:容器端口-t: 为容器重新分配一个伪输入终端,通常与 -i 同时使用;--name="nginx-lb": 为容器指定一个名称;--dns 8.8.8.8: 指定容器使用的DNS服务器,默认和宿主一致;--dns-search example.com: 指定容器DNS搜索域名,默认和宿主一致;-h "mars": 指定容器的hostname;-e username="ritchie": 设置环境变量;--env-file=[]: 从指定文件读入环境变量;--cpuset="0-2" or --cpuset="0,1,2": 绑定容器到指定CPU运行;-m: 设置容器使用内存最大值;--net="bridge": 指定容器的网络连接类型,支持 bridge/host/none/container: 四种类型;--link=[]: 添加链接到另一个容器;--expose=[]: 开放一个端口或一组端口;--volume , -v: 绑定一个卷--restart=always: 容器设置自动启动no: 不自动重启容器. (默认value)on-failure: 容器发生 error- 而退出(容器退出状态不为0)重启容器
unless-stopped: 在容器已经 stop 掉或Docker stoped/restarted的时候才重启容器always: 在容器已经 stop 掉或Docker stoped/restarted的时候才重启容器
如果创建时未指定
--restart=always,可通过update 命令docker update --restart=always [container-id]
docker run -it -d --name dvwa -p 8008:80 vuldocker/lamp
设置名字为dvwa,映射端口为8008
-i: 交互式操作。
-t: 终端(一般与i一起)
-d:后台运行。
从图中可以看到在执行
docker run -it -d --name dvwa -p 8008:80 vuldocker/lamp
指令时出现了问题,说已经有container使用了dvwa这个名字( The container name "/dvwa" is already in use by container "6e3fc590b41c9c6cf6c0d81de14730c127240edecb6a2a5e3debf1565eb3fe6b") ,但是从图中也可以看到docker ps指令执行后没有正在运行的container,可以执行
推送到 Habor
**因为是在只有http sql apach服务的镜像上跑的容器,在容器里配置了dvwa(并没有改变镜像) **
此时将原来的镜像推送还是只有http sql apach服务的镜像,没有自己在容器里的所有配置 需要将容器保存为镜像再去推送才行
在本地docker客户端--靶机进行如下配置:
touch /etc/docker/daemon.json
vim /etc/docker/daemon.json
文件中如下配置
{
	"insecure-registries": ["habor-hostip:端口"]
}
sudo systemctl daemon-reload
sudo systemctl restart docker
# 登录 Habor (登录成功会提示 Login Succeeded)
docker login [HaborHostip:端口]
# 将本地的image新建1个新的tag
docker tag SOURCE_IMAGE[:TAG] [HaborHostip]:[端口]/[目标路径][:TAG]
# 推送镜像
docker push [HaborHostip]:[端口]/[目标路径][:TAG]
后续可以通过 docker pull 命令拉取镜像
docker pull [HaborHostip]:[端口]/[目标路径][:TAG]
容器
常用指令
# 进入容器(使用 bash 或者 sh 均可)
docker container exec -it [容器id] /bin/bash
docker container exec -it [容器id] /bin/sh

# 强制删除容器 docker rm -f [容器 id]
# 删除所有容器
docker rm -f $(docker ps -a -q)

# 显示当前正在运行的容器
docker ps

# 查看容器日志
docker logs [容器ID]
从容器中复制文件到本地(docker cp)
例:从容器中复制一个test.db文件到本地data目录。
# 假设存在一个镜像名为 kitty,标签为0.1,创建一个名为 koko的容器

# 1. create a container first
docker run -itd --name koko kitty:0.1 /bin/bash
# 2. copy test.db from koko tmp directory to local data directory.
docker cp koko:/tmp/test.db ./data/test.db
# 3. rm container koko
docker rm -f koko
docker cp也可以从本地copy文件到容器中:
# 以上面的代码为例,把容器路径和本地路径颠倒即可.
docker cp ./data/test.db koko:/tmp/test.db
在docker中,LAMP是指Linux(操作系统) 、Apache HTTP服务器、MySQL(MariaDB等数据库软件) 和PHP(Perl或Python) 的组合方案,一般用来建立Web服务器环境。
将容器重新打包成镜像
Docker 使用-将容器打成镜像_谈谈1974的博客-CSDN博客_容器打包成镜像
在使用 docker-compose build 命令时, 在有些镜像 build 完启动后发现其环境是并不完整的, 缺少了一些东西
比如在复现 CVE-2015-3337 时需要安装一个
elasticsearch-head的插件, 发现用 vulhub 仓库里的 dockerfile
docker-compose build构建进行时插件实际上并没有安装成功, 但是镜像成功 build 了
进入启动的容器进行排错, 最终修复了问题后可以将目前用拥有完整环境的容器重新打包成镜像
Docker 提供了 commit 命令支持将容器重新打成镜像文件,其命令格式如下所示
docker commit [OPTIONS] CONTAINER [REPOSITORY[:TAG]]
| Option | 功能 |
|---|---|
| -a | 指定新镜像作者 |
| -c | 使用 Dockerfile 指令来创建镜像 |
| -m | 提交生成镜像的说明信息 |
| -p | 在 commit 时,将容器暂停 |
可以先查看下当前运行容器的 id
docker ps -a | grep [容器相关标识, 比如 cve-2015-3337 之类]
# 添加描述信息并将容器打包成新的镜像(给个新tag)
docker commit -m "add elasticsearch-head" 10f2daf4ead5 cve-2015-3337_es:v0
常见问题
ERROR: could not find an available, non-overlapping IPv4 address pool among the defaults to assign to the network
docker network prune
unable to connect to deb.debian.org:http
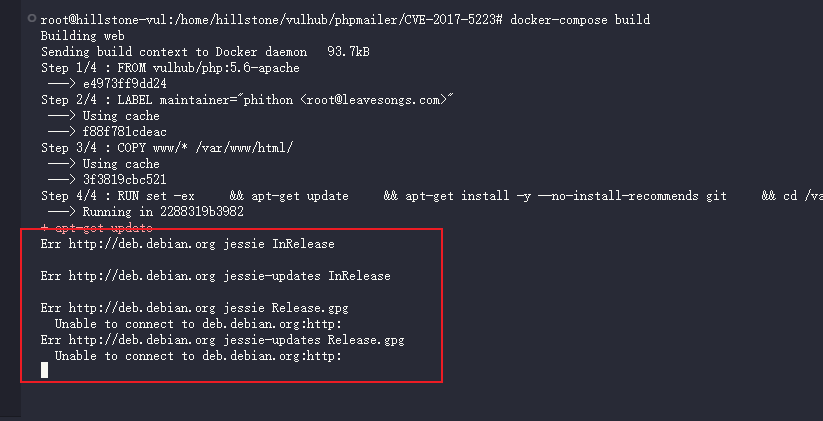
Docker failed to fetch http://deb.debian.org/debian/dists/jessie/InRelease - Stack Overflow
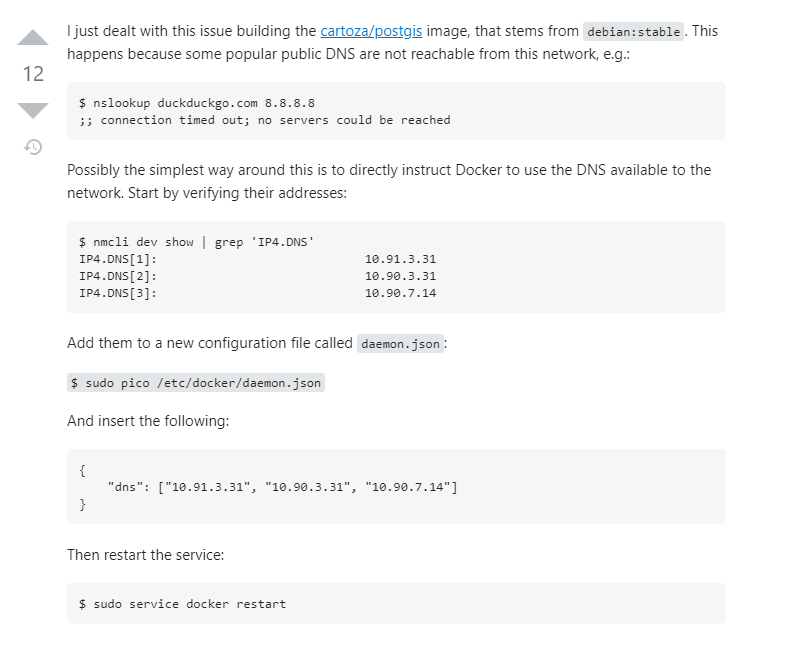
There is no public key
使用apt-get时出现 “no public key available” 的解决方法-阿里云开发者社区 (aliyun.com)
sudo apt-key adv --recv-keys --keyserver keyserver.ubuntu.com [报错缺失的public key]
debconf: delaying package configuration, since apt-utils is not installed
apt-get update && apt-get install -y --no-install-recommends apt-utils
安装插件失败 - failed to extract plugin [/usr/share/elasticsearch/plugins/head.zip]: ZipException[zip file is empty]
在使用 docker-compose build 时发现有些时候虽然 build 成功了但是实际上环境是不完整的, 比如在复现 CVE-2015-3337 时需要安装一个插件
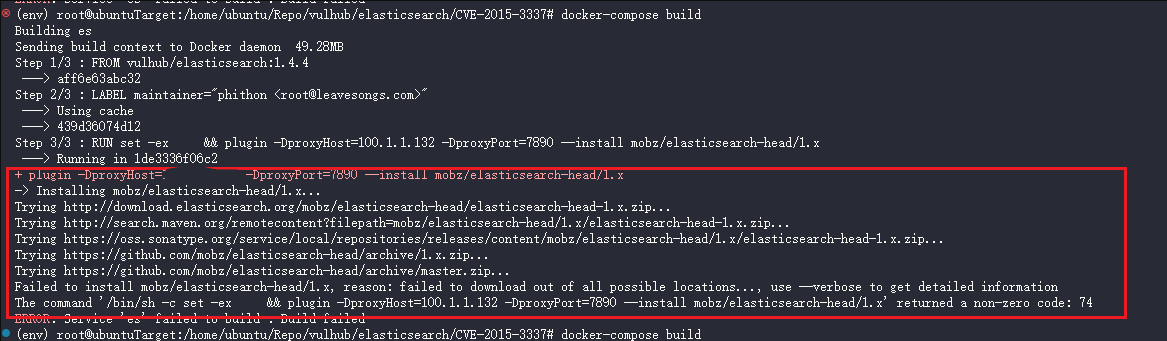
发现 vulhub 该 cve 目录下 docker-compose build 拉取了一个空的插件安装包并且解压失败了, 但是却成功 build 了
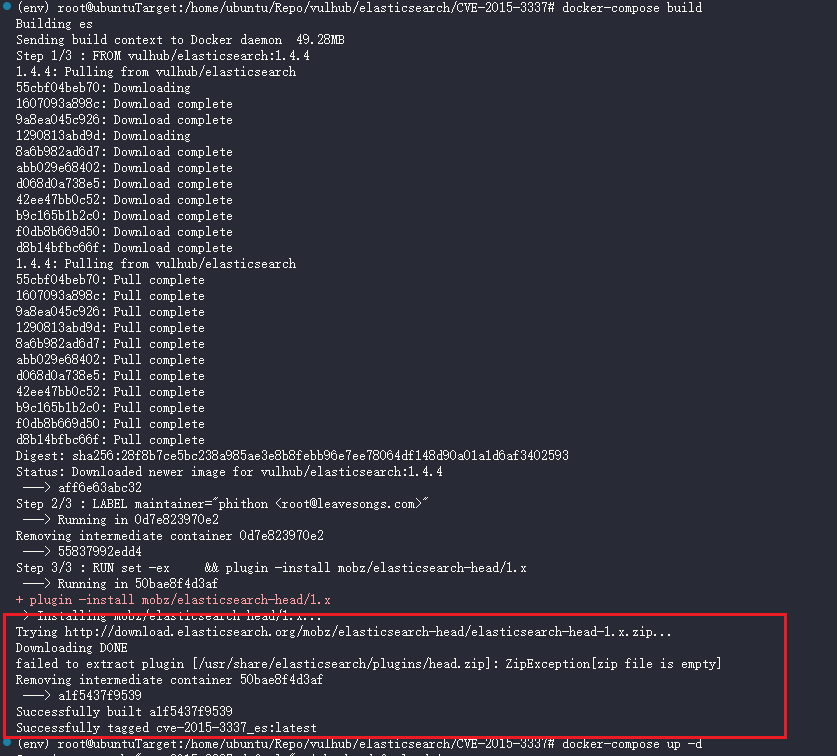
观察上图中的输出信息可以看到在安装插件时向 http://download.elasticsearch.org/mobz/elasticsearch-head/elasticsearch-head-1.x.zip. 请求了 zip 资源, 尝试在本地电脑上访问此链接发现下载不下来, 那么可以假定是指向链接出了问题, 那么现在就需要找到一个可用的插件安装链接
在使用 docker-compose up -d 后进入该容器然后尝试为拉取插件配置一个不可用的代理
plugin -DproxyHost=192.168.1.33 -DproxyPort=7890 --install mobz/elasticsearch-head/1.x
此时会尝试从各个可能的地址拉取插件
在本地机器上尝试这些链接, 最终找到可用链接 https://codeload.github.com/mobz/elasticsearch-head/zip/refs/heads/1.x
于是可以使用该链接安装插件
bin/plugin --install mobz/elasticsearch-head/1.x -u https://codeload.github.com/mobz/elasticsearch-head/zip/refs/heads/1.x

验证插件是否安装成功:
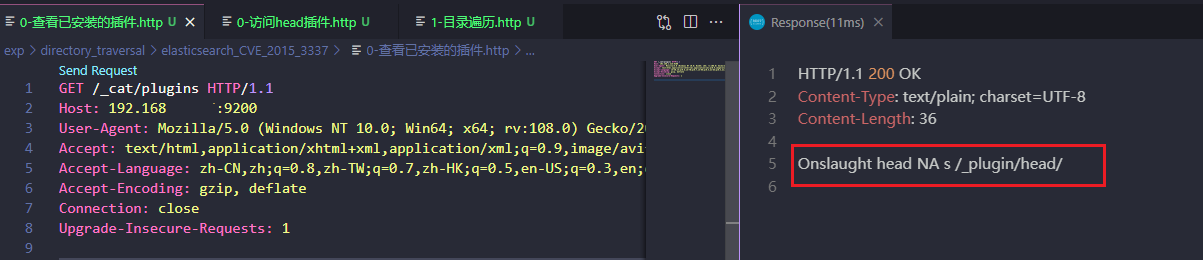
可以看到已经成功安装上了
然后 将容器重新打包成镜像 以便后续使用